<?xml version="1.0" encoding="UTF-8"?>
<!--Generated by Squarespace V5 Site Server v5.13.594-SNAPSHOT-1 (http://www.squarespace.com) on Wed, 16 Sep 2026 15:59:45 GMT--><rdf:RDF xmlns:rdf="http://www.w3.org/1999/02/22-rdf-syntax-ns#" xmlns:rss="http://purl.org/rss/1.0/" xmlns:dc="http://purl.org/dc/elements/1.1/" xmlns:sy="http://purl.org/rss/1.0/modules/syndication/" xmlns:admin="http://webns.net/mvcb/" xmlns:content="http://purl.org/rss/1.0/modules/content/" xmlns:cc="http://web.resource.org/cc/"><rss:channel rdf:about="http://www.savagehomeautomation.com/projects/"><rss:title>Articles - Raspberry Pi</rss:title><rss:link>http://www.savagehomeautomation.com/projects/</rss:link><rss:description>Do-It-Yourself Home Automation Projects</rss:description><dc:language>en-US</dc:language><dc:date>2026-09-16T15:59:46Z</dc:date><admin:generatorAgent rdf:resource="http://www.squarespace.com/">Squarespace V5 Site Server v5.13.594-SNAPSHOT-1 (http://www.squarespace.com)</admin:generatorAgent><rss:items><rdf:Seq><rdf:li rdf:resource="http://www.savagehomeautomation.com/projects/pi4j-version-14-released.html"/><rdf:li rdf:resource="http://www.savagehomeautomation.com/projects/pi4j-version-13-released.html"/><rdf:li rdf:resource="http://www.savagehomeautomation.com/projects/pi4j-version-12-released.html"/><rdf:li rdf:resource="http://www.savagehomeautomation.com/projects/pi4j-version-11-released.html"/><rdf:li rdf:resource="http://www.savagehomeautomation.com/projects/modmypi-piot-relay-board-review.html"/><rdf:li rdf:resource="http://www.savagehomeautomation.com/projects/pi4j-now-supports-non-privileged-access-no-more-rootsudo.html"/><rdf:li rdf:resource="http://www.savagehomeautomation.com/projects/raspberry-pi-with-java-programming-the-internet-of-things-io.html"/><rdf:li rdf:resource="http://www.savagehomeautomation.com/projects/pi4j-version-10-released.html"/><rdf:li rdf:resource="http://www.savagehomeautomation.com/projects/pi4j-pibrella.html"/><rdf:li rdf:resource="http://www.savagehomeautomation.com/projects/thank-you-devoxx.html"/><rdf:li rdf:resource="http://www.savagehomeautomation.com/projects/pi4j-devoxx-2014.html"/><rdf:li rdf:resource="http://www.savagehomeautomation.com/projects/teaching-kids-to-program-things-with-java-and-the-raspberry.html"/><rdf:li rdf:resource="http://www.savagehomeautomation.com/projects/raspberry-pi-power-up-using-poe-power-over-ethernet.html"/><rdf:li rdf:resource="http://www.savagehomeautomation.com/projects/pi4j-featured-in-java-magazine.html"/><rdf:li rdf:resource="http://www.savagehomeautomation.com/projects/rs232-serial-on-raspberry-pi-compute-module.html"/><rdf:li rdf:resource="http://www.savagehomeautomation.com/projects/raspberry-pi-oracle-java-se-7-jdkjvm-now-pre-installed-on-ra.html"/><rdf:li rdf:resource="http://www.savagehomeautomation.com/projects/thank-you-javaone.html"/><rdf:li rdf:resource="http://www.savagehomeautomation.com/projects/javaone-interview-with-robert-savage-on-nighthacking-tour.html"/><rdf:li rdf:resource="http://www.savagehomeautomation.com/projects/javaone-lets-get-physical-io-programming-with-java-on-the-ra.html"/><rdf:li rdf:resource="http://www.savagehomeautomation.com/projects/raspberry-pi-installing-oracle-java-se-8-milestone-8-develop.html"/><rdf:li rdf:resource="http://www.savagehomeautomation.com/projects/raspberry-pi-installing-oracle-java-development-kit-jdk-7u40.html"/><rdf:li rdf:resource="http://www.savagehomeautomation.com/projects/raspberry-pi-pi4j-version-005-released.html"/><rdf:li rdf:resource="http://www.savagehomeautomation.com/projects/raspberry-pi-programming-pi-face-with-java-pi4j.html"/><rdf:li rdf:resource="http://www.savagehomeautomation.com/projects/raspberry-pi-java-gpio-frequency-benchmarks.html"/><rdf:li rdf:resource="http://www.savagehomeautomation.com/projects/raspberry-pi-install-a-momentary-reset-button.html"/><rdf:li rdf:resource="http://www.savagehomeautomation.com/projects/raspberry-pi-stepper-motor-control-breakout-board.html"/><rdf:li rdf:resource="http://www.savagehomeautomation.com/projects/raspberry-pi-installing-the-airlink-101-wireless-n-150-ultra.html"/><rdf:li rdf:resource="http://www.savagehomeautomation.com/projects/raspberry-pi-sb-clear-raspberry-pi-enclosure.html"/><rdf:li rdf:resource="http://www.savagehomeautomation.com/projects/raspberry-pi-installing-oracle-java-se-8-with-javafx-develop.html"/><rdf:li rdf:resource="http://www.savagehomeautomation.com/projects/raspberry-pi-installing-oracle-java-development-kit-jdk-170u-1.html"/><rdf:li rdf:resource="http://www.savagehomeautomation.com/projects/pi4j-version-004-released.html"/><rdf:li rdf:resource="http://www.savagehomeautomation.com/projects/raspberry-pi-john-jays-8-led-button-breakout-board.html"/><rdf:li rdf:resource="http://www.savagehomeautomation.com/projects/raspberry-pi-sunrise-sunset-timer-for-christmas-lights.html"/><rdf:li rdf:resource="http://www.savagehomeautomation.com/projects/oracle-jdk-for-arm-hard-float-ea-expected-by-year-end.html"/><rdf:li rdf:resource="http://www.savagehomeautomation.com/projects/raspberry-pi-build-a-gpio-testing-board.html"/><rdf:li rdf:resource="http://www.savagehomeautomation.com/projects/raspberry-pi-rs232-serial-interface-options-revisit.html"/><rdf:li rdf:resource="http://www.savagehomeautomation.com/projects/raspberry-pi-installing-the-edimax-ew-7811un-usb-wifi-adapte.html"/><rdf:li rdf:resource="http://www.savagehomeautomation.com/projects/pi4j-connecting-java-to-the-raspberry-pi.html"/><rdf:li rdf:resource="http://www.savagehomeautomation.com/projects/raspberry-pi-power-up-using-the-5v-header-pin.html"/><rdf:li rdf:resource="http://www.savagehomeautomation.com/projects/raspberry-pi-adafruit-pi-box.html"/><rdf:li rdf:resource="http://www.savagehomeautomation.com/projects/raspberry-pi-shopping-list.html"/><rdf:li rdf:resource="http://www.savagehomeautomation.com/projects/raspberry-pi-change-default-java-virtual-machine-jvm.html"/><rdf:li rdf:resource="http://www.savagehomeautomation.com/projects/raspberry-pi-java-virtual-machine-benchmarks.html"/><rdf:li rdf:resource="http://www.savagehomeautomation.com/projects/raspberry-pi-installing-oracle-java-development-kit-jdk-170u.html"/><rdf:li rdf:resource="http://www.savagehomeautomation.com/projects/raspberry-pi-installing-a-rs232-serial-port.html"/><rdf:li rdf:resource="http://www.savagehomeautomation.com/projects/raspberry-pi-installing-oracle-java-runtime-environment-jre.html"/><rdf:li rdf:resource="http://www.savagehomeautomation.com/projects/raspberry-pi-enabling-ssh-for-remote-access.html"/><rdf:li rdf:resource="http://www.savagehomeautomation.com/projects/raspberry-pi-getting-started.html"/></rdf:Seq></rss:items></rss:channel><rss:item rdf:about="http://www.savagehomeautomation.com/projects/pi4j-version-14-released.html"><rss:title>Pi4J Version 1.4 - RELEASED!</rss:title><rss:link>http://www.savagehomeautomation.com/projects/pi4j-version-14-released.html</rss:link><dc:creator>Robert Savage</dc:creator><dc:date>2021-03-03T17:57:05Z</dc:date><dc:subject>Embedded Computing Java JavaFX Pi4J Raspberry Pi Raspberry Pi Utilities java pi pi4j raspberry raspi wiringpi</dc:subject><content:encoded><![CDATA[Pi4J v1.4 has been released. This is the final version for the Pi4J v1.x codebase and supports Java JDK/JRE 11.  All development effort for the Pi4J project will focus on the newer Pi4J v2.x codebase moving forward. 

Additional details are available at: 
 - http://www.savagehomeautomation.com/pi4j-1.4
 - https://www.pi4j.com/1.4
 - https://github.com/Pi4J/pi4j/releases/tag/release%2F1.4]]></content:encoded></rss:item><rss:item rdf:about="http://www.savagehomeautomation.com/projects/pi4j-version-13-released.html"><rss:title>Pi4J Version 1.3 - RELEASED!</rss:title><rss:link>http://www.savagehomeautomation.com/projects/pi4j-version-13-released.html</rss:link><dc:creator>Robert Savage</dc:creator><dc:date>2021-01-28T17:34:00Z</dc:date><dc:subject>Embedded Computing Java JavaFX Pi4J Raspberry Pi Raspberry Pi Utilities java pi pi4j raspberry raspi wiringpi</dc:subject><content:encoded><![CDATA[Pi4J V1.3 has been released. This is the final version for Java 8 with full support for all current Raspberry Pi boards and following fixes:

 - Added support for Raspberry Pi 4B
 - Added support for Raspberry Pi 400
 - Added support for Raspberry Pi Compute Module 4
 - Various improvements and bug fixes listed here: https://github.com/Pi4J/pi4j/milestone/10?closed=1

Additional details are available at: 
 - https://www.pi4j.com/1.3
 - https://github.com/Pi4J/pi4j/releases/tag/release%2F1.3]]></content:encoded></rss:item><rss:item rdf:about="http://www.savagehomeautomation.com/projects/pi4j-version-12-released.html"><rss:title>Pi4J Version 1.2 - RELEASED!</rss:title><rss:link>http://www.savagehomeautomation.com/projects/pi4j-version-12-released.html</rss:link><dc:creator>Robert Savage</dc:creator><dc:date>2019-02-28T19:34:17Z</dc:date><dc:subject>Embedded Computing Java Pi4J Raspberry Pi Raspberry Pi java pi pi4j raspberry raspi wiringpi</dc:subject><content:encoded><![CDATA[<p><span class="full-image-block ssNonEditable"><span><img src="http://pi4j.com/images/logos/pi4j-header.png?__SQUARESPACE_CACHEVERSION=1469644411083" alt="" /></span></span><span class="full-image-float-right ssNonEditable"><img style="width: 175px;" src="http://www.savagehomeautomation.com/storage/post-images/raspberrypi/available.jpg?__SQUARESPACE_CACHEVERSION=1429706937667" alt="" /></span></p>
<h3>Pi4J Version 1.2 Release</h3>
<p><strong><span style="font-size: 110%;">Version 1.2 of the <a href="http://pi4j.com/" target="_blank">Pi4J Library</a> is finally released!</span></strong></p>
<p>The long overdue release of version 1.2 is finally here! &nbsp;It's been over two year since the 1.1 release and there have been about 136 new commits to the 1.2 release which include many enhancements, optimizations, bug fixes and additional platform support for <span>Odroid, BananaPi, BananaPro, and OrangePi</span>&nbsp;boards as well as adding support for the new RaspberryPi models introduced during this time..</p>
<p>Pi4J Version 1.2 is also available in Maven Central. &nbsp;<em>&lt;&lt;<a class="offsite-link-inline" href="https://search.maven.org/search?q=g:com.pi4j" target="_blank">View in Maven Central</a>&gt;&gt;</em></p>
<h3><strong>Notable Version 1.2 Changes:</strong></h3>
<ul>
<li><strong>Removed support for statically compiled wiringPi library (for Raspberry Pi)</strong>.</li>
<li>Added support for Raspberry Pi 3B+</li>
<li>Added support for Raspberry Pi Zero W</li>
<li>Added support for Raspberry Pi Compute Module 3</li>
<li>Updated to Java 8 (enhancement #203)</li>
<li>Updated build dependencies/plugins to latest versions.</li>
<li>Removed unsupported sub-projects (pi4j-temp, pi4j-service).</li>
<li>Added SPI mode support for Odroid, BananaPi, BananaPro, and OrangePi platforms.</li>
<li>Added experimental support for OrangePi platform.</li>
<li>Added experimental support for Synovoip BPI (BananaPi) platform.</li>
<li>Added experimental support for NanoPi platform.</li>
<li>Fixed #438: ArrayIndex Out of Bounds when pin address address is &gt;= 100</li>
<li>Fixed #278: wiringPiSetup*: You must only call this once per program run.</li>
<li>Fixed #294; added java runtime and compiler check to pi4j helper script</li>
<li>Fixed #291; W1Device name contains "\n"</li>
<li>Fixed #275; LCDExample.java doesn't work in release</li>
<li>Fixed #276; RaspiBcmPin pins not firing pin state change events</li>
<li>Fixed #198; Problems with data from HMC5883L class</li>
<li>Fixed #351; Pi4J packages excluded in OSGI manifest ImportPackage declaration</li>
<li>Fixed #360; Serial.setBreak(TRUE|FALSE) is printing debug lines to stdout</li>
<li>Fixed #355; ButtonBase Executor Service should be closed on GpioController.shutdown()</li>
<li>Fixed #356; SystemInfoProvider CPU temperature was divided by 1000 on OrangePi</li>
<li>Fixed #272; SerialDataEvent should not fire when event.length() == 0</li>
<li>Fixed #361; SerialFactory isShutdown() state not getting updated on new instance</li>
</ul>
<h3><strong>Special Thanks:</strong></h3>
<p>Thank You to all the Pi4J users, contributors, testers, and tinkerers for all your help and support to continue making Pi4J the&nbsp;<em>go-to</em>&nbsp;library for Java access to the Raspberry Pi's hardware interfaces.&nbsp;</p>
<blockquote>
<h3><strong>Pi4J Related Links:</strong>&nbsp;</h3>
<ul>
<li><a class="offsite-link-inline" href="http://pi4j.com/" target="_blank">Pi4J Website</a></li>
<li><a class="offsite-link-inline" href="https://github.com/Pi4J/pi4j/" target="_blank">Pi4J Github Repository</a></li>
<li><a class="offsite-link-inline" href="https://groups.google.com/forum/#!forum/pi4j" target="_blank">Pi4J Google Groups/Forum</a></li>
<li><a class="offsite-link-inline" href="http://pi4j.com/apidocs/index.html" target="_blank">Pi4J JavaDoc</a></li>
</ul>
</blockquote>]]></content:encoded></rss:item><rss:item rdf:about="http://www.savagehomeautomation.com/projects/pi4j-version-11-released.html"><rss:title>Pi4J Version 1.1 - RELEASED!</rss:title><rss:link>http://www.savagehomeautomation.com/projects/pi4j-version-11-released.html</rss:link><dc:creator>Robert Savage</dc:creator><dc:date>2016-07-27T18:30:00Z</dc:date><dc:subject>Embedded Computing Java Pi4J Raspberry Pi Raspberry Pi java pi pi4j raspberry raspi wiringpi</dc:subject><content:encoded><![CDATA[Pi4J Version 1.1 has been released.  See this article for more details.]]></content:encoded></rss:item><rss:item rdf:about="http://www.savagehomeautomation.com/projects/modmypi-piot-relay-board-review.html"><rss:title>ModMyPi PiOT Relay Board Review</rss:title><rss:link>http://www.savagehomeautomation.com/projects/modmypi-piot-relay-board-review.html</rss:link><dc:creator>Robert Savage</dc:creator><dc:date>2016-06-16T16:56:10Z</dc:date><dc:subject>Embedded Computing Home Automation Raspberry Pi Raspberry Pi pi4j raspberry relay review rrpi</dc:subject><content:encoded><![CDATA[<p><span class="full-image-block ssNonEditable"><img src="http://www.savagehomeautomation.com/storage/post-images/raspberrypi/raspi-banner680.png?__SQUARESPACE_CACHEVERSION=1344866873551" alt="" /></span></p>
<p><span class="full-image-float-right ssNonEditable"><span><a href="http://www.modmypi.com/raspberry-pi/breakout-boards/modmypi/modmypi-piot-relay-board" target="_blank"><img src="http://www.savagehomeautomation.com/storage/post-images/piot/modmypi-logo.png?__SQUARESPACE_CACHEVERSION=1466028110779" alt="" /></a></span><span class="thumbnail-caption" style="width: 190px;">ModMyPi</span></span>In this article, I am reviewing the new <strong>ModMyPi PiOT Relay Board</strong>.</p>
<p><a name="first_impressions"></a></p>
<h3>First Impressions</h3>
<p>After un-boxing the relay board, my first impressions are just .. <strong>Wow</strong>! &nbsp;You can tell immediately that somebody really put some thought into creating a sophisticated relay board for direct use with the Raspberry Pi.&nbsp;</p>
<p>Most relay boards I have worked with have been either cheap (<em>both in cost and in quality</em>) relay boards with the most primitive of options or relay boards that I have hand-built using relays, transistors, resistors, diodes, capacitors, etc. &nbsp;The nicest in terms of quality relay board I had prior to this board was the PiFace relay board. &nbsp;However, it is controlled via software and SPI communication rather than direct GPIO control. &nbsp;So it's a very different use case.</p>
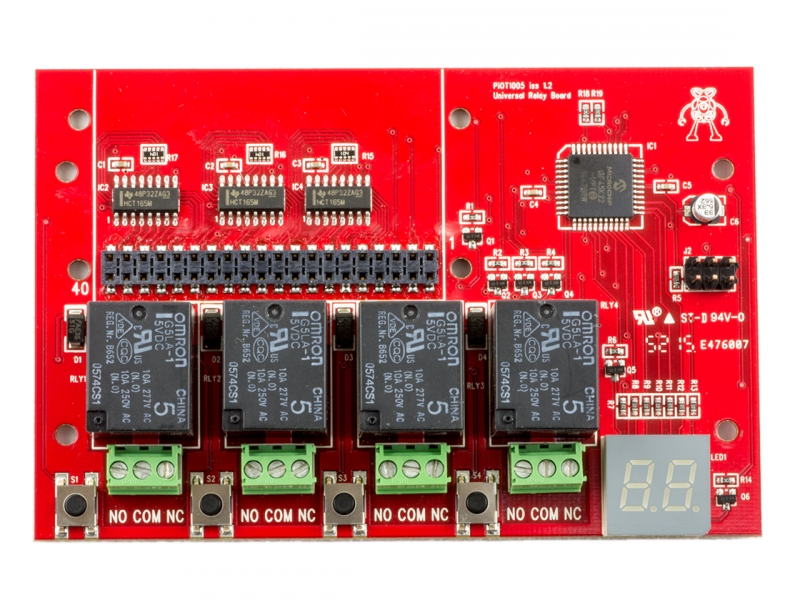
<p><span class="full-image-block ssNonEditable"><span><a href="http://www.modmypi.com/raspberry-pi/breakout-boards/modmypi/modmypi-piot-relay-board" target="_blank"><img style="width: 500px;" src="http://www.savagehomeautomation.com/storage/post-images/piot/piot-relay-board.jpg?__SQUARESPACE_CACHEVERSION=1466028103433" alt="" /></a></span><span class="thumbnail-caption" style="width: 500px;">PiOT Relay Board</span></span></p>
<p><a name="where_to_buy"></a></p>
<h3>Where To Buy</h3>
<p>You can purchase the<strong> PiOT Relay</strong>&nbsp;<strong>Board</strong> directly from <strong>ModMyPi </strong>for about $34 USD plus shipping.</p>
<ul>
<li><a class="offsite-link-inline" href="http://www.modmypi.com/raspberry-pi/breakout-boards/modmypi/modmypi-piot-relay-board" target="_blank">http://www.modmypi.com/raspberry-pi/breakout-boards/modmypi/modmypi-piot-relay-board</a></li>
</ul>
<p><a name="features"></a></p>
<h3>Features</h3>
<p>The&nbsp;<strong>ModMyPi PiOT Relay Board</strong>&nbsp;offers the following features:</p>
<ul>
<li>4 x OMRON G5LA-1 Relays for Switching up to 10A @ 250VAC, or 10A @ 24VDC</li>
<li>4 x Tactile Buttons for GPIO/Relay Bonding</li>
<li>Two-Digit 7 Segment Display for Visual Feedback &amp; Setting Control</li>
<li>Micro-controlled GPIO/Relay Setting &amp; Switching (No Jumpers Required!)</li>
<li>40 Point Raspberry Pi GPIO Modelled Input</li>
<li>5V &amp; 3.3V Input Compatible</li>
<li>Low Holding Current via PWM ~ 100mA per Relay Board</li>
<li>Stackable Relay Board (Up to 5 Without External Power)</li>
<li>Multiple Start-Up Modes to Negate Boot GPIO Chatter (Delayed/Handshake)</li>
<li>Pi Zero Mounting Points</li>
</ul>
<p><a name="installation"></a></p>
<h3>Installation</h3>
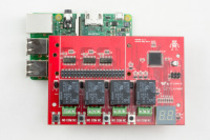
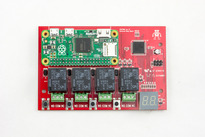
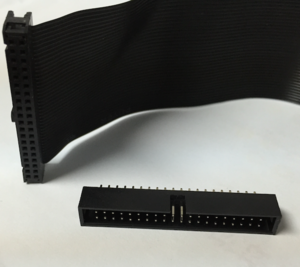
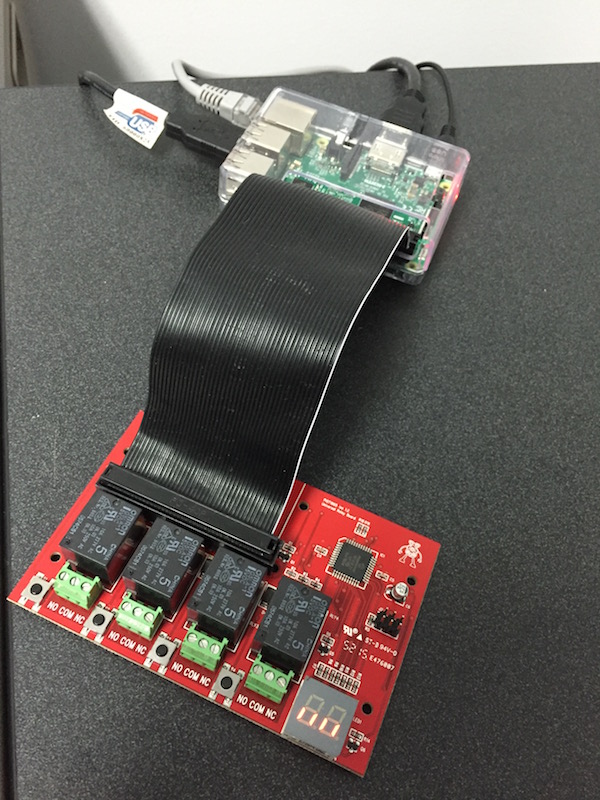
<p>There are a number of installation options for connecting to your Raspberry Pi. &nbsp;You can stack mount it on top of your Raspberry Pi like most shields and add-on boards. &nbsp;You can use a 40-pin male connector and ribbon cable to have a flexible connection between the relay board and the Raspberry Pi. &nbsp;Or if you have a Pi Zero you can surface mount the PiZero on top of the relay board. &nbsp;The<strong>&nbsp;<a class="offsite-link-inline" href="https://github.com/modmypi/PiOT-Relay-Board/wiki/Installation" target="_blank">PiOT Relay&nbsp;</a></strong><a class="offsite-link-inline" href="https://github.com/modmypi/PiOT-Relay-Board/wiki/Installation" target="_blank"><strong>Board&nbsp;</strong><strong>Wiki</strong></a> has a page that demonstrates each option. &nbsp;Some options may require additional parts, so you may want to consider how you will want to mount or connect the relay board to your Raspberry Pi before placing your order.</p>
<p><a class="offsite-link-inline" href="https://github.com/modmypi/PiOT-Relay-Board/wiki/Installation" target="_blank">https://github.com/modmypi/PiOT-Relay-Board/wiki/Installation</a></p>
<p><span class="thumbnail-image-float-left ssNonEditable"><span><a href="javascript:showFullImage('/display/ShowImage?imageUrl=%2Fstorage%2Fpost-images%2Fpiot%2Fpiot-realy-board-stack-mount.jpg%3F__SQUARESPACE_CACHEVERSION%3D1466043251550',133,200);"><img src="http://www.savagehomeautomation.com/storage/thumbnails/13113340-27103308-thumbnail.jpg?__SQUARESPACE_CACHEVERSION=1466043251551" alt="" /></a></span><span class="thumbnail-caption" style="width: 212px;">Stack Mount</span></span><span class="thumbnail-image-float-left ssNonEditable"><span><a href="javascript:showFullImage('/display/ShowImage?imageUrl=%2Fstorage%2Fpost-images%2Fpiot%2Fpiot-relay-board-ribbon-mount.jpg%3F__SQUARESPACE_CACHEVERSION%3D1466043293183',133,200);"><img src="http://www.savagehomeautomation.com/storage/thumbnails/13113340-27103309-thumbnail.jpg?__SQUARESPACE_CACHEVERSION=1466043293186" alt="" /></a></span><span class="thumbnail-caption" style="width: 207px;">Ribbon Connecrtion</span></span></p>
<p><span class="thumbnail-image-float-left ssNonEditable"><span><a href="javascript:showFullImage('/display/ShowImage?imageUrl=%2Fstorage%2Fpost-images%2Fpiot%2Fpiot-relay-board-surface-mount.jpg%3F__SQUARESPACE_CACHEVERSION%3D1466094195644',683,1024);"><img src="http://www.savagehomeautomation.com/storage/thumbnails/13113340-27103311-thumbnail.jpg?__SQUARESPACE_CACHEVERSION=1466094195645" alt="" /></a></span><span class="thumbnail-caption" style="width: 207px;">PiZero - Surface Mount</span></span></p>
<p>&nbsp;</p>
<p>&nbsp;</p>
<p>&nbsp;</p>
<p>&nbsp;</p>
<p>&nbsp;</p>
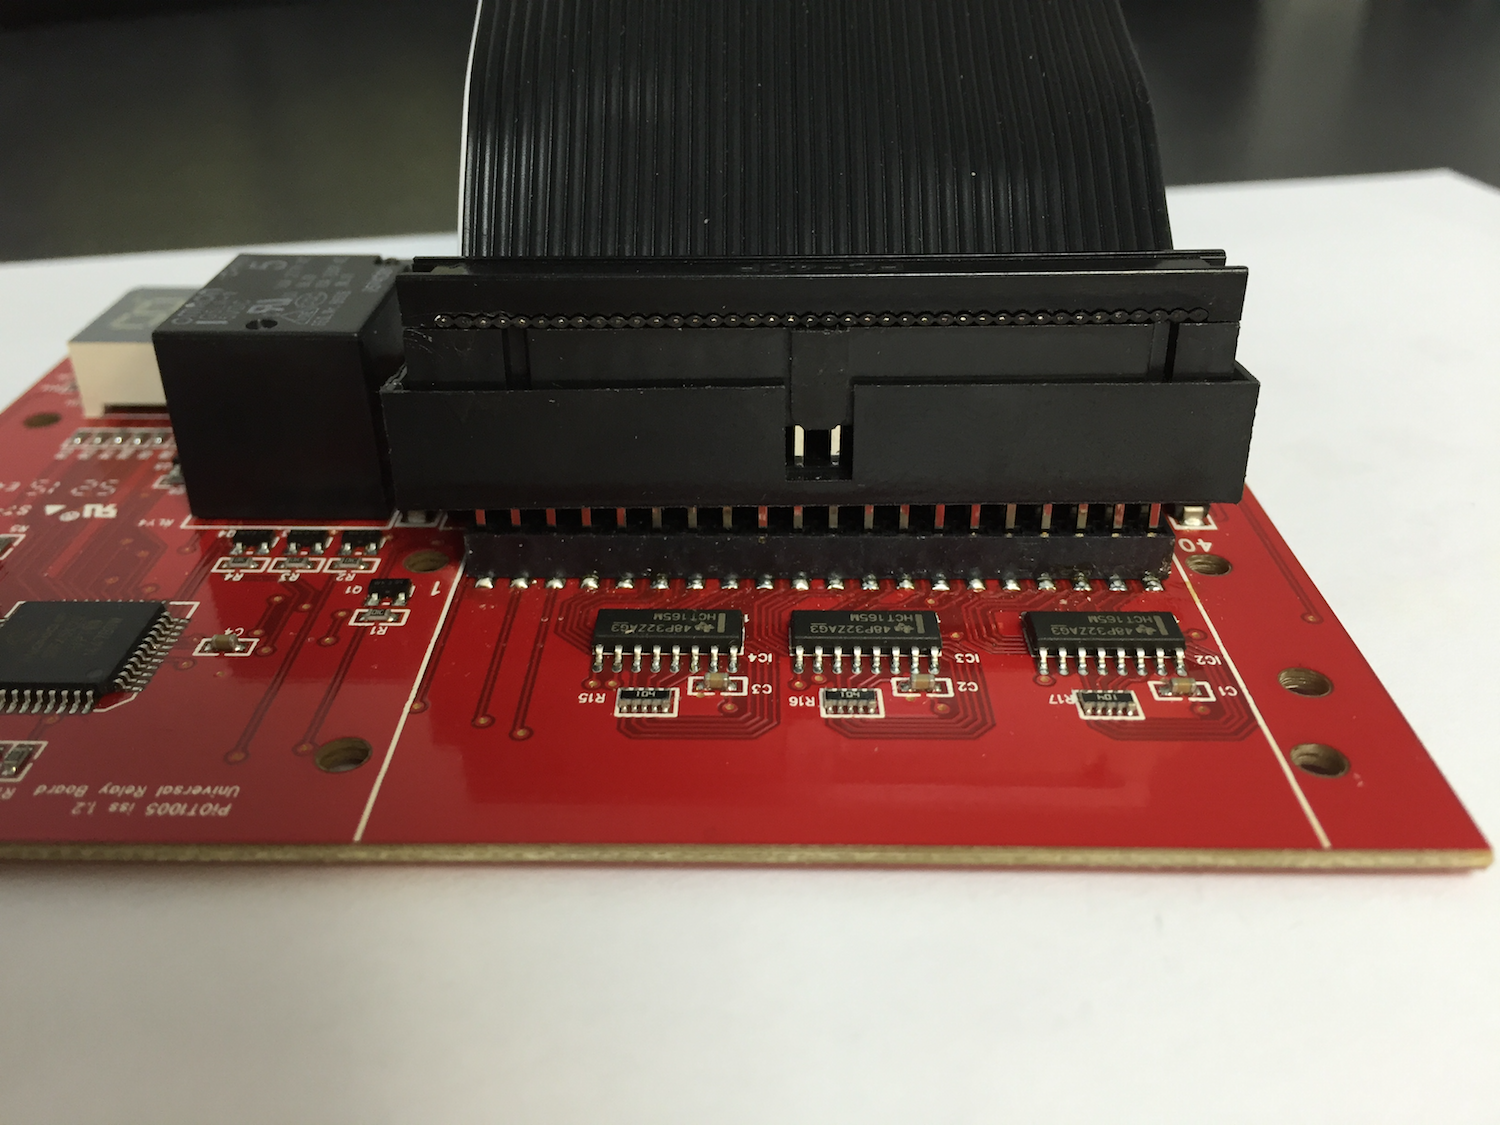
<p><br />For my testing, I chose to insert a 40-pin male header on the top side of the relay board and use a ribbon cable to attach to my Raspberry Pi.</p>
<p><span class="thumbnail-image-float-left ssNonEditable"><span><a href="javascript:showFullImage('/display/ShowImage?imageUrl=%2Fstorage%2Fpost-images%2Fpiot%2Fpiot-relay-connection.png%3F__SQUARESPACE_CACHEVERSION%3D1466095308850',534,600);"><img style="width: 290px;" src="http://www.savagehomeautomation.com/storage/thumbnails/13113340-27104440-thumbnail.jpg?__SQUARESPACE_CACHEVERSION=1466095859923" alt="" /></a></span></span><span class="full-image-inline ssNonEditable"><span><img style="width: 348px;" src="http://www.savagehomeautomation.com/storage/post-images/piot/piot-relay-connection2.png?__SQUARESPACE_CACHEVERSION=1466095951466" alt="" /></span></span></p>
<p><a name="configuration"></a></p>
<h3>Configuration</h3>
<p>In order to control each of the four relays you must first access the configuration menu on the relay board and configure the pin numbering scheme.</p>
<p>See the the following link for details on how to access the configuration menu:<br /><a class="offsite-link-inline" href="https://github.com/modmypi/PiOT-Relay-Board/wiki/Menu---Access" target="_blank">https://github.com/modmypi/PiOT-Relay-Board/wiki/Menu---Access</a>&nbsp;</p>
<p>A detailed explanation of the pin numbering schemes and a pin mapping diagram is included in the next section of this article.</p>
<p>After configuring the preferred pin numbering scheme, you can then following the instructions linked below to set/assign/select the GPIO pin to control each each relay:<br /><a class="offsite-link-inline" href="https://github.com/modmypi/PiOT-Relay-Board/wiki/Basics" target="_blank">https://github.com/modmypi/PiOT-Relay-Board/wiki/Basics</a>&nbsp;</p>
<p><a name="pin_numbering_scheme"></a></p>
<h3>Pin Numbering Scheme</h3>
<p>The <strong>ModMyPi PiOT Relay Board</strong>&nbsp;supports a soft (software-based) mapping between each of the four relays and GPIO pins on the Raspberry Pi. The relay board allows you to configure this mapping using one of two pin numbering schemes. &nbsp;Instructions for configuring your relay boards pin numbering scheme can be found here: <a class="offsite-link-inline" href="https://github.com/modmypi/PiOT-Relay-Board/wiki/Menu---Io---Pin-Numbering" target="_blank">https://github.com/modmypi/PiOT-Relay-Board/wiki/Menu---Io---Pin-Numbering</a></p>
<ul>
<li><strong>GPIO</strong> (also known as BCM or Broadcom pin numbering)<br />This numbering scheme denotes each GPIO pin by their actual GPIO number on the Broadcom SoC chipset. &nbsp;This numbering scheme is the predominate numbering scheme used by the firmware, raw C code, the GPIO device driver, the GPIO Python library and more. &nbsp;The SoC GPIO pins can, albeit rare, vary from model to model or RPi board revisions and may be exposed on difference physical header pins. &nbsp;For this reason, this is considered a direct pin mapping where there is no software abstraction layer re-mapping pins to ensure consistency across models/board revisions.<br /><br />When configured for the GPIO pin numbering scheme, the relay board will display "<strong>gP</strong>" on the LED digital display.&nbsp;<br /><img style="width: 75px;" src="http://www.savagehomeautomation.com/storage/post-images/piot/gp_segments.png?__SQUARESPACE_CACHEVERSION=1466021739903" alt="" /><br /><br /></li>
<li><strong>PN</strong> (Header Pin Numbering)<br />This numbering scheme denotes each GPIO pin by their physical pin location on the 40-pin GPIO header. This numbering scheme is easier to follow because the pin numbers directly match the actual (address) location on the header connector. &nbsp;This pin numbering scheme is considered an abstract pin mapping because there is a software abstraction layer that is responsible for mapping the physical header pin number (address) back to the appropriate GPIO number on the Broadcom SoC. &nbsp;The WiringPi C library supports addressing by header pin numbers. &nbsp;<br /><br />When configured for the header pin numbering scheme, the relay board will display "<strong>Pn</strong>" on the LED digital display.&nbsp;<br /><img style="width: 75px;" src="http://www.savagehomeautomation.com/storage/post-images/piot/pn_segments.png?__SQUARESPACE_CACHEVERSION=1466021844538" alt="" />&nbsp;</li>
</ul>
<ul>
</ul>
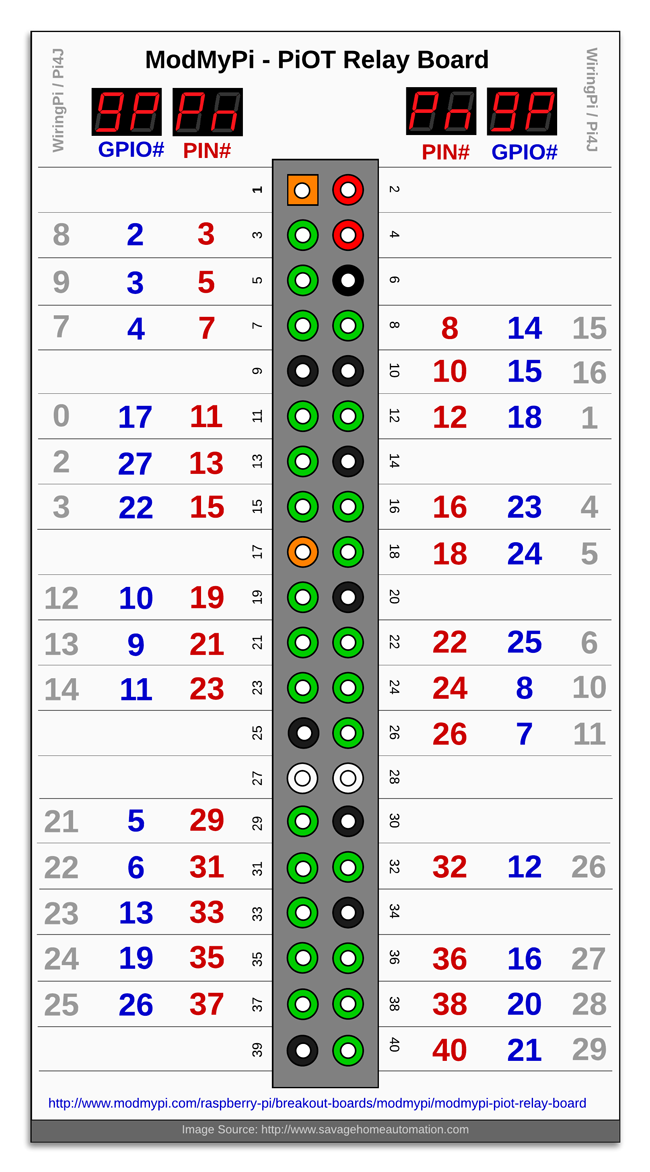
<p>You can use the diagram below to help map the pin numbering scheme you choose to the actual GPIO pins on your Raspberry Pi. &nbsp;This pin mapping diagrams includes both of the supported pin numbering schemes supported by the <strong>ModMyPi PiOT Relay Board</strong>&nbsp;as well as the WiringPi/Pi4J pin numbers in case you are using the WiringPi/Pi4J pin numbering scheme in your software. &nbsp;(<em>You can click the image to download a high resolution copy of the diagram.</em>)</p>
<div></div>
<p><span class="full-image-block ssNonEditable"><span><a href="javascript:showFullImage('/display/ShowImage?imageUrl=%2Fstorage%2Fpost-images%2Fpiot%2Fpiot-relay-board-pinout.png%3F__SQUARESPACE_CACHEVERSION%3D1466021371725',2912,1614);"><img style="width: 550px;" src="http://www.savagehomeautomation.com/storage/post-images/piot/piot-relay-board-pinout-650.png?__SQUARESPACE_CACHEVERSION=1466096015909" alt="" /></a></span><span class="thumbnail-caption" style="width: 550px;">Click the image above for a hi-resolution copy of the pinout diagram.</span></span></p>
<p><a name="documentation"></a></p>
<h3>Tutorial and Documentation</h3>
<p>There is an excellent and easy to follow set of instructions available for the <strong>ModMyPi PiOT Relay Board&nbsp;</strong>located on GitHub:</p>
<p><a class="offsite-link-inline" href="https://github.com/modmypi/PiOT-Relay-Board/wiki" target="_blank">https://github.com/modmypi/PiOT-Relay-Board/wiki</a></p>
<p>Sample Python code is also available to help get started with your relay board.</p>
<p><a class="offsite-link-inline" href="https://github.com/modmypi/PiOT-Relay-Board" target="_blank">https://github.com/modmypi/PiOT-Relay-Board</a></p>
<p>I did not use the sample code, instead I tested the board using the command line commands in the following "Testing" section of this article.</p>
<p><a name="testing"></a></p>
<h3>Testing</h3>
<p>After you have configured the pin numbering scheme and have set the GPIO pin assignments for each relay you are ready to test controlling the relay by toggling the GPIO pin states between HI and LOW. &nbsp;You can use the example Python program included in the PiOT Relay Wiki or you can simply use the following "gpio" command line instructions to test.</p>
<p><strong>Export the GPIO Pin</strong></p>
<p>The first thing we must do is export the GPIO pin as an output pin. &nbsp;To do this via the gpio utility, you must to use the BCM GPIO number. &nbsp;So lets use the GPIO #2 (Header Pin #3, WiringPi Pin #8) in our example.</p>
<pre>&gt; sudo gpio export 2 out</pre>
<p><strong><span class="full-image-float-right ssNonEditable"><span><img style="width: 60px;" src="http://www.savagehomeautomation.com/storage/post-images/piot/gp_segments.png?__SQUARESPACE_CACHEVERSION=1466094890818" alt="" /></span></span>Control Relay in "GP" (GPIO) Pin Numbering Mode</strong></p>
<p>Now we can control the GPIO assigned relay using the following commands:</p>
<p>Turn the relay ON; do do this we need to set GPIO#2 to the HIGH (1) state.</p>
<pre>&gt; sudo gpio -g write 2 1</pre>
<p>Turn the relay OFF; do do this we need to set GPIO#2 to the LOW (0) state.</p>
<pre>&gt; sudo gpio -g write 2 0</pre>
<p>(Note, the "-g" argument used with the gpio utility instructs the gpio utility to use the BCM pin numbering scheme. &nbsp;Without this argument, the gpio utility would attempt to use the WiringPi pin numbering scheme by default.)</p>
<p><strong><span class="full-image-float-right ssNonEditable"><span><img style="width: 60px;" src="http://www.savagehomeautomation.com/storage/post-images/piot/pn_segments.png?__SQUARESPACE_CACHEVERSION=1466094919310" alt="" /></span></span>Control Relay in "PN" (Header) Pin Numbering Mode</strong></p>
<p>Now we can control the GPIO assigned relay using the following commands:</p>
<p>Turn the relay ON; do do this we need to set GPIO on header pin #3 to the HIGH (1) state.</p>
<pre>&gt; sudo gpio -1 write 3 1</pre>
<p>Turn the relay OFF; do do this we need to set GPIO on header pin #3 to the LOW (0) state.</p>
<pre>&gt; sudo gpio -1 write 3 0</pre>
<p>(Note, the "-1" argument used with the gpio utility instructs the gpio utility to use the header pin numbering scheme. &nbsp;Without this argument, the gpio utility would attempt to use the WiringPi pin numbering scheme by default.)</p>
<div></div>
<p><a name="wish_list"></a></p>
<h3>Wish List</h3>
<p>Here are some of my thoughts as a wish list for a future version/revision of the product :-)&nbsp;</p>
<p><em>I wish</em> ... that there was a way to lock down the configuration of pin assignments once you have them configured just how you want them. &nbsp;It's a bit too easy to accidentally re-map a pin when fumbling with the buttons.</p>
<p><em>I wish</em>&nbsp;... that pin assignment/configuration put the board into a mode where it would not toggle the configured relay state until the assignment was complete. &nbsp;Currently as you cycle thru the pin numbers the relay toggles immediately based on the GPIO pin state of the pin number you are cycling through. &nbsp; &nbsp;</p>
<p><em>I wish </em>... there was a method via software to configure pin assignments. &nbsp;This way a booting application could ensure the proper pin mapping for it's needs. &nbsp;This would make the board highly reusable across multiple projects without manual interaction to assign pins. &nbsp; This would especially be helpful for users who potentially just download some software application to run on their system and may not be as geeky to understand or configure relay pin assignments.</p>
<p><em>I wish</em> ... there were 4 opto-isolated inputs on the board. &nbsp;The relays do a great job for outputs but often your project needs both inputs and outputs. &nbsp;I realize this may be an increased cost and perhaps a different SKU at a higher price point. &nbsp;&nbsp;</p>
<div></div>
<p><a name="final_thoughts"></a></p>
<h3>Final Thoughts</h3>
<p>In closing, I just have to say this is a very nice board and a nice prototyping tool to have on hand when building a project that requires relay control via GPIO. &nbsp;Sure its a bit more expensive than a cheap Chinese relay board, but as with most things in life .. <em>you get what you pay for</em>. &nbsp;</p>
<p>I think this board is very well suited as a prototyping tool for a professional developer and also a perfect tool for for hobbyists wanting to use their Raspberry Pi's to control things and are not well versed in concepts like active-hi, active-low, coil suppression, level-shifting, etc. when interfacing to relay boards. &nbsp;&nbsp;</p>
<p>The design and features of the <strong>ModMyPi PiOT Relay Board</strong>&nbsp;are very well thought out and offer unprecedented flexibility for relay-based projects using a Raspberry Pi. &nbsp;The features I like most are the optional boot up modes, the soft-mapping of GPIO pins, the direct test button control and the friction connector allowing surface or bottom mount connections. &nbsp;I can certainly see projects where just this board and a Pi Zero together comprise an elegant and compact solution for things like remote or expanded sprinkler zone controllers and other home automation projects. &nbsp;&nbsp;</p>
<p><span class="full-image-block ssNonEditable"><span><img style="width: 500px;" src="http://www.savagehomeautomation.com/storage/post-images/piot/piot-relay-board-photo.JPG?__SQUARESPACE_CACHEVERSION=1466027729362" alt="" /></span></span></p>
<blockquote>
<p><strong>Disclaimer</strong>:</p>
This relay board was provided to me at no cost for an honest and unbiased review.</blockquote>]]></content:encoded></rss:item><rss:item rdf:about="http://www.savagehomeautomation.com/projects/pi4j-now-supports-non-privileged-access-no-more-rootsudo.html"><rss:title>Pi4J Now Supports Non-Privileged Access (no more root/sudo)</rss:title><rss:link>http://www.savagehomeautomation.com/projects/pi4j-now-supports-non-privileged-access-no-more-rootsudo.html</rss:link><dc:creator>Robert Savage</dc:creator><dc:date>2015-12-14T17:00:00Z</dc:date><dc:subject>Embedded Computing Java Pi4J Raspberry Pi Raspberry Pi access java pi4j privilege raspberry raspi root sudo</dc:subject><content:encoded><![CDATA[The <strong><a class="offsite-link-inline" href="http://www.pi4j.com" target="_blank">Pi4J Project</a></strong> now supports non-privileged access to the basic GPIO input and output functions of the Raspberry Pi. &nbsp;What this means is that launching your Java application with "sudo" or running as a user account with "root" permissions is no longer required!]]></content:encoded></rss:item><rss:item rdf:about="http://www.savagehomeautomation.com/projects/raspberry-pi-with-java-programming-the-internet-of-things-io.html"><rss:title>Raspberry Pi with Java: Programming the Internet of Things (IoT)</rss:title><rss:link>http://www.savagehomeautomation.com/projects/raspberry-pi-with-java-programming-the-internet-of-things-io.html</rss:link><dc:creator>Robert Savage</dc:creator><dc:date>2015-12-10T23:15:00Z</dc:date><dc:subject>Embedded Computing Java JavaFX Pi4J Raspberry Pi Raspberry Pi gpio i2c java pi4j raspberry serial spi uart</dc:subject><content:encoded><![CDATA[Book Review: Raspberry Pi with Java: Programming the Internet of Things (IoT)]]></content:encoded></rss:item><rss:item rdf:about="http://www.savagehomeautomation.com/projects/pi4j-version-10-released.html"><rss:title>Pi4J Version 1.0 - RELEASED!</rss:title><rss:link>http://www.savagehomeautomation.com/projects/pi4j-version-10-released.html</rss:link><dc:creator>Robert Savage</dc:creator><dc:date>2015-04-22T13:07:54Z</dc:date><dc:subject>Embedded Computing Java Pi4J Raspberry Pi Raspberry Pi java pi pi4j raspberry raspi wiringpi</dc:subject><content:encoded><![CDATA[Pi4J Version 1.0 has been released.  See this article for more details.]]></content:encoded></rss:item><rss:item rdf:about="http://www.savagehomeautomation.com/projects/pi4j-pibrella.html"><rss:title>Pi4J + Pibrella</rss:title><rss:link>http://www.savagehomeautomation.com/projects/pi4j-pibrella.html</rss:link><dc:creator>Robert Savage</dc:creator><dc:date>2015-02-23T15:00:00Z</dc:date><dc:subject>Embedded Computing Java Pi4J Pimoroni Raspberry Pi Raspberry Pi pi pi4j pibrella raspberry raspi rpi</dc:subject><content:encoded><![CDATA[<p style="text-align: center;">&nbsp;<img style="text-align: center;" src="http://www.savagehomeautomation.com/storage/thumbnails/13113340-25979586-thumbnail.jpg?__SQUARESPACE_CACHEVERSION=1424701394426" alt="" /></p>
<p><span class="full-image-float-right ssNonEditable"><span><a href="javascript:showFullImage('/display/ShowImage?imageUrl=%2Fstorage%2Fpost-images%2Fraspberrypi%2Fpibrella.jpg%3F__SQUARESPACE_CACHEVERSION%3D1424702005788',600,600);"><img style="width: 300px;" src="http://www.savagehomeautomation.com/storage/thumbnails/13113340-25979592-thumbnail.jpg?__SQUARESPACE_CACHEVERSION=1424702036383" alt="" /></a></span><span class="thumbnail-caption" style="width: 300px;">(click to enlarge)</span></span>The&nbsp;<strong><a class="offsite-link-inline" href="http://pibrella.com/" target="_blank">Pibrella</a></strong>&nbsp;add-on board serves as a simple and easy platform to get started with and learn about inputs and outputs on your Raspberry Pi. &nbsp;</p>
<p><strong><a class="offsite-link-inline" href="http://pibrella.com/" target="_blank">Pibrella</a></strong> is an excellent development tool for both hobbyist and students to learn about programmatic interfacing with inputs and outputs to monitor and control things in the real world.&nbsp;</p>
<p>For beginners, three LED lights and a momentary button are provided directly on the board so you can get started playing with the input signals for the momentary button and output signals for controlling the LED lights without having to wire any circuits yourself. &nbsp;</p>
<p>One you are ready to sense (<em>inputs</em>) or control (<em>outputs</em>) other external devices you can use the 4 generic inputs and 4 generic outputs at the bottom of the Pibrella board via the 2 8-pin header connectors. &nbsp;(Note, <a href="http://www.amazon.com/exec/obidos/ASIN/B00NJ3SIVS/savagehomeaut-20" target="_blank">breadboard/prototyping jump wires</a> fit perfectly into these header blocks.)&nbsp;</p>
<blockquote>
<p style="text-align: center;"><strong><br />&lt;&lt;&lt;&nbsp;</strong><strong><a class="offsite-link-inline" href="http://www.amazon.com/exec/obidos/ASIN/B00MHKAFCE/savagehomeaut-20" target="_blank">BUY PIBRELLA ON AMAZON</a>&nbsp;$22.99 with Prime Shipping &gt;&gt;&gt;</strong></p>
</blockquote>
<p>More details and instructions for getting started can be found at: <a class="offsite-link-inline" href="http://pibrella.com/" target="_blank">http://pibrella.com/</a></p>
<p>&nbsp;</p>
<h2>Pi4J + Pibrella</h2>
<p>The Pibrella documentation primarily includes information about programming the Pibrella using Python. &nbsp;However, we at Pi4J recognizing the Pibrella device as an excellent tool for beginners did not want to leave Java programmers out of the party. &nbsp;So, we have added native support for the Pibrella board directly into Pi4J. &nbsp;</p>
<h3>Sources</h3>
<p>The Pibrella devices interfaces can be found here:<br /><a class="offsite-link-inline" href="https://github.com/Pi4J/pi4j/tree/develop/pi4j-device/src/main/java/com/pi4j/device/pibrella" target="_blank">https://github.com/Pi4J/pi4j/tree/develop/pi4j-device/src/main/java/com/pi4j/device/pibrella</a></p>
<p>An example program demonstrating the usage of the Pibrella device interface can be found here:<br /><a class="offsite-link-inline" href="https://github.com/Pi4J/pi4j/blob/develop/pi4j-example/src/main/java/PiBrellaExample.java" target="_blank">https://github.com/Pi4J/pi4j/blob/develop/pi4j-example/src/main/java/PiBrellaExample.java</a>&nbsp;</p>
<h3>Example</h3>
<p>Below is a sample program to help you get started using the Pibrella board in your Java program.</p>
<p><script src="https://gist.github.com/savageautomate/d1606160d802896caf6b.js"></script></p>
<h3>Board Layout<br /><br /><span class="thumbnail-image-block ssNonEditable"><span><a href="javascript:showFullImage('/display/ShowImage?imageUrl=%2Fstorage%2Fpost-images%2Fraspberrypi%2Fpibrella-pcb-layout.gif%3F__SQUARESPACE_CACHEVERSION%3D1424701782423',300,616);"><img style="width: 600px;" src="http://www.savagehomeautomation.com/storage/thumbnails/13113340-25979616-thumbnail.jpg?__SQUARESPACE_CACHEVERSION=1424703949976" alt="" /></a></span></span></h3>
<blockquote>
<p style="text-align: center;"><strong><br />&lt;&lt;&lt;&nbsp;</strong><strong><a class="offsite-link-inline" href="http://www.amazon.com/exec/obidos/ASIN/B00MHKAFCE/savagehomeaut-20" target="_blank">BUY PIBRELLA ON AMAZON</a>&nbsp;$22.99 with Prime Shipping &gt;&gt;&gt;</strong></p>
</blockquote>
<div><strong><br /></strong></div>]]></content:encoded></rss:item><rss:item rdf:about="http://www.savagehomeautomation.com/projects/thank-you-devoxx.html"><rss:title>Thank You Devoxx!</rss:title><rss:link>http://www.savagehomeautomation.com/projects/thank-you-devoxx.html</rss:link><dc:creator>Robert Savage</dc:creator><dc:date>2014-11-13T09:49:03Z</dc:date><dc:subject>Embedded Computing Home Automation Java JavaFX Pi4J Raspberry Pi Raspberry Pi devoxx embedded java javafx pi pi4j raspberry raspi</dc:subject><content:encoded><![CDATA[<p><a href="http://www.savagehomeautomation.com/devoxx">http://www.savagehomeautomation.com/devoxx</a></p>
<p>&nbsp;</p>
<blockquote class="twitter-tweet" lang="en">
<p>Thanks to all that attended yesterday's <a href="https://twitter.com/hashtag/Devoxx?src=hash">#Devoxx</a> "Let's Get Physical" talk on <a href="https://twitter.com/hashtag/Raspberry_Pi?src=hash">#Raspberry_Pi</a> &amp; <a href="https://twitter.com/hashtag/Pi4J?src=hash">#Pi4J</a> <a href="https://twitter.com/hashtag/java?src=hash">#java</a> <a href="https://twitter.com/hashtag/iot?src=hash">#iot</a> <a href="https://twitter.com/hashtag/raspi?src=hash">#raspi</a> <a href="http://t.co/3dyngd6jKY">pic.twitter.com/3dyngd6jKY</a></p>
&mdash; Robert Savage (@savageautomate) <a href="https://twitter.com/savageautomate/status/532831846787461120">November 13, 2014</a></blockquote>
<p><script async src="http://www.savagehomeautomation.com//platform.twitter.com/widgets.js" charset="utf-8"></script></p>
<hr />
<blockquote class="twitter-tweet" lang="en">
<p>Thanks to all that attended today's <a href="https://twitter.com/hashtag/Devoxx?src=hash">#Devoxx</a> talk on <a href="https://twitter.com/hashtag/Java?src=hash">#Java</a> 8 <a href="https://twitter.com/hashtag/Raspberry_Pi?src=hash">#Raspberry_Pi</a> &amp; <a href="https://twitter.com/hashtag/Pi4J?src=hash">#Pi4J</a> with <a href="https://twitter.com/steveonjava">@steveonjava</a> <a href="https://twitter.com/JavaFXpert">@JavaFXpert</a> &amp; me. <a href="http://t.co/mbz5dH11vW">pic.twitter.com/mbz5dH11vW</a></p>
&mdash; Robert Savage (@savageautomate) <a href="https://twitter.com/savageautomate/status/532232625134796800">November 11, 2014</a></blockquote>
<p><script async src="http://www.savagehomeautomation.com//platform.twitter.com/widgets.js" charset="utf-8"></script></p>
<hr />]]></content:encoded></rss:item><rss:item rdf:about="http://www.savagehomeautomation.com/projects/pi4j-devoxx-2014.html"><rss:title>Pi4J @ Devoxx 2014</rss:title><rss:link>http://www.savagehomeautomation.com/projects/pi4j-devoxx-2014.html</rss:link><dc:creator>Robert Savage</dc:creator><dc:date>2014-11-10T22:31:08Z</dc:date><dc:subject>Embedded Computing Home Automation Java JavaFX Pi4J Raspberry Pi Raspberry Pi devoxx embedded java javafx pi pi4j raspberry raspi</dc:subject><content:encoded><![CDATA[<div></div>
<div>
<p><span class="full-image-block ssNonEditable"><span><img src="http://www.savagehomeautomation.com/storage/post-images/Screen%20Shot%202014-11-11%20at%2012.36.31%20AM.png?__SQUARESPACE_CACHEVERSION=1415663049512" alt="" /></span></span><span class="full-image-float-right ssNonEditable"><span><img src="http://www.savagehomeautomation.com/storage/post-images/Devoxx%202014.jpg?__SQUARESPACE_CACHEVERSION=1415660754353" alt="" /></span></span></p>
<p>Come join the <strong>Pi4J</strong> talks at <strong>Devoxx Belgium 2014.</strong></p>
<p>Pi4J is featured in the following sessions:</p>
<blockquote>
<h3>Let's Get Physical: I/O Programming with Java on the Raspberry Pi using Pi4J</h3>
<p><span><strong>CONFERENCE SESSION<br />Wednesday at 14:00 - 15:00 @ ROOM 4</strong></span></p>
<ul>
<li>Robert Savage (@savageautomate) &nbsp;&nbsp;</li>
</ul>
<p><a class="offsite-link-inline" href="http://cfp.devoxx.be/2014/talk/JWA-8162/Let's_Get_Physical:_I%2FO_Programming_with_Java_on_the_Raspberry_Pi_using_Pi4J" target="_blank">http://cfp.devoxx.be/2014/talk/JWA-8162/Let's_Get_Physical:_I%2FO_Programming_with_Java_on_the_Raspberry_Pi_using_Pi4J<br /></a></p>
</blockquote>
<blockquote>
<h3>Raspberry Pi with Java 8</h3>
<p><span><strong>UNIVERSITY SESSION<br />Tuesday at 13:30 - 16:30 @ ROOM 9</strong></span></p>
<ul>
<li>Stephen Chin (@SteveOnJava)</li>
<li>James Weaver (@JavaFXpert)</li>
<li>Robert Savage (@savageautomate) &nbsp;&nbsp;</li>
</ul>
<p><a class="offsite-link-inline" href="http://cfp.devoxx.be/2014/talk/IWS-5192/Raspberry_Pi_with_Java_8" target="_blank">http://cfp.devoxx.be/2014/talk/IWS-5192/Raspberry_Pi_with_Java_8</a></p>
</blockquote>
</div>]]></content:encoded></rss:item><rss:item rdf:about="http://www.savagehomeautomation.com/projects/teaching-kids-to-program-things-with-java-and-the-raspberry.html"><rss:title>Teaching Kids to Program Things with Java and the Raspberry Pi</rss:title><rss:link>http://www.savagehomeautomation.com/projects/teaching-kids-to-program-things-with-java-and-the-raspberry.html</rss:link><dc:creator>Robert Savage</dc:creator><dc:date>2014-09-30T06:00:00Z</dc:date><dc:subject>Embedded Computing Java Pi4J Raspberry Pi pi4j javaone java bluej gpio</dc:subject><content:encoded><![CDATA[<div><span class="full-image-block ssNonEditable"><span><img src="http://www.savagehomeautomation.com/storage/post-images/bluej/Screen Shot 2014-09-30 at 12.07.50 AM.png?__SQUARESPACE_CACHEVERSION=1412053843742" alt="" /></span></span></div>
<div><span class="thumbnail-image-float-right ssNonEditable"><span><a href="javascript:showFullImage('/display/ShowImage?imageUrl=%2Fstorage%2Fpost-images%2Fbluej%2Fbluej-1.jpg%3F__SQUARESPACE_CACHEVERSION%3D1412054128902',2718,4300);"><img src="http://www.savagehomeautomation.com/storage/thumbnails/13113340-25495786-thumbnail.jpg?__SQUARESPACE_CACHEVERSION=1412054132561" alt="" /></a></span></span>I just attended a talk at JavaOne (2014) titled "<a class="offsite-link-inline" href="https://oracleus.activeevents.com/2014/connect/sessionDetail.ww?SESSION_ID=3174" target="_blank">Teaching Kids to Program Things with Java and the Raspberry Pi</a>" where I learned about the <a class="offsite-link-inline" href="http://www.bluej.org/" target="_blank">BlueJ</a> project created by the University of Kent and its efforts to integrate with Pi4J and the Raspberry Pi. &nbsp;</div>
<div></div>
<div><br />BlueJ is a lightweight Java IDE designed for beginners and includes all the basic functionality to get started programming including a code editor, compiling, executing and debugging capabilities. &nbsp;</div>
<div></div>
<div></div>
<div></div>
<div></div>
<div></div>
<div></div>
<div>&nbsp;</div>
<div>The idea is to install and use the BlueJ IDE directly on the Raspberry Pi to create Java programs that can run on the Pi and control things using the GPIO (via the Pi4J libraries). &nbsp;Running the IDE directly on the Pi greatly simlpifies the learning curve to get started and reduces what would typically be a bunch of command line shell interation to simple clean user interfaces point and click activities. &nbsp;</div>
<div>&nbsp;</div>
<div></div>
<div></div>
<div><span class="thumbnail-image-float-left ssNonEditable"><span><a href="javascript:showFullImage('/display/ShowImage?imageUrl=%2Fstorage%2Fpost-images%2Fbluej%2Fbluej-3.jpg%3F__SQUARESPACE_CACHEVERSION%3D1412055358601',3456,4608);"><img src="http://www.savagehomeautomation.com/storage/thumbnails/13113340-25495824-thumbnail.jpg?__SQUARESPACE_CACHEVERSION=1412055358603" alt="" /></a></span></span>The talk was hosted by <strong>Ian Utting</strong> and <strong>Fabio Hedayioglu</strong> from the University of Kent and they provided a nice overview of the two leading development approaches using the Raspberry Pi and the challenges faced by the project to build the IDE targeted at the Raspberry Pi platform. &nbsp;It was a great talk and introduction to BlueJ on the RaspberryPi.</div>
<div>&nbsp;</div>
<div>&nbsp;</div>
<div>
<div><strong>Learn more about BlueJ on the Raspberry Pi here:</strong></div>
<div><a class="offsite-link-inline" href="http://www.bluej.org/raspberry-pi.html" target="_blank"><strong>http://www.bluej.org/raspberry-pi.html</strong></a></div>
<div></div>
<div></div>
<div></div>
</div>
<div>&nbsp;</div>
<div>Below are a few of the key slides from the presentation. (<em>Click image to enlarge</em>)</div>
<div>&nbsp;</div>
<div><span class="thumbnail-image-float-left ssNonEditable"><span><a href="javascript:showFullImage('/display/ShowImage?imageUrl=%2Fstorage%2Fpost-images%2Fbluej%2Fbluej-4.jpg%3F__SQUARESPACE_CACHEVERSION%3D1412055740637',2730,4294);"><img src="http://www.savagehomeautomation.com/storage/thumbnails/13113340-25495831-thumbnail.jpg?__SQUARESPACE_CACHEVERSION=1412055740639" alt="" /></a></span>&nbsp;</span><span class="thumbnail-image-block ssNonEditable"><span><a href="javascript:showFullImage('/display/ShowImage?imageUrl=%2Fstorage%2Fpost-images%2Fbluej%2Fbluej-5.jpg%3F__SQUARESPACE_CACHEVERSION%3D1412055915117',2706,4155);"><img style="width: 315px;" src="http://www.savagehomeautomation.com/storage/thumbnails/13113340-25495833-thumbnail.jpg?__SQUARESPACE_CACHEVERSION=1412056468511" alt="" /></a></span></span><span class="thumbnail-image-float-left ssNonEditable"><span><a href="javascript:showFullImage('/display/ShowImage?imageUrl=%2Fstorage%2Fpost-images%2Fbluej%2Fbluej-6.jpg%3F__SQUARESPACE_CACHEVERSION%3D1412056136343',2678,4182);"><img src="http://www.savagehomeautomation.com/storage/thumbnails/13113340-25495840-thumbnail.jpg?__SQUARESPACE_CACHEVERSION=1412056136344" alt="" /></a></span></span><span class="thumbnail-image-block ssNonEditable"><span><a href="javascript:showFullImage('/display/ShowImage?imageUrl=%2Fstorage%2Fpost-images%2Fbluej%2Fbluej-7.jpg%3F__SQUARESPACE_CACHEVERSION%3D1412056231436',2672,4253);"><img src="http://www.savagehomeautomation.com/storage/thumbnails/13113340-25495843-thumbnail.jpg?__SQUARESPACE_CACHEVERSION=1412056231437" alt="" /></a></span></span>&nbsp;</div>
<div><span class="thumbnail-image-float-left ssNonEditable"><span><a href="javascript:showFullImage('/display/ShowImage?imageUrl=%2Fstorage%2Fpost-images%2Fbluej%2Fbluej-2.jpg%3F__SQUARESPACE_CACHEVERSION%3D1412056391415',2668,4239);"><img src="http://www.savagehomeautomation.com/storage/thumbnails/13113340-25495817-thumbnail.jpg?__SQUARESPACE_CACHEVERSION=1412056394983" alt="" /></a></span></span><span class="thumbnail-image-block ssNonEditable"><span><a href="javascript:showFullImage('/display/ShowImage?imageUrl=%2Fstorage%2Fpost-images%2Fbluej%2Fbluej-8.jpg%3F__SQUARESPACE_CACHEVERSION%3D1412056559895',2728,4171);"><img src="http://www.savagehomeautomation.com/storage/thumbnails/13113340-25495859-thumbnail.jpg?__SQUARESPACE_CACHEVERSION=1412056559896" alt="" /></a></span></span><span class="thumbnail-image-float-left ssNonEditable"><span><a href="javascript:showFullImage('/display/ShowImage?imageUrl=%2Fstorage%2Fpost-images%2Fbluej%2Fbluej-9.jpg%3F__SQUARESPACE_CACHEVERSION%3D1412056915746',3127,4448);"><img src="http://www.savagehomeautomation.com/storage/thumbnails/13113340-25495867-thumbnail.jpg?__SQUARESPACE_CACHEVERSION=1412056918605" alt="" /></a></span></span><span class="thumbnail-image-block ssNonEditable"><span><a href="javascript:showFullImage('/display/ShowImage?imageUrl=%2Fstorage%2Fpost-images%2Fbluej%2Fbluej-10.jpg%3F__SQUARESPACE_CACHEVERSION%3D1412056967239',3456,4608);"><img src="http://www.savagehomeautomation.com/storage/thumbnails/13113340-25495873-thumbnail.jpg?__SQUARESPACE_CACHEVERSION=1412056967241" alt="" /></a></span></span><span class="thumbnail-image-block ssNonEditable"><span><a href="javascript:showFullImage('/display/ShowImage?imageUrl=%2Fstorage%2Fpost-images%2Fbluej%2Fbluej-11.jpg%3F__SQUARESPACE_CACHEVERSION%3D1412057184906',2688,4174);"><img src="http://www.savagehomeautomation.com/storage/thumbnails/13113340-25495899-thumbnail.jpg?__SQUARESPACE_CACHEVERSION=1412057184907" alt="" /></a></span></span>&nbsp;</div>
<div></div>
<div></div>
<div></div>
<div></div>
<div></div>
<div></div>
<div></div>]]></content:encoded></rss:item><rss:item rdf:about="http://www.savagehomeautomation.com/projects/raspberry-pi-power-up-using-poe-power-over-ethernet.html"><rss:title>Raspberry Pi - Power up using POE (Power Over Ethernet)</rss:title><rss:link>http://www.savagehomeautomation.com/projects/raspberry-pi-power-up-using-poe-power-over-ethernet.html</rss:link><dc:creator>Robert Savage</dc:creator><dc:date>2014-09-18T02:00:00Z</dc:date><dc:subject>Embedded Computing Networking POE Raspberry Pi Raspberry Pi pi raspberry raspi</dc:subject><content:encoded><![CDATA[<p><img src="http://www.savagehomeautomation.com/storage/post-images/raspberrypi/raspi-banner680.png?__SQUARESPACE_CACHEVERSION=1347431055301" alt="" /></p>
<h3>Overview&nbsp;</h3>
<p><span class="thumbnail-image-float-right ssNonEditable"><span><a href="javascript:showFullImage('/display/ShowImage?imageUrl=%2Fstorage%2Fpost-images%2Fraspberrypi%2Fraspi-poe-all.jpg%3F__SQUARESPACE_CACHEVERSION%3D1411000457204',705,700);"><img src="http://www.savagehomeautomation.com/storage/thumbnails/13113340-25453433-thumbnail.jpg?__SQUARESPACE_CACHEVERSION=1411000542884" alt="" /></a></span><span class="thumbnail-caption" style="width: 302px;">(click image to enlarge)</span></span> While this is certainly far from the first article on how-to power your Raspberry Pi via POE (<em>Power-Over-Ethernet</em>), I thought I would go ahead and document my setup and the equipment I ordered to pull this off successfully. &nbsp;</p>
<p>First, lets be clear -- I am using a real POE switch -- so I wanted a real POE solution for the Raspberry Pi, not one of those splitter cable solutions that simply supply a fixed power voltage over the unused pairs in a CAT5/6 ethernet cable. There is nothing wrong with that type of solution ... its pretty cost effective, but its not real POE per the IEEE 802.3af (POE) or IEEE 802.3at (POE+) specifications. &nbsp;&nbsp;</p>
<p>So to pull this off, we need a POE splitter that can provide the required 5 VDC voltage and an adapter micro USB cable to plug into the Raspberry Pi's power port. <em>&nbsp;(And a short ethernet cable which you may already have laying around the house.)</em></p>
<h3>Shopping List</h3>
<p>The following items are included in this article: &nbsp;</p>
<ul>
<li><a class="offsite-link-inline" href="http://www.amazon.com/exec/obidos/ASIN/B00ECYXC3W/savagehomeaut-20" target="_blank">Raspberry Pi POE to Micro USB 1m Heavy Duty DC Power Cable (LONG)</a>&nbsp;($7.80 USB + S&amp;H)<br />~ or ~</li>
<li><a class="offsite-link-inline" href="http://www.amazon.com/exec/obidos/ASIN/B019XE67MS/savagehomeaut-20" target="_blank">Raspberry Pi POE to Micro USB 8" (20cm) Heavy Duty DC Power Cable (SHORT)</a>&nbsp;($6.80 USB + S&amp;H)</li>
<li><a class="offsite-link-inline" href="http://www.amazon.com/exec/obidos/ASIN/B0002JFN4C/savagehomeaut-20" target="_blank">1 ft CAT5/6 Ethernet Patch Cable</a>&nbsp;(Varies)</li>
</ul>
<ul>
<li><a class="offsite-link-inline" href="http://www.amazon.com/exec/obidos/ASIN/B007Y0L5I0/savagehomeaut-20" target="_blank">TRENDnet Gigabit Power over Ethernet (PoE) Splitter, TPE-114GS</a>&nbsp; ($24.99 USD)<br />~ or ~</li>
<li><a class="offsite-link-inline" href="http://www.amazon.com/exec/obidos/ASIN/B003CFATQK/savagehomeaut-20" target="_blank">TP-LINK TL-POE10R Gigabit PoE Splitter Adapter</a>&nbsp; (~ $13.74 USD)</li>
</ul>
<p><a name="usb"></a></p>
<h3>POE Splitter</h3>
<p>You need a POE splitter than can output 5 VDC. &nbsp;I chose the <a class="offsite-link-inline" href="http://www.amazon.com/exec/obidos/ASIN/B007Y0L5I0/savagehomeaut-20" target="_blank">TRENDnet Gigabit Power over Ethernet (PoE)</a>&nbsp;splitter as it has a nice little selector switch where you can select between 5, 7.5, 9, and 12 VDC. &nbsp;You don't really need the Gigabit capability for the Raspberry Pi since it only supports 10/100 Mbps and TRENDnet does make a 10/100 POE splitter model that costs a little less. &nbsp;I purchased the Gigabit model thinking about other future projects I have in mind and wanted the additional speed. &nbsp;</p>
<p><span class="thumbnail-image-block ssNonEditable"><span><a href="javascript:showFullImage('/display/ShowImage?imageUrl=%2Fstorage%2Fpost-images%2Fraspberrypi%2Fraspi-poe-2.jpg%3F__SQUARESPACE_CACHEVERSION%3D1411001294904',620,1200);"><img src="http://www.savagehomeautomation.com/storage/thumbnails/13113340-25453446-thumbnail.jpg?__SQUARESPACE_CACHEVERSION=1411001294906" alt="" /></a></span></span></p>
<p>I also (later) purchased the&nbsp;<a class="offsite-link-inline" href="http://www.amazon.com/exec/obidos/ASIN/B003CFATQK/savagehomeaut-20" target="_blank">TP-LINK TL-POE10R Gigabit PoE Splitter Adapter</a>&nbsp;adapter which was less expensive and as a bonus included a short CAT-5 ethernet cable. &nbsp;On the down-side it doesn't have the discrete LEDs specifically identifying which output voltage is selected, but that is a minor trade-off for the reduced cost.</p>
<p><span class="thumbnail-image-block ssNonEditable"><span><a href="javascript:showFullImage('/display/ShowImage?imageUrl=%2Fstorage%2Fpost-images%2Fraspberrypi%2Fraspi-poe-10.jpg%3F__SQUARESPACE_CACHEVERSION%3D1412772379705',922,1000);"><img src="http://www.savagehomeautomation.com/storage/thumbnails/13113340-25527399-thumbnail.jpg?__SQUARESPACE_CACHEVERSION=1412772379708" alt="" /></a></span></span></p>
<h3>Micro USB Adapter Cable</h3>
<p>Since the POE splitter uses a barrel connector and the Raspberry Pi is powered using a micro USB connector, you will need an adapter cable to connect the POE splitter to your Raspberry Pi. &nbsp;At first I was going to make my own cable from spare cables lying around the house, but then I found this pre-made adapter cable on Amazon that fits perfectly. &nbsp;(<em>Why reinvent the wheel .. Right?</em>)</p>
<p>It's available in a short and long lengths:</p>
<ul>
<li><a class="offsite-link-inline" href="http://www.amazon.com/exec/obidos/ASIN/B00ECYXC3W/savagehomeaut-20" target="_blank">Raspberry Pi POE to Micro USB 1m Heavy Duty DC Power Cable (LONG)</a>&nbsp;($7.80 USB + S&amp;H)<br />~ or ~</li>
<li><a class="offsite-link-inline" href="http://www.amazon.com/exec/obidos/ASIN/B019XE67MS/savagehomeaut-20" target="_blank">Raspberry Pi POE to Micro USB 8" (20cm) Heavy Duty DC Power Cable (SHORT)</a>&nbsp;($6.80 USB + S&amp;H)</li>
</ul>
<p><span class="thumbnail-image-block ssNonEditable"><span><a href="javascript:showFullImage('/display/ShowImage?imageUrl=%2Fstorage%2Fpost-images%2Fraspberrypi%2Fraspi-poe-adapter.jpg%3F__SQUARESPACE_CACHEVERSION%3D1411002846168',631,1200);"><img src="http://www.savagehomeautomation.com/storage/thumbnails/13113340-25453529-thumbnail.jpg?__SQUARESPACE_CACHEVERSION=1411002846170" alt="" /></a></span></span></p>
<blockquote>
<p><strong>Note:</strong> &nbsp;If you would like to purchase multiple quantities of this adapter cable you can order direct from Sean Kelley at Innovative Electronic Solutions and save on combined shipping. &nbsp;<br /><a class="offsite-link-inline" href="http://www.innovativeelectronicsolutions.com/" target="_blank">http://www.innovativeelectronicsolutions.com/</a>&nbsp;</p>
</blockquote>
<h3>Installation Steps</h3>
<ol>
<li>First, before attaching anything to the Raspberry Pi, make sure that the voltage selector on the POE splitter is set to 5 VDC. (<em>You don't want to accidentally fry your Raspberry Pi!</em>)</li>
<li>Connect your POE powered Ethernet cable from your network switch (or from your POE injector if you are using an injector) to the <strong><em>Data Power In</em></strong> port. &nbsp;Two green LEDs should be illuminated, the POWER LED and the 5V LED. &nbsp;</li>
<li>Connect the Micro USB adapter cable into the <strong><em>Power Out</em></strong> port and into the micro USB port on your Raspberry Pi.</li>
<li>Connect the short Ethernet patch cable between the <strong><em>Data Out</em></strong> port on the splitter and into the Ethernet jack on your Raspberry Pi. &nbsp;</li>
</ol>
<p><span class="thumbnail-image-float-left ssNonEditable"><span><a href="javascript:showFullImage('/display/ShowImage?imageUrl=%2Fstorage%2Fpost-images%2Fraspberrypi%2Fraspi-poe-5.jpg%3F__SQUARESPACE_CACHEVERSION%3D1411001798759',525,525);"><img style="width: 205px;" src="http://www.savagehomeautomation.com/storage/thumbnails/13113340-25453484-thumbnail.jpg?__SQUARESPACE_CACHEVERSION=1411001987348" alt="" /></a></span><span class="thumbnail-caption" style="width: 205px;">Select 5 VDC </span></span></p>
<p><span class="thumbnail-image-float-left ssNonEditable"><span><a href="javascript:showFullImage('/display/ShowImage?imageUrl=%2Fstorage%2Fpost-images%2Fraspberrypi%2Fraspi-poe-3.jpg%3F__SQUARESPACE_CACHEVERSION%3D1411001653065',525,525);"><img style="width: 205px;" src="http://www.savagehomeautomation.com/storage/thumbnails/13113340-25453455-thumbnail.jpg?__SQUARESPACE_CACHEVERSION=1411001971095" alt="" /></a></span><span class="thumbnail-caption" style="width: 205px;">Attach POE Ethernet Cable Here</span></span><span class="thumbnail-image-float-left ssNonEditable"><span><a href="javascript:showFullImage('/display/ShowImage?imageUrl=%2Fstorage%2Fpost-images%2Fraspberrypi%2Fraspi-poe-4.jpg%3F__SQUARESPACE_CACHEVERSION%3D1411001701300',525,525);"><img style="width: 205px;" src="http://www.savagehomeautomation.com/storage/thumbnails/13113340-25453459-thumbnail.jpg?__SQUARESPACE_CACHEVERSION=1411001977447" alt="" /></a></span><span class="thumbnail-caption" style="width: 205px;">Connect power &amp; ethernet to Raspberry Pi</span></span></p>
<p>&nbsp;</p>
<p>&nbsp;</p>
<p>&nbsp;</p>
<p>&nbsp;</p>
<h3>Final Results</h3>
<p>At this point your Raspberry Pi should be powered up and working. &nbsp;There is not really much else to say. &nbsp;Enjoy your POE powered Raspberry Pi :-)</p>
<p><span class="thumbnail-image-float-left ssNonEditable"><span><a href="javascript:showFullImage('/display/ShowImage?imageUrl=%2Fstorage%2Fpost-images%2Fraspberrypi%2Fraspi-poe-6.jpg%3F__SQUARESPACE_CACHEVERSION%3D1411003571025',1200,1200);"><img style="width: 205px;" src="http://www.savagehomeautomation.com/storage/thumbnails/13113340-25453557-thumbnail.jpg?__SQUARESPACE_CACHEVERSION=1411004032110" alt="" /></a></span></span><span class="thumbnail-image-float-left ssNonEditable"><span><a href="javascript:showFullImage('/display/ShowImage?imageUrl=%2Fstorage%2Fpost-images%2Fraspberrypi%2Fraspi-poe-8.jpg%3F__SQUARESPACE_CACHEVERSION%3D1411004021939',1200,1200);"><img src="http://www.savagehomeautomation.com/storage/thumbnails/13113340-25453574-thumbnail.jpg?__SQUARESPACE_CACHEVERSION=1411004021940" alt="" /></a></span></span></p>
<p><span class="full-image-block ssNonEditable">&nbsp;<span><img style="width: 205px;" src="http://www.savagehomeautomation.com/storage/post-images/raspberrypi/raspi-poe-9.jpg?__SQUARESPACE_CACHEVERSION=1411004079019" alt="" /></span></span></p>
<p><span class="thumbnail-image-block ssNonEditable"><span><a href="javascript:showFullImage('/display/ShowImage?imageUrl=%2Fstorage%2Fpost-images%2Fraspberrypi%2Fraspi-poe-7.jpg%3F__SQUARESPACE_CACHEVERSION%3D1411004134647',614,1200);"><img src="http://www.savagehomeautomation.com/storage/thumbnails/13113340-25453577-thumbnail.jpg?__SQUARESPACE_CACHEVERSION=1411004134649" alt="" /></a></span></span></p>
<ol> </ol>]]></content:encoded></rss:item><rss:item rdf:about="http://www.savagehomeautomation.com/projects/pi4j-featured-in-java-magazine.html"><rss:title>Pi4J Featured in Java Magazine</rss:title><rss:link>http://www.savagehomeautomation.com/projects/pi4j-featured-in-java-magazine.html</rss:link><dc:creator>Robert Savage</dc:creator><dc:date>2014-09-09T11:51:11Z</dc:date><dc:subject>Embedded Computing Java Java Magazine Pi4J article Pi4J Raspberry Pi</dc:subject><content:encoded><![CDATA[<p><span class="full-image-inline ssNonEditable"><span><img src="http://www.savagehomeautomation.com/storage/post-images/raspberrypi/javamagpi4j.jpg?__SQUARESPACE_CACHEVERSION=1410264096583" alt="" /></span></span></p>
<p>For anyone that may have missed it, check out this article in May/June issue of Java Magazine featuring me and the Pi4J project.<br /><a class="offsite-link-inline" href="http://www.oraclejavamagazine-digital.com/javamagazine_open/20140506/?pg=18&amp;pm=1&amp;u1=friend" target="_blank">http://www.oraclejavamagazine-digital.com/javamagazine_open/20140506/?pg=18&amp;pm=1&amp;u1=friend</a></p>
<table border="0" cellspacing="0" cellpadding="0">
<tbody>
<tr style="background-color: #d2d2d2; height: 30px;">
<td><img class="navlogo" src="http://images-cdn.dashdigital.com/javamagazine_open/include/icons/navbar_logo.gif?lm=1406168955000" alt="www.oracle.com/javamagazine" height="28" align="left" /></td>
<td style="color: #666666; font-weight: bold; font-family: tahoma, sans-serif; font-size: 11px; line-height: 15px; padding-right: 5px;" align="right"><span id="top_right_text">Look inside &gt;</span></td>
</tr>
<tr style="background-color: #ffffff;">
<td style="padding: 10px 0px;" colspan="2" align="center"><a title="View Magazine" onclick="window.open('http://www.oraclejavamagazine-digital.com/javamagazine_open/20140506?pg=18','sharewidget','toolbar=no,menubar=no,resizable=yes,scrollbars=yes,left=0,top=0,width='+(screen.width-10)+',height='+(screen.height-10)+'');return false;" href="http://www.oraclejavamagazine-digital.com/javamagazine_open/20140506?pg=18" target="_blank"><img src="http://images-cdn.dashdigital.com/javamagazine_open/20140506/data/imgpages/smtn/0018_pyabco.gif?lm=1406168955000" border="0" alt="17" /></a></td>
</tr>
<tr style="background-color: #d2d2d2; height: 30px;">
<td style="color: #666666; font-weight: bold; font-family: tahoma, sans-serif; font-size: 11px; line-height: 15px;" colspan="2" align="center"><span id="bottom_text">PI4J PROJECT</span></td>
</tr>
</tbody>
</table>]]></content:encoded></rss:item><rss:item rdf:about="http://www.savagehomeautomation.com/projects/rs232-serial-on-raspberry-pi-compute-module.html"><rss:title>RS232 Serial on Raspberry Pi Compute Module</rss:title><rss:link>http://www.savagehomeautomation.com/projects/rs232-serial-on-raspberry-pi-compute-module.html</rss:link><dc:creator>Robert Savage</dc:creator><dc:date>2014-08-15T10:00:00Z</dc:date><dc:subject>Embedded Computing Java Raspberry Pi Raspberry Pi pi raspberry rpi rs232 serial</dc:subject><content:encoded><![CDATA[<p><img src="http://www.savagehomeautomation.com/storage/post-images/raspberrypi/raspi-banner680.png?__SQUARESPACE_CACHEVERSION=1347431055301" alt="" /></p>
<p>In the previous article&nbsp;<a href="http://www.savagehomeautomation.com/projects/raspberry-pi-installing-a-rs232-serial-port.html">Raspberry Pi - Installing a RS232 Serial Port</a>&nbsp;we discussed how to install a RS232 port on the Raspberry Pi (model A, B, B+). &nbsp;This is a follow up article provides the same information for connecting a RS232 serial cable to the new <a class="offsite-link-inline" href="http://www.raspberrypi.org/raspberry-pi-compute-module-new-product/" target="_blank">Raspberry Pi Compute Module Development board</a>..</p>
<p>There are two primary RS232 interface options you can choose from for serial connectivity: &nbsp;</p>
<ul>
<li><a href="#usb">USB</a>&nbsp;(USB to Serial Adapter)</li>
<li><a href="#db9">DB9</a>&nbsp;(Level Shifter)</li>
</ul>
<p>Once you have a serial interface connected you can use the serial port for</p>
<ul>
<li><a href="#console">Serial Console</a></li>
<li><a href="#software">Software Application</a></li>
</ul>
<p>(<em>Click one of the above options to jump to that part of the article.</em>)</p>
<p>&nbsp;</p>
<h3>Shopping List</h3>
<p>The following items are included in this article:</p>
<ul>
<li><a class="offsite-link-inline" href="http://www.amazon.com/exec/obidos/ASIN/B008AGDTA4/savagehomeaut-20" target="_blank">PL2303HX USB to TTL to UART RS232 COM Cable module Converter</a></li>
<li><a class="offsite-link-inline" href="http://www.amazon.com/exec/obidos/ASIN/B00BXCYAO6/savagehomeaut-20" target="_blank">MAX232 RS232 to TTL Converter Adapter Board</a></li>
<li><a class="offsite-link-inline" href="http://www.amazon.com/exec/obidos/ASIN/B007MRQC1K/savagehomeaut-20" target="_blank">40pcs Female to Female 2.54mm 0.1 in Jumper Wires F/F</a>&nbsp;</li>
<li><a class="offsite-link-inline" href="http://www.amazon.com/exec/obidos/ASIN/B004G4XRY2/savagehomeaut-20" target="_blank">Jumper Wires Premium 6" F/F Pack of 10</a></li>
</ul>
<p>&nbsp;</p>
<p><a name="usb"></a></p>
<h3>Serial Communication via USB</h3>
<p><span class="full-image-float-right ssNonEditable"><span><a href="javascript:showFullImage('/display/ShowImage?imageUrl=%2Fstorage%2Fpost-images%2Fraspberrypi%2Frpi-usb-serial-cable.jpg%3F__SQUARESPACE_CACHEVERSION%3D1408026880701',563,1110);"><img src="http://www.savagehomeautomation.com/storage/thumbnails/13113340-25318765-thumbnail.jpg?__SQUARESPACE_CACHEVERSION=1408026911610" alt="" /></a></span></span>If you are just looking to communicate to your Raspberry Pi via its serial UART, then you may prefer a USB interface. &nbsp;Most recent models of computers and laptops do not have the traditional RS232 DB9 port anymore, so connecting using a USB port may be preferred. &nbsp;&nbsp;</p>
<p>The following adapter is only $5.47 USD and it provides a USB to serial converter chip: &nbsp; &nbsp;&nbsp;</p>
<ul>
<li><a class="offsite-link-inline" href="http://www.amazon.com/exec/obidos/ASIN/B008AGDTA4/savagehomeaut-20" target="_blank">PL2303HX USB to TTL to UART RS232 COM Cable module Converter</a>&nbsp; (<a class="offsite-link-inline" href="http://www.amazon.com/exec/obidos/ASIN/B008AGDTA4/savagehomeaut-20" target="_blank">Buy Here</a>)</li>
</ul>
<p>This adapter is based on the Prolific PL2303HX chipset. &nbsp;To use this USB to serial interface you will have to install a USB serial port driver on your host operating system. &nbsp;Many operating systems already include support for the prolific drivers. &nbsp;But in case you need it, the drivers can be found here: &nbsp;<a class="offsite-link-inline" href="http://prolificusa.com/portfolio/pl2303hx-rev-d-usb-to-serial-bridge-controller/" target="_blank">http://prolificusa.com/portfolio/pl2303hx-rev-d-usb-to-serial-bridge-controller/</a></p>
<p>Below is a wiring diagram illustrating how to connect the USB to serial interface to the RaspberryPi Compute Module development board:</p>
<p><span class="thumbnail-image-block ssNonEditable"><span><a href="javascript:showFullImage('/display/ShowImage?imageUrl=%2Fstorage%2Fpost-images%2Fraspberrypi%2Fraspi-cm-usbserial-1.png%3F__SQUARESPACE_CACHEVERSION%3D1412774052719',2070,1175);"><img src="http://www.savagehomeautomation.com/storage/thumbnails/13113340-25527451-thumbnail.jpg?__SQUARESPACE_CACHEVERSION=1412774052721" alt="" /></a></span></span></p>
<p><em>Photos of the connected USB to Serial interface (click to enlarge):</em></p>
<p><span class="thumbnail-image-float-left ssNonEditable"><span><a href="javascript:showFullImage('/display/ShowImage?imageUrl=%2Fstorage%2Fpost-images%2Fraspi-case%2Fraspi-cm-usbserial-2.jpg%3F__SQUARESPACE_CACHEVERSION%3D1412774943273',1098,1500);"><img src="http://www.savagehomeautomation.com/storage/thumbnails/13113340-25527509-thumbnail.jpg?__SQUARESPACE_CACHEVERSION=1412774943275" alt="" /></a></span></span></p>
<p><span class="thumbnail-image-inline ssNonEditable"><span><a href="javascript:showFullImage('/display/ShowImage?imageUrl=%2Fstorage%2Fpost-images%2Fraspberrypi%2Fraspi-cm-usbserial-3.jpg%3F__SQUARESPACE_CACHEVERSION%3D1412775253160',1090,1500);"><img src="http://www.savagehomeautomation.com/storage/thumbnails/13113340-25527547-thumbnail.jpg?__SQUARESPACE_CACHEVERSION=1412775253163" alt="" /></a></span></span></p>
<p><strong>NOTE: </strong>&nbsp;Please secure the RED lead from the USB adapter so that it does not come into contact with any of the other pins or components on the Raspberry Pi. &nbsp;This RED pin carries +5VDC and could damage the Pi if it makes contact.</p>
<p>Now that you have the serial interface connected, you can skip down to the&nbsp;<a href="#console">Serial Console</a>&nbsp;section to test the interface.</p>
<p>&nbsp;</p>
<p><a name="db9"></a></p>
<h3>Serial Communication via DB9 (Level Shifter)</h3>
<p><span class="ssNonEditable full-image-float-right"><a href="javascript:showFullImage('/display/ShowImage?imageUrl=%2Fstorage%2Fpost-images%2Fraspberrypi%2Fusb-serial-5.png%3F__SQUARESPACE_CACHEVERSION%3D1350786584875',500,500);"><img src="http://www.savagehomeautomation.com/storage/thumbnails/13113340-20698191-thumbnail.jpg?__SQUARESPACE_CACHEVERSION=1350786611052" alt="" /></a></span></p>
<p>For certain applications and especially projects involving interfacing with other hardware devices a standard RS232 serial device with a DB9 connector is preferred. &nbsp;A standard serial port such as this does not require any drivers. &nbsp;RS232 serial communication is standardized at the hardware layer. &nbsp;RS232 communication can also achieve longer distance runs (<em>maximum distance depends on baud rate</em>). &nbsp;</p>
<p>The following interface adapter is available for $4.50 USD:</p>
<ul>
<li><a class="offsite-link-inline" href="http://www.amazon.com/exec/obidos/ASIN/B00BXCYAO6/savagehomeaut-20" target="_blank">MAX232 RS232 to TTL Converter Adapter Board</a>&nbsp; (<a class="offsite-link-inline" href="http://www.amazon.com/exec/obidos/ASIN/B00BXCYAO6/savagehomeaut-20" target="_blank">Buy Here</a>)</li>
</ul>
<p>In addition to the adapter, you will need at least 4 female to female jumper wires.&nbsp;</p>
<p>Here are a couple of purchase options:</p>
<ul>
<li><a class="offsite-link-inline" href="http://www.amazon.com/exec/obidos/ASIN/B007MRQC1K/savagehomeaut-20" target="_blank">40pcs Female to Female 2.54mm 0.1 in Jumper Wires F/F</a>&nbsp;</li>
<li><a class="offsite-link-inline" href="http://www.amazon.com/exec/obidos/ASIN/B004G4XRY2/savagehomeaut-20" target="_blank">Jumper Wires Premium 6" F/F Pack of 10</a></li>
</ul>
<blockquote>
<p>Why is special circuitry (<em>level shifter</em>) needed for RS232 serial communication?</p>
<p>So .. what is a&nbsp;<em>level shifter</em>&nbsp; and why is it needed you ask. &nbsp;A level shifter is a circuit that can take the low voltage (&plusmn;3.3VDC) TTL signals for serial transmit (TX) and receive (RX) from the UART on the Pi and shift them to &plusmn;5VDC the voltage signals required for RS232 standard communication. &nbsp;Want to know more? &nbsp;Click&nbsp;<a class="offsite-link-inline" href="http://en.wikipedia.org/wiki/RS-232#Voltage_levels" target="_blank">here</a>. &nbsp;&nbsp;</p>
</blockquote>
<p>Below is a wiring diagram illustrating how to connect the level shifter serial interface:</p>
<p><span class="thumbnail-image-block ssNonEditable"><span><a href="javascript:showFullImage('/display/ShowImage?imageUrl=%2Fstorage%2Fpost-images%2Fraspberrypi%2Frpi-cm-usb-levelshifter-wiring.png%3F__SQUARESPACE_CACHEVERSION%3D1408026665370',1519,889);"><img src="http://www.savagehomeautomation.com/storage/thumbnails/13113340-25318747-thumbnail.jpg?__SQUARESPACE_CACHEVERSION=1408026665373" alt="" /></a></span></span></p>
<p>Now that you have the serial interface connected, you can skip down to the&nbsp;<a href="#console">Serial Console</a>&nbsp;section to test the interface.<br />(Use a straight-thru cable for connecting to a computer.)&nbsp;</p>
<p>&nbsp;</p>
<p><a name="console"></a></p>
<h3>Serial Console</h3>
<p>The Debian/Raspbian distribution images include support out-of-the-box for accessing the shell console via the hardware serial port. &nbsp;This can be extremely convenient if you need to access your Raspberry Pi Compute Module when it is not connected to a monitor and network remote access is not available.</p>
<p>Open a terminal emulation software such as Hyperterminal (Windows), Procom Plus (Windows), Indigo Terminal Emulator (Windows), minicom (Linux/OSX) or screen (Linux/OSX)&nbsp;and connect to the serial port using settings "115200, N, 8, 1". &nbsp; You may need to press the enter key a time or two to see the prompt. &nbsp;Authenticate using your credentials and you are good to go. &nbsp;&nbsp; &nbsp; &nbsp; &nbsp;</p>
<p>Here is a screenshot of the terminal displaying the boot up information and then prompting for a login:</p>
<p><span class="ssNonEditable full-image-block"><img src="http://www.savagehomeautomation.com/storage/post-images/raspberrypi/serial-console.png?__SQUARESPACE_CACHEVERSION=1350789648210" alt="" /></span></p>
<p>&nbsp;</p>
<p><a name="software"></a></p>
<h3>Software use of the Serial Port</h3>
<p>If you intend to use the serial port for a software application running on the Raspberry Pi, there is a bit of configuration required to disable the console from using this port. &nbsp;&nbsp;By default, the serial port is configured as a console port for interacting with the Linux OS shell. &nbsp;The following steps will guide you through disabling the port from console access.</p>
<p>First, lets make of backup of the two files that we intend to modify.</p>
<pre>sudo cp /boot/cmdline.txt /boot/cmdline.bak<br />sudo cp /etc/inittab /etc/inittab.bak</pre>
<p>Next, we need to remove the "<em>console=ttyAMA0,115200</em>" and "<em>kgdboc=ttyAMA0,115200</em>" configuration parameters from the "/boot/cmdline.txt" configuration file.&nbsp;</p>
<p>To edit the file use this command:</p>
<pre>sudo nano /boot/cmdline.txt</pre>
<div></div>
<p>The file probably contains this default configuration line:</p>
<pre>dwc_otg.lpm_enable=0 <strong>console=ttyAMA0,115200 kgdboc=ttyAMA0,115200</strong> <br />console=tty1 root=/dev/mmcblk0p2 rootfstype=ext4 elevator=deadline rootwait</pre>
<p>After removing the two configuration parameters, it will look similar to this:</p>
<pre>dwc_otg.lpm_enable=0 console=tty1 root=/dev/mmcblk0p2 rootfstype=ext4 <br />elevator=deadline rootwait</pre>
<p>&nbsp;</p>
<p>The last step is to edit the "/etc/inittab" file and comment out the use of the "ttyAMA0" serial port. &nbsp;To edit the file use this command:</p>
<pre>sudo nano /etc/inittab</pre>
<div></div>
<div></div>
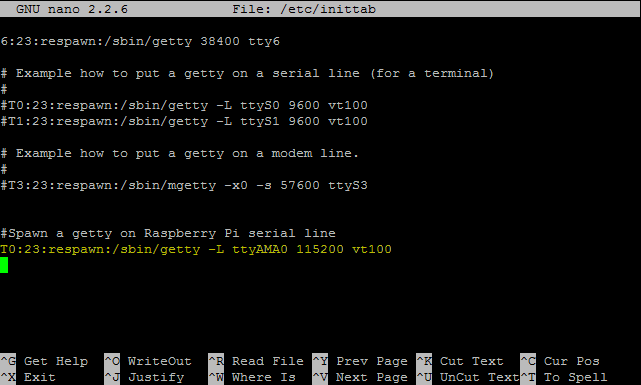
<p>Now towards the bottom of the file, look for a configuration line that includes the "ttyAMA0" port address.</p>
<p><span class="ssNonEditable full-image-block"><img src="http://www.savagehomeautomation.com/storage/post-images/raspberrypi/serial-inittab.png?__SQUARESPACE_CACHEVERSION=1350791143867" alt="" /></span></p>
<p>Place a pound sign ("#") in front of the line to comment it out. &nbsp;With a pound sign ("#") at the beginning of the line, Linux will ignore this configuration line. &nbsp;</p>
<p><span class="ssNonEditable full-image-block"><img src="http://www.savagehomeautomation.com/storage/post-images/raspberrypi/serial-inittab2.png?__SQUARESPACE_CACHEVERSION=1350791262626" alt="" /></span></p>
<p>Save the "/etc/inittab" file and then issue this command to reboot the Raspberry Pi:</p>
<pre>sudo reboot</pre>
<div></div>
<div></div>
<div></div>
<p>Now you are ready to use the serial port with a software application and the operating system won't interfere with the port. &nbsp;Use the device address "ttyAMA0" in your application to access this serial port. &nbsp;</p>
<blockquote>
<p>If are interested in using the serial port with Java programming, please see this page:&nbsp;<a href="http://pi4j.com/example/serial.html">http://pi4j.com/example/serial.html</a></p>
</blockquote>]]></content:encoded></rss:item><rss:item rdf:about="http://www.savagehomeautomation.com/projects/raspberry-pi-oracle-java-se-7-jdkjvm-now-pre-installed-on-ra.html"><rss:title>Raspberry Pi - Oracle Java SE 7 (JDK/JVM) Now Pre-Installed on Raspbian</rss:title><rss:link>http://www.savagehomeautomation.com/projects/raspberry-pi-oracle-java-se-7-jdkjvm-now-pre-installed-on-ra.html</rss:link><dc:creator>Robert Savage</dc:creator><dc:date>2013-10-02T04:04:36Z</dc:date><dc:subject>Embedded Computing Java JavaFX Pi4J Raspberry Pi Raspberry Pi java javaone jdk jre oracle pi raspberry</dc:subject><content:encoded><![CDATA[<p><span class="full-image-block ssNonEditable"><span><img src="http://www.savagehomeautomation.com/storage/post-images/raspberrypi/raspi-banner680.png?__SQUARESPACE_CACHEVERSION=1344881925351" alt="" /></span></span></p>
<p><span class="full-image-float-right ssNonEditable"><span><img src="http://www.savagehomeautomation.com/storage/images/JavaOne_clr.gif?__SQUARESPACE_CACHEVERSION=1380687133179" alt="" /></span></span></p>
<p><strong>My Raspberry Pi just got a whole lot *sweeter*.</strong></p>
<p>While attending JavaOne this year, Oracle announced that the Raspberry Pi foundation would soon start shipping the Oracle JDK/JVM (Java) baked into the Raspbian distribution.</p>
<p>Here was the official announcement on raspberrypi.org:<br /><a href="http://www.raspberrypi.org/archives/4920" target="_blank">http://www.raspberrypi.org/archives/4920</a></p>
<p>And a day later new images were posted for download that include Oracle Java SE fully "<em>baked in</em>".<br /><a href="http://www.raspberrypi.org/archives/4959">http://www.raspberrypi.org/archives/4959</a>&nbsp;</p>
<p>You can download the latest Raspian image that includes Oracle Java SE 7 here:<br /><a href="http://www.raspberrypi.org/downloads" target="_blank">http://www.raspberrypi.org/downloads</a>&nbsp;</p>
<p>Here is a slide (photo) from the JavaOne Community Keynote where this was announced.</p>
<p><span class="thumbnail-image-block ssNonEditable"><span><a href="http://instagram.com/p/eux4XDKEoR/" target="_blank"><img src="http://www.savagehomeautomation.com/storage/post-images/raspberrypi/oracle-java-pi.jpg?__SQUARESPACE_CACHEVERSION=1380687011051" alt="" /></a></span><span class="thumbnail-caption" style="width: 612px;">Photo by @yarasenger</span></span></p>
<p>Its a real treat to flash and boot up a fresh Raspberry Pi (<em>Raspbian</em>) image and Java be there without requiring additional steps to install it.</p>
<p><span class="full-image-block ssNonEditable"><span><img src="http://www.savagehomeautomation.com/storage/post-images/raspberrypi/Screen Shot 2013-10-02 at 12.35.08 AM.png?__SQUARESPACE_CACHEVERSION=1380688605971" alt="" /></span></span></p>
<p><strong><br /></strong></p>
<blockquote>
<p><span style="font-size: 12px;"><strong>Java SE 8 - Developer Preview</strong><br /><br />If you prefer to install the JDK8 developer preview/early access version, please see this page:<br /><a href="http://www.savagehomeautomation.com/raspi-jdk8">Install Oracle Java SE8 (Milestone 8) Developer Preview (JDK)</a></span></p>
</blockquote>]]></content:encoded></rss:item><rss:item rdf:about="http://www.savagehomeautomation.com/projects/thank-you-javaone.html"><rss:title>Thank You JavaOne!</rss:title><rss:link>http://www.savagehomeautomation.com/projects/thank-you-javaone.html</rss:link><dc:creator>Robert Savage</dc:creator><dc:date>2013-09-26T05:19:28Z</dc:date><dc:subject>Embedded Computing Java JavaFX Pi4J Raspberry Pi Raspberry Pi java javaone pi pi4j raspberry raspi</dc:subject><content:encoded><![CDATA[<p><span class="full-image-float-right ssNonEditable"><img src="http://www.savagehomeautomation.com/storage/images/JavaOne_clr.gif?__SQUARESPACE_CACHEVERSION=1380173605216" alt="" /></span></p>
<h3>Thank You</h3>
<p>Thank You JavaOne attendees for joining my session today on I/O programming with Java using Pi4J on the Raspberry Pi. &nbsp;Thank You Oracle for accepting my talk and providing the opportunity to for me to spead the embedded/IOT message.</p>
<p>I do plan on posting additional in-depth articles to this blog that cover how I built the demo system and the access control solution. &nbsp;In the meantime, &nbsp;I have posted a couple of photos from the session as well as the slides and links to the source code below.</p>
<h3>Photos</h3>
<p><span class="full-image-float-left ssNonEditable"><span><a href="javascript:showFullImage('/display/ShowImage?imageUrl=%2Fstorage%2Fpost-images%2Fraspberrypi%2Fjavaone-2013-one.jpg%3F__SQUARESPACE_CACHEVERSION%3D1380173141500',864,1296);"><img style="width: 320px;" src="http://www.savagehomeautomation.com/storage/thumbnails/13113340-23581885-thumbnail.jpg?__SQUARESPACE_CACHEVERSION=1380176320758" alt="" /></a></span></span><span class="full-image-float-left ssNonEditable"><span><a href="javascript:showFullImage('/display/ShowImage?imageUrl=%2Fstorage%2Fpost-images%2Fraspberrypi%2Fjavaone-2013-two.jpg%3F__SQUARESPACE_CACHEVERSION%3D1380173215559',864,1296);"><img style="width: 320px;" src="http://www.savagehomeautomation.com/storage/thumbnails/13113340-23581888-thumbnail.jpg?__SQUARESPACE_CACHEVERSION=1380176328185" alt="" /></a></span></span></p>
<p><span class="full-image-block ssNonEditable"><span><img style="width: 680px;" src="http://www.savagehomeautomation.com/storage/post-images/raspberrypi/javaone-2013-post.png?__SQUARESPACE_CACHEVERSION=1380173282216" alt="" /></span></span></p>
<p><span class="thumbnail-image-block ssNonEditable"><span><a href="javascript:showFullImage('/display/ShowImage?imageUrl=%2Fstorage%2Fpost-images%2Fraspberrypi%2Fjavaone-2013-demo.jpg%3F__SQUARESPACE_CACHEVERSION%3D1380173499636',968,1374);"><img src="http://www.savagehomeautomation.com/storage/thumbnails/13113340-23581901-thumbnail.jpg?__SQUARESPACE_CACHEVERSION=1380173499638" alt="" /></a></span></span></p>
<h3>Slides / Presentation</h3>
<p><iframe src="http://www.slideshare.net/slideshow/embed_code/26565782" width="660" height="400" frameborder="0" marginwidth="0" marginheight="0" scrolling="no" style="border:1px solid #CCC;border-width:1px 1px 0;margin-bottom:5px" allowfullscreen> </iframe></p>
<div style="margin-bottom: 5px;"><strong> <a title="Con7968 let's get physical - io programming using pi4 j" href="https://www.slideshare.net/savageautomate/con7968-lets-get-physical-io-programming-using-pi4-j" target="_blank">Con7968 let's get physical - io programming using pi4 j</a> </strong> from <strong><a href="http://www.slideshare.net/savageautomate" target="_blank">savageautomate</a></strong></div>
<h3>Source Code</h3>
<p>All of the source code examples used in the presentation can be found here on GitHub:<br /><a class="offsite-link-inline" href="https://github.com/savagehomeautomation/pi4j-javaone-demos" target="_blank">https://github.com/savagehomeautomation/pi4j-javaone-demos</a></p>]]></content:encoded></rss:item><rss:item rdf:about="http://www.savagehomeautomation.com/projects/javaone-interview-with-robert-savage-on-nighthacking-tour.html"><rss:title>JavaOne Interview with Robert Savage on NightHacking Tour</rss:title><rss:link>http://www.savagehomeautomation.com/projects/javaone-interview-with-robert-savage-on-nighthacking-tour.html</rss:link><dc:creator>Robert Savage</dc:creator><dc:date>2013-09-13T16:23:13Z</dc:date><dc:subject>Java Pi4J Raspberry Pi Raspberry Pi java javaone pi raspberry raspi</dc:subject><content:encoded><![CDATA[<p><span class="full-image-block ssNonEditable"><span><a href="http://www.oracle.com/go/?&amp;Src=7328808&amp;Act=33&amp;pcode=WWMK11054239MPP004" target="_blank"><img src="http://www.savagehomeautomation.com/storage/images/j1_register.jpg?__SQUARESPACE_CACHEVERSION=1379089470082" alt="" /></a></span></span></p>
<p>Here is a recent interview with <a class="offsite-link-inline" href="http://steveonjava.com/" target="_blank">Steven Chin (steveonjava)</a> on the NightHacking Tour for my upcoming JavaOne <a href="http://www.savagehomeautomation.com/projects/javaone-lets-get-physical-io-programming-with-java-on-the-ra.html">session</a>.</p>
<blockquote>
<p><strong><br />Session</strong><span>:&nbsp;</span><a href="http://www.savagehomeautomation.com/projects/javaone-lets-get-physical-io-programming-with-java-on-the-ra.html" target="_blank">CON7968 - Let&rsquo;s Get Physical: I/O Programming with Java on the Raspberry Pi with Pi4J<br /></a><strong>When:&nbsp;</strong><a class="imageAddDisabled sessionScheduling">Wednesday, Sep 25, 11:30 AM - 12:30 PM<br /></a><strong>Where</strong><span>: Hotel Nikko - Monterey I/II</span></p>
</blockquote>
<p style="text-align: center;"><iframe width="660" height="403" src="http://www.ustream.tv/embed/recorded/38347877?ub=ff720a&amp;lc=ff720a&amp;oc=ffffff&amp;uc=ffffff&amp;v=3&amp;wmode=direct" scrolling="no" frameborder="0" style="border: 0px none transparent;">    </iframe> <br /><a style="padding: 2px 0px 4px; width: 400px; background: #ffffff; display: block; color: #000000; font-weight: normal; font-size: 10px; text-decoration: underline; text-align: center;" href="http://www.ustream.tv/" target="_blank">Video streaming by Ustream</a></p>]]></content:encoded></rss:item><rss:item rdf:about="http://www.savagehomeautomation.com/projects/javaone-lets-get-physical-io-programming-with-java-on-the-ra.html"><rss:title>JavaOne - Let’s Get Physical: I/O Programming with Java on the Raspberry Pi with Pi4J [CON7968]</rss:title><rss:link>http://www.savagehomeautomation.com/projects/javaone-lets-get-physical-io-programming-with-java-on-the-ra.html</rss:link><dc:creator>Robert Savage</dc:creator><dc:date>2013-09-13T15:42:18Z</dc:date><dc:subject>Embedded Computing Java JavaFX Pi4J Raspberry Pi Raspberry Pi java javaone pi4j raspberry raspi</dc:subject><content:encoded><![CDATA[<p><span class="full-image-float-right ssNonEditable"><span><a href="http://www.oracle.com/go/?&amp;Src=7328808&amp;Act=33&amp;pcode=WWMK11054239MPP004" target="_blank"><img src="http://www.savagehomeautomation.com/storage/images/im_speaking.jpg?__SQUARESPACE_CACHEVERSION=1379088853357" alt="" /></a></span></span><span class="full-image-block ssNonEditable"><span><a href="http://www.oracle.com/go/?&amp;Src=7328808&amp;Act=33&amp;pcode=WWMK11054239MPP004" target="_blank"><img src="http://www.savagehomeautomation.com/storage/images/JavaOne_clr.gif?__SQUARESPACE_CACHEVERSION=1379088843221" alt="" /></a></span></span><br />If you are attending <a class="offsite-link-inline" href="http://www.oracle.com/javaone/index.html" target="_blank">JavaOne</a> in San Francisco this year ... make sure to come check out my session on Pi4J and Raspberry Pi.</p>
<p>We will be reviewing into the fundamentals of programming with Pi4J and jumping into some real world demos of how you can use Pi4J and the Raspberry Pi platform to automate things in your life! &nbsp; &nbsp;</p>
<p>&nbsp;</p>
<blockquote>
<p><strong>Session</strong>: <a href="https://oracleus.activeevents.com/2013/connect/sessionDetail.ww?SESSION_ID=7968" target="_blank">CON7968 - Let&rsquo;s Get Physical: I/O Programming with Java on the Raspberry Pi with Pi4J<br /></a><strong>When: </strong><a class="sessionScheduling imageAddDisabled">Wednesday, Sep 25, 11:30 AM - 12:30 PM<br /></a><strong>Where</strong>: Hotel Nikko - Monterey I/II</p>
</blockquote>
<p><strong>Abstract</strong>:</p>
<fieldset id="abstract" class="special">
<p>Oracle&rsquo;s JVM support on low-cost ARM devices opens a world of new possibilities for powerful Java applications running on this new class of embedded platforms. This affords Java programmers the opportunity to play a significant role in the Internet of Things revolution. However, one gap remains: I/O communication with hardware devices and sensors. The Pi4J project bridges this gap. Pi4J is an open source project that provides a rich set of Java libraries enabling Java programmers to participate in these hardware communication layers (GPIO, I2C, SPI, RS232) on the Raspberry Pi. Attend this session for an hour of fast-paced fun and informative demonstrations that will leave you inspired and motivated to &ldquo;get physical&rdquo; with Java and the Raspberry Pi.</p>
</fieldset>
<p>&nbsp;</p>
<p><span class="full-image-block ssNonEditable"><span><a href="http://www.oracle.com/go/?&amp;Src=7328808&amp;Act=33&amp;pcode=WWMK11054239MPP004" target="_blank"><img src="http://www.savagehomeautomation.com/storage/images/j1_register.jpg?__SQUARESPACE_CACHEVERSION=1379088893773" alt="" /></a></span></span></p>]]></content:encoded></rss:item><rss:item rdf:about="http://www.savagehomeautomation.com/projects/raspberry-pi-installing-oracle-java-se-8-milestone-8-develop.html"><rss:title>Raspberry Pi - Installing Oracle Java SE 8 (Milestone 8) Developer Preview</rss:title><rss:link>http://www.savagehomeautomation.com/projects/raspberry-pi-installing-oracle-java-se-8-milestone-8-develop.html</rss:link><dc:creator>Robert Savage</dc:creator><dc:date>2013-09-13T14:35:04Z</dc:date><dc:subject>Java JavaFX Raspberry Pi Raspberry Pi java jdk jre jvm pi raspberry raspi</dc:subject><content:encoded><![CDATA[<p><span class="ssNonEditable full-image-block"><img src="http://www.savagehomeautomation.com/storage/post-images/raspberrypi/raspi-banner680.png?__SQUARESPACE_CACHEVERSION=1344866873551" alt="" /></span></p>
<p style="text-align: left;">The Oracle JDK8 Developer Preview (Milestone 8) for ARM v6/7 (hard-float ABI) is now available! &nbsp;<br />This release represents a feature complete and Oracle tested version of the JDK.</p>
<blockquote>
<p style="text-align: left;">Please see Mark Reinhold's blog post for more details: &nbsp;<a class="offsite-link-inline" href="http://mreinhold.org/blog/jdk8-preview" target="_blank">http://mreinhold.org/blog/jdk8-preview</a></p>
</blockquote>
<p style="text-align: left;">This article will provide the necessary instructions on how to install the Oracle Java Development Kit 8 (JDK8) on your Raspberry Pi. &nbsp;</p>
<p style="text-align: center;"><span class="thumbnail-image-inline ssNonEditable"><a href="javascript:showFullImage('/display/ShowImage?imageUrl=%2Fstorage%2Fpost-images%2Fraspberrypi%2Fraspi.jpg%3F__SQUARESPACE_CACHEVERSION%3D1344866408187',406,600);"><img style="width: 650px;" src="http://www.savagehomeautomation.com/storage/post-images/raspberrypi/piandcoffee.png?__SQUARESPACE_CACHEVERSION=1355877408472" alt="" /></a></span></p>
<h3>Prerequisites</h3>
<ul>
<li>Install and boot the Raspberry Pi using the Rasbian "Wheezy" (2013-07-26 <em>or newer</em>) image. &nbsp;</li>
<li><span style="font-size: 12px;">Get the Raspberry Pi's IP address.</span></li>
</ul>
<h3>Tools &amp; Downloads:</h3>
<p>All:</p>
<ul>
<li><a class="offsite-link-inline" href="http://downloads.raspberrypi.org/raspbian_latest" target="_blank">Raspberry Pi &nbsp;- Raspbian "Wheezy" image</a>&nbsp;(2013-09-10)</li>
<li><a class="offsite-link-inline" href="http://www.oracle.com/technetwork/java/javase/downloads/index.html" target="_blank">Oracle Java SE Development Kit</a>&nbsp;(Select <em>JDK Download</em>, then Linux ARM v6/v7 VFP Hard Float ABI&nbsp;- jdk-7u40-linux-arm-vfp-hflt.tar.gz)</li>
</ul>
<p>Windows:</p>
<ul>
<li><a class="offsite-link-inline" href="http://winscp.net/eng/download.php" target="_blank">WinSCP</a></li>
</ul>
<p>Mac-OSX:</p>
<ul>
<li><a class="offsite-link-inline" href="http://cyberduck.ch/" target="_blank">Cyberduck</a></li>
</ul>
<h3>Download the Oracle JDK for the Raspberry Pi</h3>
<p>You can download the JDK 8 Developer Preview on this page:<br /><a href="https://jdk8.java.net/download.html">https://jdk8.java.net/download.html</a></p>
<p>Select the Linux ARMv6/7 VFP, HardFP ABI&nbsp;distribution <span style="font-size: 80%;">(</span><span style="font-size: 80%;">jdk-8-ea-b106-linux-arm-vfp-hflt-04_sep_2013.tar.gz</span><span style="font-size: 80%;">).&nbsp;</span></p>
<p style="padding-left: 30px;"><span class="full-image-block ssNonEditable"><img style="width: 325px;" src="http://www.savagehomeautomation.com/storage/post-images/raspberrypi/jdk8b106.png?__SQUARESPACE_CACHEVERSION=1379083483251" alt="" /></span></p>
<h3>Transfer the Oracle JDK to the Raspberry Pi</h3>
<p>After downloading the Oracle JDK to you desktop computer, we need to transfer it over to the Raspberry Pi. &nbsp;We will use SCP to transfer the file over the network. &nbsp;If you are running on a Windows desktop, then download and install <a class="offsite-link-inline" href="http://winscp.net/eng/download.php" target="_blank">WinSCP</a>.</p>
<blockquote>
<p>&nbsp;If you are using Mac OSX, you can download and install <a class="offsite-link-inline" href="http://cyberduck.ch/" target="_blank">Cyberduck</a>. &nbsp;The screens will look different but the goals are the same.</p>
</blockquote>
<p>Create a new session in WinSCP using the IP address of you Raspberry Pi. &nbsp;The default authentication credentials for the Raspbian Wheezy image is username "<em>pi</em>" and password "<em>raspberry</em>". &nbsp;Save the session and then login. &nbsp;You may be prompted to accept the SSH fingerprint, choose "Yes" to accept and continue.</p>
<p><span class="full-image-block ssNonEditable"><img style="width: 450px;" src="http://www.savagehomeautomation.com/storage/post-images/raspberrypi/raspi-winscp-settings.png?__SQUARESPACE_CACHEVERSION=1379080272357" alt="" /></span></p>
<p>After successfully establishing a connection, select the drive and folder location in the left pane where you download the Oracle JDK file to on your local desktop system. &nbsp;In the right pane is the file system on the Raspberry Pi, we will leave it in it's default location in the "pi" user's home directory. &nbsp;Drag and drop the Oracle JDK file from the left pane to the right pane and WinSCP will start the file transfer process. &nbsp;You will be prompted with a transfer dialog, just click the "<strong>Copy</strong>" button to start the transfer. &nbsp;</p>
<p><span class="full-image-block ssNonEditable"><span><img style="width: 550px;" src="http://www.savagehomeautomation.com/storage/post-images/raspberrypi/jdk8b106_winscp.png?__SQUARESPACE_CACHEVERSION=1379083731032" alt="" /></span></span><br />When the file transfer is complete, you can close WinSCP (<em>or CyberDuck</em>).</p>
<h3>Installation Procedure on Raspberry Pi</h3>
<p>The remaining steps should be performed directly on the console of the Raspberry Pi or using a SSH terminal connection with shell access. &nbsp;In the last step, we transfered the Oracle JDK file to the "pi" user's home directory. &nbsp;We should be logged in as the "pi" user and already in the user's home directory.</p>
<p>Lets create a new directory where we will install the JDK files to.&nbsp;</p>
<pre>sudo mkdir -p -v /opt/java</pre>
<p>Next, lets unpack the Oracle JDK .gz file using this command:</p>
<pre>sudo tar xvzf ~/jdk-8-ea-b106-linux-arm-vfp-hflt-04_sep_2013.tar.gz -C /opt/java</pre>
<p><span class="full-image-block ssNonEditable"><span><img src="http://www.savagehomeautomation.com/storage/post-images/raspberrypi/jdk8b106_tar.png?__SQUARESPACE_CACHEVERSION=1379084009746" alt="" /></span></span>The unpacking process will take a few seconds to complete. &nbsp;It unpacks all the contents of the Oracle JDK gz file to a new directory named "jdk1.8.0" located in the "/opt/java" directory.</p>
<p>We can now delete the original .gz file as it is no longer needed&nbsp;</p>
<pre>rm ~/jdk-8-ea-b106-linux-arm-vfp-hflt-04_sep_2013.tar.gz</pre>
<p>To complete the JDK installation we need to let the system know there is a new JVM installed and where it is located. &nbsp;Use the following command to perform this task.</p>
<pre><span style="font-size: 90%;">sudo update-alternatives --install "/usr/bin/java" "java" "/opt/java/jdk1.8.0/bin/java" 1</span></pre>
<p>And finally we also need to tell the system that we want this JDK to be the default Java runtime for the system. The following command will perform this action.</p>
<pre>sudo update-alternatives --set java /opt/java/jdk1.8.0/bin/java</pre>
<p><span class="full-image-block ssNonEditable"><span><a href="javascript:showFullImage('/display/ShowImage?imageUrl=%2Fstorage%2Fpost-images%2Fraspberrypi%2Fraspi-jre-install-2.png%3F__SQUARESPACE_CACHEVERSION%3D1345096887183',129,816);"><img src="http://www.savagehomeautomation.com/storage/post-images/raspberrypi/jdk8b106_update_alternatives.png?__SQUARESPACE_CACHEVERSION=1379084178787" alt="" /></a></span></span></p>
<p>Now java is installed. &nbsp;To test and verify we can execute the java command using the version argument.</p>
<pre>java -version</pre>
<p>You should get the following response:</p>
<p><span class="full-image-block ssNonEditable"><span><img style="width: 430px;" src="http://www.savagehomeautomation.com/storage/post-images/raspberrypi/jdk8b106_version.png?__SQUARESPACE_CACHEVERSION=1379084259579" alt="" /></span></span></p>
<p>That's it the Oracle JDK is installed and ready for use.</p>
<h3>Add JAVA_HOME Environment Variable</h3>
<p>Some Java programs require a JAVA_HOME environment variable to be configured on the system. &nbsp;Add the following line to you "/etc/environment" using your favorite text editor.</p>
<pre>JAVA_HOME="/opt/java/jdk1.8.0"</pre>
<p><br />Also, edit your "~/.bashrc" file using this command</p>
<pre>nano ~/.bashrc</pre>
<p>and add the following two lines to the bottom of the file and save.</p>
<pre>export JAVA_HOME="/opt/java/jdk1.8.0"<br />export PATH=$PATH:$JAVA_HOME/bin&nbsp;</pre>
<p><br />Reboot or re-login to apply the export to your environment. &nbsp;</p>
<p>&nbsp;</p>
<p><span style="font-size: 80%;">* Raspberry Pi is a trademark of the Raspberry Pi foundation.<br /></span><span style="font-size: 80%;">* Oracle and Java are registered trademarks of Oracle.</span></p>
<p>&nbsp;</p>
<blockquote>
<p><span style="font-size: 12px;"><br />If you prefer to install the JDK7 release version, please see this page:<br /><a href="http://www.savagehomeautomation.com/raspi-jdk7">Install Oracle Java 7 SE Development Kit (JDK)</a><span>&nbsp;</span>&nbsp;</span></p>
</blockquote>]]></content:encoded></rss:item><rss:item rdf:about="http://www.savagehomeautomation.com/projects/raspberry-pi-installing-oracle-java-development-kit-jdk-7u40.html"><rss:title>Raspberry Pi - Installing Oracle Java Development Kit (JDK 7u40)</rss:title><rss:link>http://www.savagehomeautomation.com/projects/raspberry-pi-installing-oracle-java-development-kit-jdk-7u40.html</rss:link><dc:creator>Robert Savage</dc:creator><dc:date>2013-09-13T13:30:53Z</dc:date><dc:subject>Java Raspberry Pi Raspberry Pi java jdk jre jvm pi raspberry raspi</dc:subject><content:encoded><![CDATA[<blockquote>
<h3>UPDATE!</h3>
<p><span style="font-size: 12px;">The Oracle Java SE 7 JDK/JRE now comes pre-installed in Raspbian images!<br />See this post for more details: &nbsp;<a href="http://www.savagehomeautomation.com/projects/raspberry-pi-oracle-java-se-7-jdkjvm-now-pre-installed-on-ra.html">Oracle JDK/JVM Now Pre-Installed on Raspbian</a></span></p>
</blockquote>
<p><span class="ssNonEditable full-image-block"><img src="http://www.savagehomeautomation.com/storage/post-images/raspberrypi/raspi-banner680.png?__SQUARESPACE_CACHEVERSION=1344866873551" alt="" /></span></p>
<p style="text-align: left;">The Oracle JDK7 for ARM v6/7 (hard-float ABI) is now available! &nbsp;This article will provide the necessary instructions on how to install the Oracle Java Development Kit (JDK) on your Raspberry Pi. &nbsp;</p>
<p style="text-align: center;"><span class="thumbnail-image-inline ssNonEditable"><span><a href="javascript:showFullImage('/display/ShowImage?imageUrl=%2Fstorage%2Fpost-images%2Fraspberrypi%2Fraspi.jpg%3F__SQUARESPACE_CACHEVERSION%3D1344866408187',406,600);"><img style="width: 650px;" src="http://www.savagehomeautomation.com/storage/post-images/raspberrypi/piandcoffee.png?__SQUARESPACE_CACHEVERSION=1355877408472" alt="" /></a></span></span></p>
<h3>Prerequisites</h3>
<ul>
<li>Install and boot the Raspberry Pi using the Rasbian "Wheezy" (2013-07-26 <em>or newer</em>) image. &nbsp;</li>
<li><span style="font-size: 12px;">Enable the Raspberry Pi for SSH remote network connections. &nbsp;<br /></span><strong>Update</strong><span style="font-size: 12px;">: &nbsp;The Debian "Wheezy" image comes with SSH access enabled in the default image.</span></li>
<li><span style="font-size: 12px;">Get the Raspberry Pi's IP address.</span></li>
</ul>
<h3>Tools &amp; Downloads:</h3>
<p>All:</p>
<ul>
<li><a class="offsite-link-inline" href="http://downloads.raspberrypi.org/raspbian_latest" target="_blank">Raspberry Pi &nbsp;- Raspbian "Wheezy" image</a>&nbsp;(2013-09-10)</li>
<li><a class="offsite-link-inline" href="http://www.oracle.com/technetwork/java/javase/downloads/index.html" target="_blank">Oracle Java SE Development Kit</a>&nbsp;(Select <em>JDK Download</em>, then <span>Linux ARM v6/v7 VFP Hard Float ABI</span>&nbsp;- jdk-7u40-linux-arm-vfp-hflt.tar.gz)</li>
</ul>
<p>Windows:</p>
<ul>
<li><a class="offsite-link-inline" href="http://winscp.net/eng/download.php" target="_blank">WinSCP</a></li>
</ul>
<p>Mac-OSX:</p>
<ul>
<li><a class="offsite-link-inline" href="http://cyberduck.ch/" target="_blank">Cyberduck</a></li>
</ul>
<h3>Download the Oracle JDK for the Raspberry Pi</h3>
<p>You can download the Oracle Java SE Development Kit 7u40 on this page:<br /><a class="offsite-link-inline" href="http://www.oracle.com/technetwork/java/javase/downloads/index.html" target="_blank">http://www.oracle.com/technetwork/java/javase/downloads/index.html</a></p>
<p>First, select <em>JDK Download </em>button&nbsp;under JDK SE 7, then select the Linux ARM v6/v7 VFP Hard Float AB&nbsp;distribution (jdk-7u40-linux-arm-vfp-hflt.tar.gz).&nbsp;</p>
<p style="padding-left: 30px;"><span class="full-image-block ssNonEditable"><span><img style="width: 450px;" src="http://www.savagehomeautomation.com/storage/post-images/raspberrypi/jdk7u40.png?__SQUARESPACE_CACHEVERSION=1379079959717" alt="" /></span></span></p>
<h3>Transfer the Oracle JDK to the Raspberry Pi</h3>
<p>After downloading the Oracle JDK to you desktop computer, we need to transfer it over to the Raspberry Pi. &nbsp;We will use SCP to transfer the file over the network. &nbsp;If you are running on a Windows desktop, then download and install <a class="offsite-link-inline" href="http://winscp.net/eng/download.php" target="_blank">WinSCP</a>.</p>
<blockquote>
<p>&nbsp;If you are using Mac OSX, you can download and install <a class="offsite-link-inline" href="http://cyberduck.ch/" target="_blank">Cyberduck</a>. &nbsp;The screens will look different but the goals are the same.</p>
</blockquote>
<p>Create a new session in WinSCP using the IP address of you Raspberry Pi. &nbsp;The default authentication credentials for the Raspbian Wheezy image is username "<em>pi</em>" and password "<em>raspberry</em>". &nbsp;Save the session and then login. &nbsp;You may be prompted to accept the SSH fingerprint, choose "Yes" to accept and continue.</p>
<p><span class="full-image-block ssNonEditable"><span><img style="width: 450px;" src="http://www.savagehomeautomation.com/storage/post-images/raspberrypi/raspi-winscp-settings.png?__SQUARESPACE_CACHEVERSION=1379080272357" alt="" /></span></span></p>
<p>After successfully establishing a connection, select the drive and folder location in the left pane where you download the Oracle JDK file to on your local desktop system. &nbsp;In the right pane is the file system on the Raspberry Pi, we will leave it in it's default location in the "pi" user's home directory. &nbsp;Drag and drop the Oracle JDK file from the left pane to the right pane and WinSCP will start the file transfer process. &nbsp;You will be prompted with a transfer dialog, just click the "<strong>Copy</strong>" button to start the transfer. &nbsp;</p>
<p><span class="full-image-block ssNonEditable"><span><img style="width: 550px;" src="http://www.savagehomeautomation.com/storage/post-images/raspberrypi/jdk7u40_winscp.png?__SQUARESPACE_CACHEVERSION=1379080258040" alt="" /></span></span><br />When the file transfer is complete, you can close WinSCP (<em>or CyberDuck</em>).</p>
<h3>Installation Procedure on Raspberry Pi</h3>
<p>The remaining steps should be performed directly on the console of the Raspberry Pi or using a SSH terminal connection with shell access. &nbsp;In the last step, we transfered the Oracle JDK file to the "pi" user's home directory. &nbsp;We should be logged in as the "pi" user and already in the user's home directory.</p>
<p>Lets create a new directory where we will install the JDK files to.&nbsp;</p>
<pre>sudo mkdir -p -v /opt/java</pre>
<p>Next, lets unpack the Oracle JDK .gz file using this command:</p>
<pre>sudo tar xvzf ~/jdk-7u40-linux-arm-vfp-hflt.gz -C /opt/java</pre>
<p><span class="full-image-block ssNonEditable"><span><img style="width: 600px;" src="http://www.savagehomeautomation.com/storage/post-images/raspberrypi/jdk7u40_tar.png?__SQUARESPACE_CACHEVERSION=1379081383997" alt="" /></span></span>The unpacking process will take a few seconds to complete. &nbsp;It unpacks all the contents of the Oracle JDK gz file to a new directory named "jdk1.7.0_40" located in the "/opt/java" directory.</p>
<p>We can now delete the original .gz file as it is no longer needed&nbsp;</p>
<pre>rm ~/jdk-7u40-linux-arm-vfp-hflt.gz</pre>
<p>To complete the JDK installation we need to let the system know there is a new JVM installed and where it is located. &nbsp;Use the following command to perform this task.</p>
<pre><span style="font-size: 90%;">sudo update-alternatives --install "/usr/bin/java" "java" "/opt/java/jdk1.7.0_40/bin/java" 1</span></pre>
<p>And finally we also need to tell the system that we want this JDK to be the default Java runtime for the system. The following command will perform this action.</p>
<pre>sudo update-alternatives --set java /opt/java/jdk1.7.0_40/bin/java</pre>
<p><span class="full-image-block ssNonEditable"><span><a href="javascript:showFullImage('/display/ShowImage?imageUrl=%2Fstorage%2Fpost-images%2Fraspberrypi%2Fraspi-jre-install-2.png%3F__SQUARESPACE_CACHEVERSION%3D1345096887183',129,816);"><img style="width: 600px;" src="http://www.savagehomeautomation.com/storage/post-images/raspberrypi/jdk7u40_update_alternatives.png?__SQUARESPACE_CACHEVERSION=1379081497762" alt="" /></a></span></span></p>
<p>Now java is installed. &nbsp;To test and verify we can execute the java command using the version argument.</p>
<pre>java -version</pre>
<p>You should get the following response:</p>
<p><span class="full-image-block ssNonEditable"><span><img style="width: 420px;" src="http://www.savagehomeautomation.com/storage/post-images/raspberrypi/jdk7u40_version.png?__SQUARESPACE_CACHEVERSION=1379081572653" alt="" /></span></span></p>
<p>That's it the Oracle JDK is installed and ready for use.</p>
<h3>Add JAVA_HOME Environment Variable</h3>
<p>Some Java programs require a JAVA_HOME environment variable to be configured on the system. &nbsp;Add the following line to you "/etc/environment" using your favorite text editor.</p>
<pre>JAVA_HOME="/opt/java/jdk1.7.0_40"</pre>
<p><br />Also, edit your "~/.bashrc" file using this command</p>
<pre>nano ~/.bashrc</pre>
<p>and add the following two lines to the bottom of the file and save.</p>
<pre>export JAVA_HOME="/opt/java/jdk1.7.0_40"<br />export PATH=$PATH:$JAVA_HOME/bin&nbsp;</pre>
<p><br />Reboot or re-login to apply the export to your environment. &nbsp;</p>
<p>&nbsp;</p>
<p><span style="font-size: 80%;">* Raspberry Pi is a trademark of the Raspberry Pi foundation.<br /></span><span style="font-size: 80%;">* Oracle and Java are registered trademarks of Oracle.</span></p>
<p>&nbsp;</p>
<blockquote>
<p><span style="font-size: 12px;"><br />If you prefer to install the JDK8 developer preview/early access version, please see this page:<br /><a href="http://www.savagehomeautomation.com/raspi-jdk8">Install Oracle Java SE8 (Milestone 8) Developer Preview (JDK)</a></span></p>
</blockquote>]]></content:encoded></rss:item><rss:item rdf:about="http://www.savagehomeautomation.com/projects/raspberry-pi-pi4j-version-005-released.html"><rss:title>Raspberry Pi - Pi4J Version 0.0.5 Released!</rss:title><rss:link>http://www.savagehomeautomation.com/projects/raspberry-pi-pi4j-version-005-released.html</rss:link><dc:creator>Robert Savage</dc:creator><dc:date>2013-03-19T14:00:00Z</dc:date><dc:subject>Embedded Computing Java Pi4J Raspberry Pi Raspberry Pi java pi4j</dc:subject><content:encoded><![CDATA[Pi4J Version 0.0.5 is now released and it has been a stable build for quite some time.  Users of previous versions are encouraged to upgrade to this latest build.  This release includes a number of bug fixes (see below), new features, and added support for add-on accessory boards and GPIO expander chips.  This version also introduces a component abstraction layer where interfaces are defined for components such as Relays, Lights, Switches, and LCD displays.]]></content:encoded></rss:item><rss:item rdf:about="http://www.savagehomeautomation.com/projects/raspberry-pi-programming-pi-face-with-java-pi4j.html"><rss:title>Raspberry Pi - Programming Pi-Face with Java &amp; Pi4J</rss:title><rss:link>http://www.savagehomeautomation.com/projects/raspberry-pi-programming-pi-face-with-java-pi4j.html</rss:link><dc:creator>Robert Savage</dc:creator><dc:date>2013-02-25T13:25:30Z</dc:date><dc:subject>Embedded Computing Java Pi4J Raspberry Pi Raspberry Pi java pi pi-face pi4j piface raspberry raspi</dc:subject><content:encoded><![CDATA[<p>I just got my hands on a Pi-Face expansion board for my Raspberry Pi. &nbsp;I purchased mine direct from Newark and it arrived is less than a week. My first objective was to get this board integrated into the <a href="http://www.pi4j.com" target="_blank">Pi4J</a> project and fully working with Java on my Raspberry Pi. &nbsp;This article covers installing the Pi-Face board, setting up the SPI communication driver, and demonstrates programming the Pi-Face in Java. &nbsp;With the Pi-Face Java API interface now available in the Pi4J libraries (<em>in Pi4J version 0.0.5-SNAPSHOT and later</em>) this makes it a breeze to program and work with in your own Java program.</p>
<img src="http://www.savagehomeautomation.com/storage/thumbnails/13113340-22015128-thumbnail.jpg __SQUARESPACE_CACHEVERSION=1361749121306" alt="" />]]></content:encoded></rss:item><rss:item rdf:about="http://www.savagehomeautomation.com/projects/raspberry-pi-java-gpio-frequency-benchmarks.html"><rss:title>Raspberry Pi - Java GPIO Frequency Benchmarks</rss:title><rss:link>http://www.savagehomeautomation.com/projects/raspberry-pi-java-gpio-frequency-benchmarks.html</rss:link><dc:creator>Robert Savage</dc:creator><dc:date>2013-01-09T14:30:00Z</dc:date><dc:subject>Embedded Computing Java JavaFX Pi4J Raspberry Pi Raspberry Pi benchmarks frequency gpio java jdk performance pi pi4j raspberry raspi</dc:subject><content:encoded><![CDATA[In a previous article we covered Java runtime benchmarks using various JVMs.  Typical benchmark testing runs a series of varied task-based tests that attempt a wide array of coverage.  While these benchmark tests are great for generalized comparisons, I was curious how fast Java programs could update/write to the GPIO pins.  So this article is a very coarse-grained comparison on a single data point ... frequency of GPIO state changes.

Click the title to see the full article.]]></content:encoded></rss:item><rss:item rdf:about="http://www.savagehomeautomation.com/projects/raspberry-pi-install-a-momentary-reset-button.html"><rss:title>Raspberry Pi - Install a Momentary Reset Button</rss:title><rss:link>http://www.savagehomeautomation.com/projects/raspberry-pi-install-a-momentary-reset-button.html</rss:link><dc:creator>Robert Savage</dc:creator><dc:date>2013-01-07T09:05:07Z</dc:date><dc:subject>Embedded Computing Raspberry Pi Raspberry Pi button pi raspberry raspi reset</dc:subject><content:encoded><![CDATA[Inspired by a blog post by Alex on Raspi.tv (Thanks Alex!) on how to install a reset switch on the Raspberry Pi, I too wanted to install a reset switch on my Raspberry Pi.  The only significant difference is that I wanted to install an actual momentary push-button switch permanently on the Pi rather than header pins and an external pushbutton switch.  

This article provides a step-by-step set of instructions and photographs for installing a reset switch on the Raspberry Pi.  Please click the title to view the full article.]]></content:encoded></rss:item><rss:item rdf:about="http://www.savagehomeautomation.com/projects/raspberry-pi-stepper-motor-control-breakout-board.html"><rss:title>Raspberry Pi - Stepper Motor Control &amp; Breakout Board</rss:title><rss:link>http://www.savagehomeautomation.com/projects/raspberry-pi-stepper-motor-control-breakout-board.html</rss:link><dc:creator>Robert Savage</dc:creator><dc:date>2012-12-31T21:20:56Z</dc:date><dc:subject>Embedded Computing Java Pi4J Raspberry Pi Raspberry Pi java motor pi pi4j raspberry raspi stepper</dc:subject><content:encoded><![CDATA[<p><span class="full-image-block ssNonEditable"><img src="http://www.savagehomeautomation.com/storage/post-images/raspberrypi/raspi-banner680.png?__SQUARESPACE_CACHEVERSION=1344867662099" alt="" /></span></p>
<h3>Overview</h3>
<div>
<div>Many of the previous Raspberry Pi projects I had been working on were based on fairly simple GPIO logic to turn things on and off. &nbsp;Today I wanted a little more of a challenge so I started working to control a stepper motor from my Raspberry Pi using Java. &nbsp;Fortunately I had previously obtained one of John Jay's Stepper Motor Breakout Board kits which includes all the necessary components (including the stepper motor) to get started. &nbsp;</div>
<div></div>
<div></div>
<div><br /><span style="font-size: 90%;">The kit includes:</span></div>
<div>
<ul>
<li><span style="font-size: 90%;">1 @ printed circuit board</span></li>
<li><span style="font-size: 90%;">1 @&nbsp;ULN2803 8 Channel Darlington Driver IC (<a class="offsite-link-inline" href="http://www.adafruit.com/blog/2012/08/23/new-product-uln2803-8-channel-darlington-driver-solenoidunipolar-stepper-uln2803a/" target="_blank">Adafruit</a>)</span></li>
<li><span style="font-size: 90%;">1 @ 18 pin DIP socket (<a class="offsite-link-inline" href="http://www.amazon.com/exec/obidos/ASIN/B0079SLPIW/savagehomeaut-20" target="_blank">Amazon</a>)</span></li>
<li><span style="font-size: 90%;">8 @ green LEDs</span></li>
<li><span style="font-size: 90%;">1 @ Jumper and Jumper header</span></li>
<li><span style="font-size: 90%;">1 @ resistor array/network</span></li>
<li><span style="font-size: 90%;">1 @ capacitor</span></li>
<li><span style="font-size: 90%;">1 @ 26 pin PCB mount female header&nbsp;(not pictured)</span></li>
<li><span style="font-size: 90%;">1 @ peel-and-stick on rubber bumper &nbsp;(not pictured)&nbsp;</span></li>
<li><span style="font-size: 90%;">1 @ 28BYJ-48 5 VDC stepper motor&nbsp;(<a class="offsite-link-inline" href="http://www.amazon.com/exec/obidos/ASIN/B009ZB861K/savagehomeaut-20" target="_blank">Amazon</a> | <a class="offsite-link-inline" href="http://www.adafruit.com/products/858" target="_blank">Adafruit</a>)</span></li>
</ul>
</div>
<div></div>
<div>This kit is very easy to assemble and very reasonably priced. &nbsp;<br />It is available now on eBay. &lt;&lt;&nbsp;<a class="offsite-link-inline" href="http://www.ebay.com/itm/Raspberry-Pi-Stepper-breakout-board-with-stepper-motor-GPIO-/261147900179" target="_blank">Click here to see John Jay's eBay listings</a>&nbsp;&gt;&gt;&nbsp;</div>
<div>&nbsp;</div>
<div></div>
<div>
<h3>Assembly</h3>
</div>
<div></div>
<div>Please visit John's website for further instructions and photos on assembly:<br />&lt;&lt; <a class="offsite-link-inline" href="http://mypishop.com/Stepper.html" target="_blank">http://mypishop.com/Stepper.html</a>&nbsp;&gt;&gt;</div>
<div>&nbsp;</div>
<div></div>
<h3>Shopping List</h3>
<div>
<div>
<ul>
<li>1 @&nbsp;<a class="offsite-link-inline" href="http://www.raspberrypi.org/" target="_blank">Raspberry Pi</a>&nbsp; (<em><a href="http://www.savagehomeautomation.com/projects/raspberry-pi-shopping-list.html">see this page for more Raspberry Pi related supplies</a></em>)</li>
<li>1 @&nbsp;<a class="offsite-link-inline" href="http://www.ebay.com/itm/Raspberry-Pi-Stepper-breakout-board-with-stepper-motor-GPIO-/261147900179" target="_blank">John Jay's Stepper Motor Breakout Board (kit)</a>&nbsp;(<em>includes stepper motor</em>)</li>
</ul>
</div>
<h3>Logic</h3>
</div>
<p><span class="full-image-float-right ssNonEditable"><span><img style="width: 280px;" src="http://www.savagehomeautomation.com/storage/post-images/jj-stepper/figure1-stepper-motor.png?__SQUARESPACE_CACHEVERSION=1356982584656" alt="" /></span></span>The stepper motor is controlled by pulsing the GPIO pins from LOW to HIGH states in a sequence that causes the motor to spin. &nbsp;Each time a GPIO pin state is HIGH an electromagnet is engaged inside the stepper motor to cause a rotational force on the center rotor.&nbsp;With the proper sequence and timing you achieve motor rotation.&nbsp;</p>
<p>Here is a fantastic article with photos and illustrations to help learn more about stepper motors and stepping techniquest:<br /><a class="offsite-link-inline" href="http://www.lirtex.com/robotics/stepper-motor-controller-circuit/" target="_blank">http://www.lirtex.com/robotics/stepper-motor-controller-circuit/</a></p>
<h3>Photos</h3>
<p>Below are photos of the assembled board and attached stepper motor.</p>
<p><span class="full-image-float-left ssNonEditable"><a href="javascript:showFullImage('/display/ShowImage?imageUrl=%2Fstorage%2Fpost-images%2Fjj-stepper%2Fstepper-board-1.jpg%3F__SQUARESPACE_CACHEVERSION%3D1356936730877',1391,1281);"><img style="width: 166px;" src="http://www.savagehomeautomation.com/storage/thumbnails/13113340-21396647-thumbnail.jpg?__SQUARESPACE_CACHEVERSION=1356937860957" alt="" /></a></span><span class="full-image-float-left ssNonEditable"><a href="javascript:showFullImage('/display/ShowImage?imageUrl=%2Fstorage%2Fpost-images%2Fjj-stepper%2Fstepper-board-4.jpg%3F__SQUARESPACE_CACHEVERSION%3D1356937055289',856,1084);"><img style="width: 228px;" src="http://www.savagehomeautomation.com/storage/thumbnails/13113340-21396659-thumbnail.jpg?__SQUARESPACE_CACHEVERSION=1356937842817" alt="" /></a></span></p>
<p><span class="thumbnail-image-block ssNonEditable"><a href="javascript:showFullImage('/display/ShowImage?imageUrl=%2Fstorage%2Fpost-images%2Fjj-stepper%2Fstepper-board-7.jpg%3F__SQUARESPACE_CACHEVERSION%3D1356937770227',1000,1361);"><img style="width: 244px;" src="http://www.savagehomeautomation.com/storage/thumbnails/13113340-21396682-thumbnail.jpg?__SQUARESPACE_CACHEVERSION=1356937868147" alt="" /></a></span></p>
<p><span class="full-image-float-left ssNonEditable"><a href="javascript:showFullImage('/display/ShowImage?imageUrl=%2Fstorage%2Fpost-images%2Fjj-stepper%2Fstepper-board-5.jpg%3F__SQUARESPACE_CACHEVERSION%3D1356937241955',845,1030);"><img style="width: 250px;" src="http://www.savagehomeautomation.com/storage/thumbnails/13113340-21396663-thumbnail.jpg?__SQUARESPACE_CACHEVERSION=1356937491818" alt="" /></a></span></p>
<p><span class="thumbnail-image-block ssNonEditable"><a href="javascript:showFullImage('/display/ShowImage?imageUrl=%2Fstorage%2Fpost-images%2Fjj-stepper%2Fstepper-board-6.jpg%3F__SQUARESPACE_CACHEVERSION%3D1356937412801',721,1380);"><img style="width: 392px;" src="http://www.savagehomeautomation.com/storage/thumbnails/13113340-21396672-thumbnail.jpg?__SQUARESPACE_CACHEVERSION=1356937505191" alt="" /></a></span></p>
<h3>Stepper Motor Ports</h3>
<p>This breakout board includes two ports for controlling two separate stepper motors.</p>
<p style="text-align: left;"><span class="full-image-float-left ssNonEditable"><a href="javascript:showFullImage('/display/ShowImage?imageUrl=%2Fstorage%2Fpost-images%2Fjj-stepper%2Fstepper-board-3.png%3F__SQUARESPACE_CACHEVERSION%3D1356936123158',909,806);"><img style="width: 280px;" src="http://www.savagehomeautomation.com/storage/thumbnails/13113340-21396608-thumbnail.jpg?__SQUARESPACE_CACHEVERSION=1356937983843" alt="" /></a></span></p>
<div></div>
<p>&nbsp;</p>
<p>&nbsp;</p>
<p>&nbsp;</p>
<blockquote>
<p><em>You can purchase an additional stepper motor to use on the second port here:</em></p>
<p><span>28BYJ-48 5 VDC stepper motor&nbsp;(</span><a class="offsite-link-inline" href="http://www.amazon.com/exec/obidos/ASIN/B009ZB861K/savagehomeaut-20" target="_blank">Amazon</a><span>&nbsp;|&nbsp;</span><a class="offsite-link-inline" href="http://www.adafruit.com/products/858" target="_blank">Adafruit</a><span>)</span>&nbsp;</p>
</blockquote>
<p>&nbsp;</p>
<p>&nbsp;</p>
<p>&nbsp;</p>
<h3>GPIO Wiring Diagram</h3>
<p>The two stepper motor controllers are mapped to GPIO pins on the Raspberry Pi's&nbsp;P1 header as depicted in the diagram below. &nbsp;The GPIO numbering in the diagrams below is based on the WiringPi &nbsp;/ Pi4J numbering scheme. &nbsp;See below for a mapping chart for other numbering schemes.&nbsp;</p>
<ul>
<li>GPIO Pins 0 to 3 are mapped to the X1 motor controller port (LEFT).</li>
<li>GPIO Pins 4 to 7 are mapped to the X2 motor controller port (RIGHT).</li>
</ul>
<p><span class="full-image-block ssNonEditable"><a href="javascript:showFullImage('/display/ShowImage?imageUrl=%2Fstorage%2Fpost-images%2Fjj-stepper%2FJJStepperMotorBreakoutBoardPinNumbering.png%3F__SQUARESPACE_CACHEVERSION%3D1356933155577',929,1323);"><img src="http://www.savagehomeautomation.com/storage/thumbnails/13113340-21396381-thumbnail.jpg?__SQUARESPACE_CACHEVERSION=1356933158095" alt="" /></a></span></p>
<h3>GPIO Pin Cross-Reference Chart</h3>
<p>Below is a cross reference chart to better help define the GPIO pin numbers used under the various pin numbering schemes.</p>
<p style="text-align: center;"><span class="thumbnail-image-block ssNonEditable"><a href="javascript:showFullImage('/display/ShowImage?imageUrl=%2Fstorage%2Fpost-images%2Fjj-stepper%2Fjjstepper-pinmap.png%3F__SQUARESPACE_CACHEVERSION%3D1356933791511',243,730);"><img style="width: 550px;" src="http://www.savagehomeautomation.com/storage/thumbnails/13113340-21396419-thumbnail.jpg?__SQUARESPACE_CACHEVERSION=1356933994345" alt="" /></a></span></p>
<div></div>
<h3>JP1 Jumper Information</h3>
<p>A jumper is provided on the board to supply 5 VDC to the stepper motors directly from the 5 VDC output from the Raspberry Pi. &nbsp;If you would prefer to provide 5 VDC from an external power supply, please remove the jumper from JP1 and connect your power source to JP1 pins 2 and 3. &nbsp;See the diagrams below.</p>
<p style="text-align: center;"><br /><span class="thumbnail-image-block ssNonEditable"><a href="javascript:showFullImage('/display/ShowImage?imageUrl=%2Fstorage%2Fpost-images%2Fjj-stepper%2Fstepper-board-jp1.png%3F__SQUARESPACE_CACHEVERSION%3D1356935188487',952,1528);"><img src="http://www.savagehomeautomation.com/storage/thumbnails/13113340-21396529-thumbnail.jpg?__SQUARESPACE_CACHEVERSION=1356935188488" alt="" /></a></span></p>
<p style="text-align: left;">Make sure that you place the jumper between&nbsp;pins 1 and 2. &nbsp;</p>
<p style="text-align: center;"><span class="full-image-block ssNonEditable"><img style="width: 400px;" src="http://www.savagehomeautomation.com/storage/post-images/jj-stepper/stepper-board-jp1-correct.png?__SQUARESPACE_CACHEVERSION=1356935575944" alt="" /></span></p>
<blockquote>
<p style="text-align: left;"><strong>ATTENTION !</strong></p>
<p style="text-align: left;">Never attach JP1 pins 1 and 3 together as this will cause a direct short on the 5 VDC power line from the Raspberry Pi. &nbsp;This would likely render the Pi defective. &nbsp;&nbsp;</p>
</blockquote>
<h3>Java Sample Program using Pi4J to Control Stepper Motor</h3>
<p>Below is a sample Java program for controlling the stepper motor. &nbsp;The <a class="offsite-link-inline" href="http://www.pi4j.com" target="_blank">Pi4J</a> project now includes a new stepper motor interface and component implementation for GPIO based stepper motors. &nbsp;This makes it really simple to control a stepper motor from Java. &nbsp;(Note that the stepper motor implementation is available in 0.0.5 and later versions of Pi4J.)</p>
<p>The source for this example is provided with the Pi4J installation package and can also be found on Github:</p>
<ul>
<li>&lt;&lt;&nbsp;<a class="offsite-link-inline" href="https://github.com/Pi4J/pi4j/blob/develop/pi4j-example/src/main/java/StepperMotorGpioExample.java" target="_blank">Click here to view source on Github</a>&nbsp;&nbsp;&gt;&gt;</li>
</ul>
<p><iframe src="http://pastebin.com/embed_iframe.php?i=LRqWTbPq" style="border:1px solid black;width:660px; height:500px;"></iframe></p>
<h3>Final Thoughts</h3>
<p>This was my first time working with a stepper motor and having this kit certainly made it much easier to understand and get started. &nbsp;For me the timing was the trickiest thing to get right. &nbsp;Fortunately with a little trial and error I was able to get it working. &nbsp;Here is a quick video demonstrating the final working project.</p>
<p><iframe width="640" height="360" src="http://www.youtube-nocookie.com/embed/38w_PcPo8Tk" frameborder="0" allowfullscreen></iframe></p>
<p><strong>Happy New Year!</strong></p>
<p>&nbsp;</p>
</div>]]></content:encoded></rss:item><rss:item rdf:about="http://www.savagehomeautomation.com/projects/raspberry-pi-installing-the-airlink-101-wireless-n-150-ultra.html"><rss:title>Raspberry Pi - Installing the Airlink 101 Wireless N 150 Ultra Mini-USB Adapter (AWLL5099)</rss:title><rss:link>http://www.savagehomeautomation.com/projects/raspberry-pi-installing-the-airlink-101-wireless-n-150-ultra.html</rss:link><dc:creator>Robert Savage</dc:creator><dc:date>2012-12-29T07:02:29Z</dc:date><dc:subject>802.11 Embedded Computing Raspberry Pi Raspberry Pi adapter network raspberry raspi wifi wifipi wireless</dc:subject><content:encoded><![CDATA[<p><img src="http://www.savagehomeautomation.com/storage/post-images/raspberrypi/raspi-banner680.png?__SQUARESPACE_CACHEVERSION=1347431055301" alt="" /></p>
<p><span class="full-image-float-right ssNonEditable"><span><a href="javascript:showFullImage('/display/ShowImage?imageUrl=%2Fstorage%2Fpost-images%2Fraspberrypi%2Fedimax.jpg%3F__SQUARESPACE_CACHEVERSION%3D1350763514144',300,300);"><img style="width: 190px;" src="http://www.savagehomeautomation.com/storage/post-images/raspberrypi/airlink.jpg?__SQUARESPACE_CACHEVERSION=1356822288855" alt="" /></a></span></span>The <a class="offsite-link-inline" href="http://www.amazon.com/exec/obidos/ASIN/B006ZZUK5Y/savagehomeaut-20" target="_blank">Airlink 101 Wireless N 150 Ultra Mini-USB Adapter</a>&nbsp;is another low-cost wireless network adapter for use with the Raspberry Pi. &nbsp;Here is what this little adapter has going for it: &nbsp;</p>
<ul>
<li>It is on the <a class="offsite-link-inline" href="http://elinux.org/RPi_VerifiedPeripherals#Working_USB_Wifi_Adapters" target="_blank">approved list</a> of known working peripherals. <span class="full-image-inline ssNonEditable"><img src="http://www.savagehomeautomation.com/storage/post-images/raspberrypi/raspiicon.png?__SQUARESPACE_CACHEVERSION=1350773176405" alt="" /><img src="http://www.savagehomeautomation.com/storage/post-images/raspberrypi/raspiicon.png?__SQUARESPACE_CACHEVERSION=1350773176405" alt="" /><img src="http://www.savagehomeautomation.com/storage/post-images/raspberrypi/raspiicon.png?__SQUARESPACE_CACHEVERSION=1350773176405" alt="" /></span></li>
<li>Works directly attached to the Raspberry Pi USB port.&nbsp;<span class="full-image-inline ssNonEditable"><img src="http://www.savagehomeautomation.com/storage/post-images/raspberrypi/raspiicon.png?__SQUARESPACE_CACHEVERSION=1350773176405" alt="" /><img src="http://www.savagehomeautomation.com/storage/post-images/raspberrypi/raspiicon.png?__SQUARESPACE_CACHEVERSION=1350773176405" alt="" /><img src="http://www.savagehomeautomation.com/storage/post-images/raspberrypi/raspiicon.png?__SQUARESPACE_CACHEVERSION=1350773176405" alt="" /><br /></span><em>(Some network adapters used with the Pi require an external USB powered hub)</em>&nbsp;</li>
<li>The latest Raspbian distributions come with the driver for this adapter pre-installed. &nbsp;<span class="full-image-inline ssNonEditable"><img src="http://www.savagehomeautomation.com/storage/post-images/raspberrypi/raspiicon.png?__SQUARESPACE_CACHEVERSION=1350773176405" alt="" /><img src="http://www.savagehomeautomation.com/storage/post-images/raspberrypi/raspiicon.png?__SQUARESPACE_CACHEVERSION=1350773176405" alt="" /><img src="http://www.savagehomeautomation.com/storage/post-images/raspberrypi/raspiicon.png?__SQUARESPACE_CACHEVERSION=1350773176405" alt="" /></span></li>
<li>It's tiny! &nbsp;It does not block access to the second USB port on the Raspberry Pi (<em>Model B</em>). &nbsp;<span class="full-image-inline ssNonEditable"><img src="http://www.savagehomeautomation.com/storage/post-images/raspberrypi/raspiicon.png?__SQUARESPACE_CACHEVERSION=1350773176405" alt="" /><img src="http://www.savagehomeautomation.com/storage/post-images/raspberrypi/raspiicon.png?__SQUARESPACE_CACHEVERSION=1350773176405" alt="" /></span></li>
<li>Supports 150 Mbps 802.11n &nbsp;<span class="full-image-inline ssNonEditable"><img src="http://www.savagehomeautomation.com/storage/post-images/raspberrypi/raspiicon.png?__SQUARESPACE_CACHEVERSION=1350773176405" alt="" /></span></li>
<li>Backward compatible with 802.11b/g &nbsp;<span class="full-image-inline ssNonEditable"><img src="http://www.savagehomeautomation.com/storage/post-images/raspberrypi/raspiicon.png?__SQUARESPACE_CACHEVERSION=1350773176405" alt="" /></span></li>
<li>Internal chip antenna &nbsp;<span class="full-image-inline ssNonEditable"><img src="http://www.savagehomeautomation.com/storage/post-images/raspberrypi/raspiicon.png?__SQUARESPACE_CACHEVERSION=1350773176405" alt="" /></span></li>
<li>Affordable / Reasonably priced at $9.49 USD (<a class="offsite-link-inline" href="http://www.amazon.com/exec/obidos/ASIN/B006ZZUK5Y/savagehomeaut-20" target="_blank">Buy it here</a>)&nbsp;<span class="full-image-inline ssNonEditable"><img src="http://www.savagehomeautomation.com/storage/post-images/raspberrypi/raspiicon.png?__SQUARESPACE_CACHEVERSION=1350773176405" alt="" /><img src="http://www.savagehomeautomation.com/storage/post-images/raspberrypi/raspiicon.png?__SQUARESPACE_CACHEVERSION=1350773176405" alt="" /><img src="http://www.savagehomeautomation.com/storage/post-images/raspberrypi/raspiicon.png?__SQUARESPACE_CACHEVERSION=1350773176405" alt="" /></span></li>
</ul>
<h3>Shopping List</h3>
<ul>
<li>1 @&nbsp;<a class="offsite-link-inline" href="http://www.raspberrypi.org/" target="_blank">Raspberry Pi</a>&nbsp; (<em><a href="http://www.savagehomeautomation.com/projects/raspberry-pi-shopping-list.html">see this page for more Raspberry Pi related supplies</a></em>)</li>
<li>1 @&nbsp;<a class="offsite-link-inline" href="http://www.amazon.com/exec/obidos/ASIN/B006ZZUK5Y/savagehomeaut-20" target="_blank">Airlink 101 Wireless N 150 Ultra Mini-USB Adapter</a></li>
</ul>
<h3>Photos</h3>
<p>(Click photo to enlarge.)</p>
<p><br /><span class="full-image-float-left ssNonEditable"><span><a href="javascript:showFullImage('/display/ShowImage?imageUrl=%2Fstorage%2Fpost-images%2Fraspberrypi%2Fairlink101-photo-2.jpg%3F__SQUARESPACE_CACHEVERSION%3D1356770512920',1224,1632);"><img src="http://www.savagehomeautomation.com/storage/thumbnails/13113340-21378934-thumbnail.jpg?__SQUARESPACE_CACHEVERSION=1356770520202" alt="" /></a></span></span><span class="full-image-block ssNonEditable"><span><a href="javascript:showFullImage('/display/ShowImage?imageUrl=%2Fstorage%2Fpost-images%2Fraspberrypi%2Fairlink101-photo-1.jpg%3F__SQUARESPACE_CACHEVERSION%3D1356770549291',1224,1632);"><img src="http://www.savagehomeautomation.com/storage/thumbnails/13113340-21378941-thumbnail.jpg?__SQUARESPACE_CACHEVERSION=1356770551154" alt="" /></a></span></span></p>
<p><span class="full-image-float-left ssNonEditable"><span><a href="javascript:showFullImage('/display/ShowImage?imageUrl=%2Fstorage%2Fpost-images%2Fraspberrypi%2Fairlink101-photo-3.jpg%3F__SQUARESPACE_CACHEVERSION%3D1356771603411',1632,1224);"><img src="http://www.savagehomeautomation.com/storage/thumbnails/13113340-21378980-thumbnail.jpg?__SQUARESPACE_CACHEVERSION=1356771609549" alt="" /></a></span></span><span class="full-image-inline ssNonEditable"><span><a href="javascript:showFullImage('/display/ShowImage?imageUrl=%2Fstorage%2Fpost-images%2Fraspberrypi%2Fairlink101-photo-4.jpg%3F__SQUARESPACE_CACHEVERSION%3D1356771631990',1632,1224);"><img src="http://www.savagehomeautomation.com/storage/thumbnails/13113340-21378983-thumbnail.jpg?__SQUARESPACE_CACHEVERSION=1356771634981" alt="" /></a></span></span></p>
<p><span class="full-image-inline ssNonEditable"><span><br /></span></span></p>
<h3>Packaging / Specs</h3>
<p>(Click image to enlarge.)</p>
<p><span class="full-image-float-left ssNonEditable"><span><a href="javascript:showFullImage('/display/ShowImage?imageUrl=%2Fstorage%2Fpost-images%2Fraspberrypi%2Fairlink-package-1.jpg%3F__SQUARESPACE_CACHEVERSION%3D1356799671066',1770,1454);"><img src="http://www.savagehomeautomation.com/storage/thumbnails/13113340-21380000-thumbnail.jpg?__SQUARESPACE_CACHEVERSION=1356799674883" alt="" /></a></span></span><span class="full-image-block ssNonEditable"><span><a href="javascript:showFullImage('/display/ShowImage?imageUrl=%2Fstorage%2Fpost-images%2Fraspberrypi%2Fairlink-package-2.jpg%3F__SQUARESPACE_CACHEVERSION%3D1356799884041',1772,1464);"><img src="http://www.savagehomeautomation.com/storage/thumbnails/13113340-21380012-thumbnail.jpg?__SQUARESPACE_CACHEVERSION=1356799885904" alt="" /></a></span></span></p>
<div></div>
<h3>Installation</h3>
<p>The latest Raspian distribution (<a class="offsite-link-inline" href="http://www.raspberrypi.org/downloads" target="_blank">Raspbian &ldquo;wheezy&rdquo; 2012-12-16</a>) already includes the drivers for this adapter pre-installed. &nbsp;This greatly simplifies the installation. &nbsp;(If you are using a different distribution or an older distribution you may have to install the Linux driver for the Realtek RTL8192CU driver.)</p>
<p>Insert the Airlink 101 USB adapter into your Raspberry Pi's USB port. &nbsp; Next, lets make sure that the Raspberry Pi recognizes the device. &nbsp;Use the following command to verify that the Pi "sees" the Airlink 101 WiFi adapter.</p>
<pre>lsusb</pre>
<p><span class="full-image-block ssNonEditable"><span><img src="http://www.savagehomeautomation.com/storage/post-images/raspberrypi/airlink101-lsusb.png?__SQUARESPACE_CACHEVERSION=1356769077954" alt="" /></span></span></p>
<p>You should see the <em>RealTek RTL8188CUS 802.11n WLAN Adapter</em> device listed in the output. &nbsp;This is the chipset used by the Airlink 101 adapter.</p>
<p><br />Now that we have verified that the Airlink 101 adapter is recognized, lets check to make sure the kernel driver is loaded. &nbsp;Use the following command to list the kernel modules:</p>
<pre>lsmod</pre>
<p><span class="full-image-block ssNonEditable"><img src="http://www.savagehomeautomation.com/storage/post-images/raspberrypi/edimax-lsmod.png?__SQUARESPACE_CACHEVERSION=1350767388976" alt="" /></span></p>
<p>You should see the "8192cu" kernel module loaded. &nbsp;If not, try removing and re-inserting the Airlink 101 USB adapter.&nbsp;</p>
<p><br />As a final validation check to make sure that the Airlink 101 adapter is ready to use, send the "iwconfig" command to display a listing of the current wireless network configuration.&nbsp;</p>
<pre>iwconfig</pre>
<p><span class="full-image-block ssNonEditable"><img src="http://www.savagehomeautomation.com/storage/post-images/raspberrypi/edimax-iwconfig.png?__SQUARESPACE_CACHEVERSION=1350768388291" alt="" /></span></p>
<p>We are just looking to ensure that the "wlan0" adapter is present.</p>
<p>Now we are ready to move on to the configuration steps.</p>
<h3>Configuration</h3>
<div></div>
<p>One you have installed the adapter, verified the kernel driver is loaded, and confirmed that a wireless network interface ("wlan0") is available, you will need to configure the wireless connection settings to securely connect to your wireless network.</p>
<p>First, let's open the network interfaces configuration file for editing using the following command:</p>
<pre>sudo nano /etc/network/interfaces</pre>
<p>Make sure the following lines are added to (<em>or un-commented in</em>) your file</p>
<pre>auto wlan0
allow-hotplug wlan0<br />iface wlan0 inet manual
wpa-roam /etc/wpa_supplicant/wpa_supplicant.conf</pre>
<p><span class="full-image-block ssNonEditable"><span><img src="http://www.savagehomeautomation.com/storage/post-images/raspberrypi/edimax-interfaces.png?__SQUARESPACE_CACHEVERSION=1350798565422" alt="" /></span></span>&nbsp;</p>
<p>After modifying the network interface configuration file, we need to create the wireless configuration file.  Use the following command to create (or edit) this file.</p>
<pre>sudo nano /etc/wpa_supplicant/wpa_supplicant.conf</pre>
<p>Add the following data to this wireless configuration file. (Replace the "_SSID_" and "_WPA_SHARED_KEY_" text with your actual SSID and WPA key values.)</p>
<pre>network={
ssid="_SSID_"
proto=RSN
key_mgmt=WPA-PSK
pairwise=CCMP TKIP
group=CCMP TKIP
psk="_WPA_SHARED_KEY_"
}</pre>
<p>(<em>Note: &nbsp;This configuration is intended for WPA protected wireless networks.</em>)<span class="full-image-block ssNonEditable"><span><img src="http://www.savagehomeautomation.com/storage/post-images/raspberrypi/edimax-wpa.png?__SQUARESPACE_CACHEVERSION=1350798747292" alt="" /></span></span></p>
<p><br />Once the configuration files are complete, use the following command to restart the wireless adapter / interface.</p>
<pre>sudo ifup wlan0</pre>
<p>This command will restart the network interface and use the newly defined interface and wireless settings to establish a wireless network connection. &nbsp;Assuming the configuration is correct, the wlan0 interface should connect and acquire an IP address.</p>
<p><span class="full-image-block ssNonEditable"><img src="http://www.savagehomeautomation.com/storage/post-images/raspberrypi/edimax-ifup.png?__SQUARESPACE_CACHEVERSION=1350770232825" alt="" /></span></p>
<p>&nbsp;</p>
<p>For connection verification and an alternate way to see your assigned IP address, use the following command to list the network configuration:</p>
<pre>ifconfig wlan0</pre>
<p><span class="full-image-block ssNonEditable"><img src="http://www.savagehomeautomation.com/storage/post-images/raspberrypi/edimax-ifconfig.png?__SQUARESPACE_CACHEVERSION=1350770542112" alt="" /></span></p>
<p>If you have any trouble getting connected using the "ifup" command, verify your wireless connection settings and reboot your Raspberry Pi. &nbsp;If you have the Raspberry Pi connected to a display you can watch the Pi attempt the connection during startup. &nbsp;</p>
<p>That's it, hopefully you now have a <strong>WiFiPi</strong>.</p>
<p><span style="font-size: 80%;">*&nbsp;Raspberry Pi is a trademark of the Raspberry Pi foundation.</span></p>
<blockquote>
<p style="padding-top: 8px;"><span class="thumbnail-image-float-left ssNonEditable"><span><a href="javascript:showFullImage('/display/ShowImage?imageUrl=%2Fstorage%2Fpost-images%2Fraspberrypi%2Fedimax.jpg%3F__SQUARESPACE_CACHEVERSION%3D1356772494225',300,300);"><img style="width: 50px;" src="http://www.savagehomeautomation.com/storage/thumbnails/13113340-20695911-thumbnail.jpg?__SQUARESPACE_CACHEVERSION=1356772665657" alt="" /></a></span></span>Also check out the installation instructions for installing and configuring the</p>
<p><strong>&gt;&gt;&nbsp;<a href="http://www.savagehomeautomation.com/raspi-edimax-ew-7811un">Edimax EW-7811Un 150 Mbps Wireless 802.11bgn USB Adapter</a></strong></p>
</blockquote>
<blockquote>
<div style="padding-top: 8px;">The following article is an excellent resource describing many different wireless network configurations for Debian based distributions:&nbsp;</div>
<div>
<ul>
<li><a class="offsite-link-inline" href="http://wiki.debian.org/WiFi/HowToUse" target="_blank">Debian : How to use a WiFi interface</a></li>
</ul>
</div>
</blockquote>]]></content:encoded></rss:item><rss:item rdf:about="http://www.savagehomeautomation.com/projects/raspberry-pi-sb-clear-raspberry-pi-enclosure.html"><rss:title>Raspberry Pi - SB Clear Raspberry Pi Enclosure</rss:title><rss:link>http://www.savagehomeautomation.com/projects/raspberry-pi-sb-clear-raspberry-pi-enclosure.html</rss:link><dc:creator>Robert Savage</dc:creator><dc:date>2012-12-19T06:56:23Z</dc:date><dc:subject>Embedded Computing Raspberry Pi Raspberry Pi case enclosure pi raspberry</dc:subject><content:encoded><![CDATA[<p><span class="ssNonEditable full-image-block"><img src="http://www.savagehomeautomation.com/storage/post-images/raspberrypi/raspi-banner680.png?__SQUARESPACE_CACHEVERSION=1344866873551" alt="" /></span></p>
<p style="text-align: left;"><span class="thumbnail-image-float-right ssNonEditable"><span><a href="javascript:showFullImage('/display/ShowImage?imageUrl=%2Fstorage%2Fpost-images%2Fraspi-case%2Fcase-enclosed-8.jpg%3F__SQUARESPACE_CACHEVERSION%3D1355900342941',991,986);"><img src="http://www.savagehomeautomation.com/storage/thumbnails/13113340-21308115-thumbnail.jpg?__SQUARESPACE_CACHEVERSION=1355900438144" alt="" /></a></span><span class="thumbnail-caption" style="width: 302px;">(click image to enlarge)</span></span></p>
<p style="text-align: left;">I picked up a new Raspberry Pi case a few days ago from Amazon and was impressed so much that I decided to write this review article.</p>
<ul>
<li><strong><a class="offsite-link-inline" href="http://www.amazon.com/exec/obidos/ASIN/B008TCUXLW/savagehomeaut-20" target="_blank">SB Clear Raspberry Pi Enclosure</a></strong></li>
</ul>
<p><strong>PROS</strong></p>
<ul>
<li>Clear / See-Thru</li>
<li>Great Looking</li>
<li>Lightweight</li>
<li>Compact</li>
<li>Slot for GPIO 26P ribbon cable (P1 header)</li>
<li>Access to all onboard headers / connectors / ports</li>
<li>Easy disassembly for access to hardware if needed</li>
<li>Minimal assembly required</li>
<li>Available in multiple colors</li>
<li>Screw "+" slots on bottom for mounting solution</li>
<li>Ventilation slots on bottom&nbsp;</li>
</ul>
<p><strong>CONS</strong></p>
<ul>
<li>The plastic seems potentially brittle whereby constant opening and reassembly of the hard plastic shell may end up breaking the retention clips. &nbsp;(I have reopened mine a number of times and no issues yet.)</li>
<li>The price at $19.95 is a bit high, but with Amazon Prime free shipping on this item, that offsets the costs back into the appropriate range. &nbsp;(<em>NOTE: &nbsp;This case is also available (and cheaper, but shipping costs apply) on eBay, <a class="offsite-link-inline" href="https://www.sparkfun.com/products/11623" target="_blank">SparkFun</a> and <a class="offsite-link-inline" href="https://www.adafruit.com/products/1140" target="_blank">Adafruit</a>.)</em></li>
</ul>
<p>I really do like this case overall and think it is my personal favorite so far. &nbsp;It is very compact and will make an excellent travel case for my Pi on the go. &nbsp;&nbsp;</p>
<p>You can purchase this case via the link below directly on Amazon:</p>
<ul>
<li><a class="offsite-link-inline" href="http://www.amazon.com/exec/obidos/ASIN/B008TCUXLW/savagehomeaut-20" target="_blank">SB Clear Raspberry Pi Enclosure&nbsp;</a></li>
</ul>
<p><strong><a class="offsite-link-inline" href="http://www.amazon.com/exec/obidos/ASIN/B008TCUXLW/savagehomeaut-20" target="_blank"></a></strong>Here are additional photos. &nbsp;Click any of the images to enlarge hi-resolution photo.</p>
<p><span class="thumbnail-image-float-left ssNonEditable"><span><a href="javascript:showFullImage('/display/ShowImage?imageUrl=%2Fstorage%2Fpost-images%2Fraspi-case%2Fcase-bare-1.jpg%3F__SQUARESPACE_CACHEVERSION%3D1355902054750',996,1609);"><img src="http://www.savagehomeautomation.com/storage/thumbnails/13113340-21308099-thumbnail.jpg?__SQUARESPACE_CACHEVERSION=1355902054751" alt="" /></a></span></span><span class="thumbnail-image-block ssNonEditable"><span><a href="javascript:showFullImage('/display/ShowImage?imageUrl=%2Fstorage%2Fpost-images%2Fraspi-case%2Fcase-bare-2.jpg%3F__SQUARESPACE_CACHEVERSION%3D1355902099337',643,1431);"><img style="width: 273px;" src="http://www.savagehomeautomation.com/storage/thumbnails/13113340-21308107-thumbnail.jpg?__SQUARESPACE_CACHEVERSION=1355902129032" alt="" /></a></span></span></p>
<p><br /><span class="thumbnail-image-float-left ssNonEditable"><span><a href="javascript:showFullImage('/display/ShowImage?imageUrl=%2Fstorage%2Fpost-images%2Fraspi-case%2Fcase-bare-3.jpg%3F__SQUARESPACE_CACHEVERSION%3D1355902187367',775,1632);"><img src="http://www.savagehomeautomation.com/storage/thumbnails/13113340-21308106-thumbnail.jpg?__SQUARESPACE_CACHEVERSION=1355902187369" alt="" /></a></span></span><span class="thumbnail-image-block ssNonEditable"><span><a href="javascript:showFullImage('/display/ShowImage?imageUrl=%2Fstorage%2Fpost-images%2Fraspi-case%2Fcase-bare-4.jpg%3F__SQUARESPACE_CACHEVERSION%3D1355902228981',798,1564);"><img style="width: 235px;" src="http://www.savagehomeautomation.com/storage/thumbnails/13113340-21308105-thumbnail.jpg?__SQUARESPACE_CACHEVERSION=1355902255020" alt="" /></a>&nbsp;</span></span></p>
<p>&nbsp;</p>
<p><span class="thumbnail-image-float-left ssNonEditable"><span><a href="javascript:showFullImage('/display/ShowImage?imageUrl=%2Fstorage%2Fpost-images%2Fraspi-case%2Fcase-bare-5.jpg%3F__SQUARESPACE_CACHEVERSION%3D1355902293002',882,1203);"><img src="http://www.savagehomeautomation.com/storage/thumbnails/13113340-21308104-thumbnail.jpg?__SQUARESPACE_CACHEVERSION=1355902293006" alt="" /></a></span></span><span class="thumbnail-image-float-left ssNonEditable"><span><a href="javascript:showFullImage('/display/ShowImage?imageUrl=%2Fstorage%2Fpost-images%2Fraspi-case%2Fcase-bare-6.jpg%3F__SQUARESPACE_CACHEVERSION%3D1355902344274',907,968);"><img style="width: 158px;" src="http://www.savagehomeautomation.com/storage/thumbnails/13113340-21308100-thumbnail.jpg?__SQUARESPACE_CACHEVERSION=1355902419914" alt="" /></a></span></span></p>
<p><span class="thumbnail-image-block ssNonEditable"><span><a href="javascript:showFullImage('/display/ShowImage?imageUrl=%2Fstorage%2Fpost-images%2Fraspi-case%2Fcase-bare-7.jpg%3F__SQUARESPACE_CACHEVERSION%3D1355902471050',845,1297);"><img style="width: 230px;" src="http://www.savagehomeautomation.com/storage/thumbnails/13113340-21308098-thumbnail.jpg?__SQUARESPACE_CACHEVERSION=1355902488376" alt="" /></a></span></span></p>
<p>&nbsp;</p>
<p><span class="full-image-float-left ssNonEditable"><span><a href="javascript:showFullImage('/display/ShowImage?imageUrl=%2Fstorage%2Fpost-images%2Fraspi-case%2Fcase-open-1.jpg%3F__SQUARESPACE_CACHEVERSION%3D1355902582972',919,1391);"><img style="width: 240px;" src="http://www.savagehomeautomation.com/storage/thumbnails/13113340-21308096-thumbnail.jpg?__SQUARESPACE_CACHEVERSION=1355902755880" alt="" /></a></span></span><span class="full-image-float-left ssNonEditable"><span><a href="javascript:showFullImage('/display/ShowImage?imageUrl=%2Fstorage%2Fpost-images%2Fraspi-case%2Fcase-open-2.jpg%3F__SQUARESPACE_CACHEVERSION%3D1355902639058',860,880);"><img style="width: 162px;" src="http://www.savagehomeautomation.com/storage/thumbnails/13113340-21308114-thumbnail.jpg?__SQUARESPACE_CACHEVERSION=1355902768704" alt="" /></a></span></span><span class="thumbnail-image-block ssNonEditable"><span><a href="javascript:showFullImage('/display/ShowImage?imageUrl=%2Fstorage%2Fpost-images%2Fraspi-case%2Fcase-open-3.jpg%3F__SQUARESPACE_CACHEVERSION%3D1355902723316',958,1485);"><img src="http://www.savagehomeautomation.com/storage/thumbnails/13113340-21308113-thumbnail.jpg?__SQUARESPACE_CACHEVERSION=1355903604048" alt="" /></a></span></span></p>
<p>&nbsp;</p>
<p style="text-align: left;"><span class="full-image-float-left ssNonEditable"><span><a href="javascript:showFullImage('/display/ShowImage?imageUrl=%2Fstorage%2Fpost-images%2Fraspi-case%2Fcase-open-4.jpg%3F__SQUARESPACE_CACHEVERSION%3D1355902825619',801,1036);"><img src="http://www.savagehomeautomation.com/storage/thumbnails/13113340-21308112-thumbnail.jpg?__SQUARESPACE_CACHEVERSION=1355906059785" alt="" /></a></span></span></p>
<p><span class="thumbnail-image-block ssNonEditable"><span><a href="javascript:showFullImage('/display/ShowImage?imageUrl=%2Fstorage%2Fpost-images%2Fraspi-case%2Fcase-open-5.jpg%3F__SQUARESPACE_CACHEVERSION%3D1355903035929',906,1320);"><img style="width: 284px;" src="http://www.savagehomeautomation.com/storage/thumbnails/13113340-21308110-thumbnail.jpg?__SQUARESPACE_CACHEVERSION=1355903593497" alt="" /></a></span></span></p>
<p><br /><span class="full-image-float-left ssNonEditable"><span><a href="javascript:showFullImage('/display/ShowImage?imageUrl=%2Fstorage%2Fpost-images%2Fraspi-case%2Fcase-enclosed-1.png%3F__SQUARESPACE_CACHEVERSION%3D1355903079853',1212,995);"><img style="width: 236px;" src="http://www.savagehomeautomation.com/storage/thumbnails/13113340-21308127-thumbnail.jpg?__SQUARESPACE_CACHEVERSION=1355906052513" alt="" /></a></span></span><span class="thumbnail-image-block ssNonEditable"><span><a href="javascript:showFullImage('/display/ShowImage?imageUrl=%2Fstorage%2Fpost-images%2Fraspi-case%2Fcase-enclosed-2.jpg%3F__SQUARESPACE_CACHEVERSION%3D1355903137183',1243,951);"><img src="http://www.savagehomeautomation.com/storage/thumbnails/13113340-21308125-thumbnail.jpg?__SQUARESPACE_CACHEVERSION=1355903137185" alt="" /></a></span></span></p>
<p><br /><span class="full-image-float-left ssNonEditable"><span><a href="javascript:showFullImage('/display/ShowImage?imageUrl=%2Fstorage%2Fpost-images%2Fraspi-case%2Fcase-enclosed-3.jpg%3F__SQUARESPACE_CACHEVERSION%3D1355903174424',839,1295);"><img style="width: 250px;" src="http://www.savagehomeautomation.com/storage/thumbnails/13113340-21308097-thumbnail.jpg?__SQUARESPACE_CACHEVERSION=1355906046329" alt="" /></a></span></span><span class="thumbnail-image-block ssNonEditable"><span><a href="javascript:showFullImage('/display/ShowImage?imageUrl=%2Fstorage%2Fpost-images%2Fraspi-case%2Fcase-enclosed-4.jpg%3F__SQUARESPACE_CACHEVERSION%3D1355903250191',699,1536);"><img style="width: 358px;" src="http://www.savagehomeautomation.com/storage/thumbnails/13113340-21308123-thumbnail.jpg?__SQUARESPACE_CACHEVERSION=1355903494729" alt="" /></a></span></span></p>
<p><br /><span class="full-image-float-left ssNonEditable"><span><a href="javascript:showFullImage('/display/ShowImage?imageUrl=%2Fstorage%2Fpost-images%2Fraspi-case%2Fcase-enclosed-5.jpg%3F__SQUARESPACE_CACHEVERSION%3D1355903354243',711,1632);"><img style="width: 320px;" src="http://www.savagehomeautomation.com/storage/thumbnails/13113340-21308121-thumbnail.jpg?__SQUARESPACE_CACHEVERSION=1355906039649" alt="" /></a></span></span><span class="thumbnail-image-block ssNonEditable"><span><a href="javascript:showFullImage('/display/ShowImage?imageUrl=%2Fstorage%2Fpost-images%2Fraspi-case%2Fcase-enclosed-6.jpg%3F__SQUARESPACE_CACHEVERSION%3D1355903423278',715,1487);"><img style="width: 294px;" src="http://www.savagehomeautomation.com/storage/thumbnails/13113340-21308119-thumbnail.jpg?__SQUARESPACE_CACHEVERSION=1355903452337" alt="" /></a></span></span></p>
<p>&nbsp;</p>
<p><span class="full-image-float-left ssNonEditable"><span><a href="javascript:showFullImage('/display/ShowImage?imageUrl=%2Fstorage%2Fpost-images%2Fraspi-case%2Fcase-enclosed-7.jpg%3F__SQUARESPACE_CACHEVERSION%3D1355903656848',766,1224);"><img style="width: 350px;" src="http://www.savagehomeautomation.com/storage/thumbnails/13113340-21308117-thumbnail.jpg?__SQUARESPACE_CACHEVERSION=1355906031834" alt="" /></a></span></span><span class="thumbnail-image-block ssNonEditable"><span><a href="javascript:showFullImage('/display/ShowImage?imageUrl=%2Fstorage%2Fpost-images%2Fraspi-case%2Fcase-enclosed-8.jpg%3F__SQUARESPACE_CACHEVERSION%3D1355903687740',991,986);"><img style="width: 220px;" src="http://www.savagehomeautomation.com/storage/thumbnails/13113340-21308115-thumbnail.jpg?__SQUARESPACE_CACHEVERSION=1355903737721" alt="" /></a></span></span></p>]]></content:encoded></rss:item><rss:item rdf:about="http://www.savagehomeautomation.com/projects/raspberry-pi-installing-oracle-java-se-8-with-javafx-develop.html"><rss:title>Raspberry Pi - Installing Oracle Java SE 8 (with JavaFX) Developer Preview for ARM</rss:title><rss:link>http://www.savagehomeautomation.com/projects/raspberry-pi-installing-oracle-java-se-8-with-javafx-develop.html</rss:link><dc:creator>Robert Savage</dc:creator><dc:date>2012-12-19T01:11:03Z</dc:date><dc:subject>Embedded Computing Java JavaFX Raspberry Pi Raspberry Pi java jdk jre pi raspberry</dc:subject><content:encoded><![CDATA[<p><span class="ssNonEditable full-image-block"><img src="http://www.savagehomeautomation.com/storage/post-images/raspberrypi/raspi-banner680.png?__SQUARESPACE_CACHEVERSION=1344866873551" alt="" /></span></p>
<p style="text-align: left;">The Oracle JDK8 for ARM with support for hard-float ABI is now available as a developer preview edition! &nbsp;This article will provide the necessary instructions on how to install the Oracle Java SE 8 (with JavaFX) Developer Preview for ARM&nbsp;on your Raspberry Pi. &nbsp;</p>
<p style="text-align: center;"><span class="thumbnail-image-inline ssNonEditable"><span><a href="javascript:showFullImage('/display/ShowImage?imageUrl=%2Fstorage%2Fpost-images%2Fraspberrypi%2Fraspi.jpg%3F__SQUARESPACE_CACHEVERSION%3D1344866408187',406,600);"><img style="width: 650px;" src="http://www.savagehomeautomation.com/storage/post-images/raspberrypi/piandcoffee.png?__SQUARESPACE_CACHEVERSION=1355877408472" alt="" /></a></span></span></p>
<h3>Prerequisites</h3>
<ul>
<li>Install and boot the Raspberry Pi using the latest Raspbian "Wheezy" (<a href="http://downloads.raspberrypi.org/images/raspbian/2012-12-16-wheezy-raspbian/2012-12-16-wheezy-raspbian.zip">2012-12-16-wheezy-raspbian.zip</a>) image. &nbsp;<br />(<em>This is the first Oracle JDK compatible with the Raspian "Wheezy" image</em>)&nbsp;</li>
<li>Get the Raspberry Pi's IP address.</li>
</ul>
<h3>Tools &amp; Downloads:</h3>
<p>All:</p>
<ul>
<li><a class="offsite-link-inline" href="http://www.raspberrypi.org/downloads" target="_blank">Raspberry Pi Raspbian "Wheezy" image</a>&nbsp;(2012-12-16)</li>
<li><a class="offsite-link-inline" href="http://jdk8.java.net/fxarmpreview/" target="_blank">Java SE 8 (with JavaFX) Developer Preview for ARM</a></li>
</ul>
<p>Windows:</p>
<ul>
<li><a class="offsite-link-inline" href="http://winscp.net/eng/download.php" target="_blank">WinSCP</a></li>
</ul>
<p>Mac-OSX:</p>
<ul>
<li><a class="offsite-link-inline" href="http://cyberduck.ch/" target="_blank">Cyberduck</a></li>
</ul>
<h3>Download the Oracle JDK for the Raspberry Pi</h3>
<p>You can download the Oracle Java SE 8 (with JavaFX) Developer Preview for ARM&nbsp;on this page:<br /><a href="http://jdk8.java.net/fxarmpreview/">http://jdk8.java.net/fxarmpreview/</a></p>
<h3>Transfer the Oracle JDK to the Raspberry Pi</h3>
<p>After downloading the Oracle JDK to you desktop computer, we need to transfer it over to the Raspberry Pi. &nbsp;We will use SCP to transfer the file over the network. &nbsp;If you are running on a Windows desktop, then download and install <a class="offsite-link-inline" href="http://winscp.net/eng/download.php" target="_blank">WinSCP</a>.</p>
<blockquote>
<p>&nbsp;If you are using Mac OSX, you can download and install <a class="offsite-link-inline" href="http://cyberduck.ch/" target="_blank">Cyberduck</a>. &nbsp;The screens will look different but the goals are the same.</p>
</blockquote>
<p>Create a new session in WinSCP using the IP address of you Raspberry Pi. &nbsp;The default authentication credentials for the Debian Squeeze image is username "<em>pi</em>" and password "<em>raspberry</em>". &nbsp;Save the session and then login. &nbsp;You may be prompted to accept the SSH fingerprint, choose "Yes" to accept and continue.</p>
<p><span class="ssNonEditable full-image-block"><img src="http://www.savagehomeautomation.com/storage/post-images/raspberrypi/raspi-winscp-settings.png?__SQUARESPACE_CACHEVERSION=1345088737082" alt="" /></span></p>
<p>After successfully establishing a connection, select the drive and folder location in the left pane where you download the Oracle JDK file to on your local desktop system. &nbsp;In the right pane is the file system on the Raspberry Pi, we will leave it in it's default location in the "pi" user's home directory. &nbsp;Drag and drop the Oracle JDK file from the left pane to the right pane and WinSCP will start the file transfer process. &nbsp;You will be prompted with a transfer dialog, just click the "<strong>Copy</strong>" button to start the transfer. &nbsp;</p>
<p><span class="full-image-block ssNonEditable"><span><img src="http://www.savagehomeautomation.com/storage/raspi-java-8-1.png?__SQUARESPACE_CACHEVERSION=1355880375914" alt="" /></span></span><br />When the file transfer is complete, you can close WinSCP (<em>or CyberDuck</em>).</p>
<h3>Installation Procedure on Raspberry Pi</h3>
<p>The remaining steps should be performed directly on the console of the Raspberry Pi or using a SSH terminal connection with shell access. &nbsp;In the last step, we transfered the Oracle JDK file to the "pi" user's home directory. &nbsp;We should be logged in as the "pi" user and already in the user's home directory.</p>
<p>Lets create a new directory where we will install the JDK files to.&nbsp;</p>
<pre>sudo mkdir -p -v /opt/java</pre>
<p>Next, lets unpack the Oracle JDK .gz file using this command</p>
<pre>tar xvzf ~/jdk-8-ea-b36e-linux-arm-hflt-29_nov_2012.tar.gz</pre>
<p><span class="full-image-block ssNonEditable"><span><img src="http://www.savagehomeautomation.com/storage/post-images/raspberrypi/raspi-java-8-2.png?__SQUARESPACE_CACHEVERSION=1355880763506" alt="" /></span></span>The unpacking process will take a few seconds to complete. &nbsp;It unpacks all the contents of the Oracle JDK tz file to a new directory named "jdk1.8.0" located in the user's home directory.</p>
<p>With the unpack complete its now time to move the new unpacked directory to the Java install location that we created earlier under "opt/java". &nbsp;</p>
<pre>sudo mv -v ~/jdk1.8.0 /opt/java</pre>
<p>We can also delete the original .gz file as it is no longer needed&nbsp;</p>
<pre>rm ~/jdk-8-ea-b36e-linux-arm-hflt-29_nov_2012.tar.gz</pre>
<p>To complete the JDK installation we need to let the system know there is a new JVM installed and where it is located. &nbsp;Use the following command to perform this task.</p>
<pre><span style="font-size: 90%;">sudo update-alternatives --install "/usr/bin/java" "java" "/opt/java/jdk1.8.0/bin/java" 1</span></pre>
<p>And finally we also need to tell the system that we want this JDK to be the default Java runtime for the system. The following command will perform this action.</p>
<pre>sudo update-alternatives --set java /opt/java/jdk1.8.0/bin/java</pre>
<p><span class="full-image-block ssNonEditable"><span><a href="javascript:showFullImage('/display/ShowImage?imageUrl=%2Fstorage%2Fpost-images%2Fraspberrypi%2Fraspi-jre-install-2.png%3F__SQUARESPACE_CACHEVERSION%3D1345096887183',129,816);"><img src="http://www.savagehomeautomation.com/storage/post-images/raspberrypi/raspi-java-8-3.png?__SQUARESPACE_CACHEVERSION=1355880930025" alt="" /></a></span></span></p>
<p>Now java is installed. &nbsp;To test and verify we can execute the java command using the version argument.</p>
<pre>java -version</pre>
<p>You should get the following response:</p>
<p><span class="full-image-block ssNonEditable"><span><img src="http://www.savagehomeautomation.com/storage/post-images/raspberrypi/raspi-java-8-4.png?__SQUARESPACE_CACHEVERSION=1355881005490" alt="" /></span></span></p>
<p>That's it the Oracle JDK is installed and ready for use.</p>
<h3>Add JAVA_HOME Environment Variable</h3>
<p>Some Java programs require a JAVA_HOME environment variable to be configured on the system. &nbsp;Add the following line to you "/etc/environment" using your favorite text editor.</p>
<pre>JAVA_HOME="/opt/java/jdk1.8.0"</pre>
<p><br />Also, edit your "~/.bashrc" file using this command</p>
<pre>nano ~/.bashrc</pre>
<p>and add the following two lines to the bottom of the file and save.</p>
<pre>export JAVA_HOME="/opt/java/jdk1.8.0"<br />export PATH=$PATH:$JAVA_HOME/bin&nbsp;</pre>
<p><br />Reboot or re-login to apply the export to your environment. &nbsp;</p>
<p><span style="font-size: 80%;">* Raspberry Pi is a trademark of the Raspberry Pi foundation.<br /></span><span style="font-size: 80%;">* Oracle and Java are registered trademarks of Oracle.</span></p>]]></content:encoded></rss:item><rss:item rdf:about="http://www.savagehomeautomation.com/projects/raspberry-pi-installing-oracle-java-development-kit-jdk-170u-1.html"><rss:title>Raspberry Pi - Installing Oracle Java Development Kit (JDK 1.7.0u10)</rss:title><rss:link>http://www.savagehomeautomation.com/projects/raspberry-pi-installing-oracle-java-development-kit-jdk-170u-1.html</rss:link><dc:creator>Robert Savage</dc:creator><dc:date>2012-12-19T00:35:37Z</dc:date><dc:subject>Embedded Computing Java Raspberry Pi Raspberry Pi java jdk jre pi raspberry</dc:subject><content:encoded><![CDATA[<p><span class="ssNonEditable full-image-block"><img src="http://www.savagehomeautomation.com/storage/post-images/raspberrypi/raspi-banner680.png?__SQUARESPACE_CACHEVERSION=1344866873551" alt="" /></span></p>
<p style="text-align: left;">The Oracle JDK for ARM is now available! &nbsp;This article will provide the necessary instructions on how to install the Oracle Java Development Kit (JDK) on your Raspberry Pi. &nbsp;</p>
<p style="text-align: center;"><span class="thumbnail-image-inline ssNonEditable"><span><a href="javascript:showFullImage('/display/ShowImage?imageUrl=%2Fstorage%2Fpost-images%2Fraspberrypi%2Fraspi.jpg%3F__SQUARESPACE_CACHEVERSION%3D1344866408187',406,600);"><img style="width: 650px;" src="http://www.savagehomeautomation.com/storage/post-images/raspberrypi/piandcoffee.png?__SQUARESPACE_CACHEVERSION=1355877408472" alt="" /></a></span></span></p>
<h3>Prerequisites</h3>
<ul>
<li>Install and boot the Raspberry Pi using the Debian "Wheezy" (2012-08-08 soft-float) image. &nbsp;<br />(<em>The Oracle JDK is not currently compatible with the Raspian "Wheezy" image</em>)&nbsp;</li>
<li>Enable the Raspberry Pi for SSH remote network connections. &nbsp;<br /><strong>Update</strong>: &nbsp;The Debian "Wheezy" image comes with SSH access enabled in the default image.<br /><span style="font-size: 90%;">(<a href="http://www.savagehomeautomation.com/projects/raspberry-pi-enabling-ssh-for-remote-access.html">Here is an article on how to enable SSH in the Debian Squeeze distribution</a>)</span></li>
<li>Get the Raspberry Pi's IP address.</li>
</ul>
<h3>Tools &amp; Downloads:</h3>
<p>All:</p>
<ul>
<li><a class="offsite-link-inline" href="http://downloads.raspberrypi.org/download.php?file=/images/debian/7/2012-08-08-wheezy-armel/2012-08-08-wheezy-armel.zip" target="_blank">Raspberry Pi Debian "Wheezy" image</a>&nbsp;(2012-08-08)</li>
<li><a class="offsite-link-inline" href="http://www.oracle.com/technetwork/java/javase/downloads/index.html" target="_blank">Oracle Java SE Development Kit</a>&nbsp;(Select <em>JDK Download</em>, then Linux ARM - jdk-7u10-linux-arm-sfp.tar.gz)</li>
</ul>
<p>Windows:</p>
<ul>
<li><a class="offsite-link-inline" href="http://winscp.net/eng/download.php" target="_blank">WinSCP</a></li>
</ul>
<p>Mac-OSX:</p>
<ul>
<li><a class="offsite-link-inline" href="http://cyberduck.ch/" target="_blank">Cyberduck</a></li>
</ul>
<h3>Download the Oracle JDK for the Raspberry Pi</h3>
<p>You can download the Oracle Java SE Development Kit 7u10 on this page:<br /><a class="offsite-link-inline" href="http://www.oracle.com/technetwork/java/javase/downloads/index.html" target="_blank">http://www.oracle.com/technetwork/java/javase/downloads/index.html</a></p>
<p>First, select <em>JDK Download </em>button&nbsp;under JDK SE 7, then select the Linux ARM JDK7 SE distribution (jdk-7u10-linux-arm-sfp.gz).&nbsp;</p>
<h3>Transfer the Oracle JDK to the Raspberry Pi</h3>
<p>After downloading the Oracle JDK to you desktop computer, we need to transfer it over to the Raspberry Pi. &nbsp;We will use SCP to transfer the file over the network. &nbsp;If you are running on a Windows desktop, then download and install <a class="offsite-link-inline" href="http://winscp.net/eng/download.php" target="_blank">WinSCP</a>.</p>
<blockquote>
<p>&nbsp;If you are using Mac OSX, you can download and install <a class="offsite-link-inline" href="http://cyberduck.ch/" target="_blank">Cyberduck</a>. &nbsp;The screens will look different but the goals are the same.</p>
</blockquote>
<p>Create a new session in WinSCP using the IP address of you Raspberry Pi. &nbsp;The default authentication credentials for the Debian Squeeze image is username "<em>pi</em>" and password "<em>raspberry</em>". &nbsp;Save the session and then login. &nbsp;You may be prompted to accept the SSH fingerprint, choose "Yes" to accept and continue.</p>
<p><span class="ssNonEditable full-image-block"><img src="http://www.savagehomeautomation.com/storage/post-images/raspberrypi/raspi-winscp-settings.png?__SQUARESPACE_CACHEVERSION=1345088737082" alt="" /></span></p>
<p>After successfully establishing a connection, select the drive and folder location in the left pane where you download the Oracle JDK file to on your local desktop system. &nbsp;In the right pane is the file system on the Raspberry Pi, we will leave it in it's default location in the "pi" user's home directory. &nbsp;Drag and drop the Oracle JDK file from the left pane to the right pane and WinSCP will start the file transfer process. &nbsp;You will be prompted with a transfer dialog, just click the "<strong>Copy</strong>" button to start the transfer. &nbsp;</p>
<p><span class="full-image-block ssNonEditable"><span><img src="http://www.savagehomeautomation.com/storage/post-images/raspberrypi/raspi-java-7u10-1.png?__SQUARESPACE_CACHEVERSION=1355878373666" alt="" /></span></span><br />When the file transfer is complete, you can close WinSCP (<em>or CyberDuck</em>).</p>
<h3>Installation Procedure on Raspberry Pi</h3>
<p>The remaining steps should be performed directly on the console of the Raspberry Pi or using a SSH terminal connection with shell access. &nbsp;In the last step, we transfered the Oracle JDK file to the "pi" user's home directory. &nbsp;We should be logged in as the "pi" user and already in the user's home directory.</p>
<p>Lets create a new directory where we will install the JDK files to.&nbsp;</p>
<pre>sudo mkdir -p -v /opt/java</pre>
<p>Next, lets unpack the Oracle JDK .gz file using this command</p>
<pre>tar xvzf ~/jdk-7u10-linux-arm-sfp.gz</pre>
<p><span class="full-image-block ssNonEditable"><span><img src="http://www.savagehomeautomation.com/storage/post-images/raspberrypi/raspi-java-7u10-2.png?__SQUARESPACE_CACHEVERSION=1355878705262" alt="" /></span></span>The unpacking process will take a few seconds to complete. &nbsp;It unpacks all the contents of the Oracle JDK tz file to a new directory named "jdk1.7.0_10" located in the user's home directory.</p>
<p>With the unpack complete its now time to move the new unpacked directory to the Java install location that we created earlier under "opt/java". &nbsp;</p>
<pre>sudo mv -v ~/jdk1.7.0_10 /opt/java</pre>
<p>We can also delete the original .tz file as it is no longer needed&nbsp;</p>
<pre>rm ~/jdk-7u10-linux-arm-sfp.gz</pre>
<p>To complete the JDK installation we need to let the system know there is a new JVM installed and where it is located. &nbsp;Use the following command to perform this task.</p>
<pre><span style="font-size: 90%;">sudo update-alternatives --install "/usr/bin/java" "java" "/opt/java/jdk1.7.0_10/bin/java" 1</span></pre>
<p>And finally we also need to tell the system that we want this JDK to be the default Java runtime for the system. The following command will perform this action.</p>
<pre>sudo update-alternatives --set java /opt/java/jdk1.7.0_10/bin/java</pre>
<p><span class="full-image-block ssNonEditable"><span><a href="javascript:showFullImage('/display/ShowImage?imageUrl=%2Fstorage%2Fpost-images%2Fraspberrypi%2Fraspi-jre-install-2.png%3F__SQUARESPACE_CACHEVERSION%3D1345096887183',129,816);"><img src="http://www.savagehomeautomation.com/storage/post-images/raspberrypi/raspi-java-7u10-3.png?__SQUARESPACE_CACHEVERSION=1355878902847" alt="" /></a></span></span></p>
<p>Now java is installed. &nbsp;To test and verify we can execute the java command using the version argument.</p>
<pre>java -version</pre>
<p>You should get the following response:</p>
<p><span class="full-image-block ssNonEditable"><span><img src="http://www.savagehomeautomation.com/storage/post-images/raspberrypi/raspi-java-7u10-4.png?__SQUARESPACE_CACHEVERSION=1355879307982" alt="" /></span></span></p>
<p>That's it the Oracle JDK is installed and ready for use.</p>
<h3>Add JAVA_HOME Environment Variable</h3>
<p>Some Java programs require a JAVA_HOME environment variable to be configured on the system. &nbsp;Add the following line to you "/etc/environment" using your favorite text editor.</p>
<pre>JAVA_HOME="/opt/java/jdk1.7.0_10"</pre>
<p><br />Also, edit your "~/.bashrc" file using this command</p>
<pre>nano ~/.bashrc</pre>
<p>and add the following two lines to the bottom of the file and save.</p>
<pre>export JAVA_HOME="/opt/java/jdk1.7.0_10"<br />export PATH=$PATH:$JAVA_HOME/bin&nbsp;</pre>
<p><br />Reboot or re-login to apply the export to your environment. &nbsp;</p>
<p>&nbsp;</p>
<p><span style="font-size: 80%;">* Raspberry Pi is a trademark of the Raspberry Pi foundation.<br /></span><span style="font-size: 80%;">* Oracle and Java are registered trademarks of Oracle.</span></p>]]></content:encoded></rss:item><rss:item rdf:about="http://www.savagehomeautomation.com/projects/pi4j-version-004-released.html"><rss:title>Pi4J - Version 0.0.4 Released!</rss:title><rss:link>http://www.savagehomeautomation.com/projects/pi4j-version-004-released.html</rss:link><dc:creator>Robert Savage</dc:creator><dc:date>2012-12-18T01:52:49Z</dc:date><dc:subject>Embedded Computing Pi4J Raspberry Pi Raspberry Pi pi4 raspberry raspi</dc:subject><content:encoded><![CDATA[<p style="text-align: left;"><span class="full-image-inline ssNonEditable"><a href="http://pi4j.com/" target="_blank"><img src="http://www.savagehomeautomation.com/storage/post-images/raspberrypi/pi4j-header-small3.png?__SQUARESPACE_CACHEVERSION=1355799443185" alt="" /></a></span></p>
<p><span style="font-size: 110%;"><strong>Announcing the release of&nbsp;</strong><strong>Version 0.0.4 of the&nbsp;<strong><a href="http://pi4j.com/" target="_blank">Pi4J</a></strong>&nbsp;project!</strong></span></p>
<p>Version 0.0.4 is the first "official" release of the <a class="offsite-link-inline" href="http://www.pi4j.com" target="_blank">Pi4J</a> project. &nbsp;Development snapshot builds have been available since September but now an official release is available complete with an installer and a number of sample projects to help you get started. &nbsp; &nbsp;</p>
<blockquote>
<p><strong><span style="font-size: 90%;"><em>Project Summary</em></span></strong></p>
<p><span style="font-size: 90%;">This project is intended to provide a bridge between the native hardware and Java for full access to the Raspberry Pi in with a Java-friendly object-oriented approach. &nbsp;Pi4J provides a set of advanced features that make working with the Raspberry&nbsp;Pi an easy to implement and more convenient&nbsp;experience for Java developers. &nbsp;</span>&nbsp;</p>
<p style="text-align: right;">&gt;&gt;&nbsp;<a class="offsite-link-inline" style="font-size: 90%;" href="http://www.savagehomeautomation.com/projects/pi4j-connecting-java-to-the-raspberry-pi.html" target="_blank">View original project announcement.</a></p>
</blockquote>
<h3><strong>Pi4J Project Website</strong></h3>
<p>The Pi4J website content has been updated with instructions and examples for 0.0.4.</p>
<ul>
<li><a class="offsite-link-inline" href="http://pi4j.com/" target="_blank">http://www.pi4j.com</a></li>
</ul>
<h3><strong>Follow @Pi4J on Twitter</strong></h3>
<p><span class="full-image-float-right ssNonEditable"><span><img src="http://www.savagehomeautomation.com/storage/images/twitter-logo.jpg?__SQUARESPACE_CACHEVERSION=1355801298763" alt="" /></span></span>The Pi4J project now posts announcements on Twitter. &nbsp;<br />Follow us to get the latest Pi4J release notices and other Pi4J news.</p>
<p><a class="twitter-follow-button" href="https://twitter.com/pi4j">Follow @pi4j</a> <script>!function(d,s,id){var js,fjs=d.getElementsByTagName(s)[0];if(!d.getElementById(id)){js=d.createElement(s);js.id=id;js.src="http://www.savagehomeautomation.com//platform.twitter.com/widgets.js";fjs.parentNode.insertBefore(js,fjs);}}(document,"script","twitter-wjs");</script>&nbsp;</p>
<h3><strong>Pi4J Google Groups - Forums</strong></h3>
<p><span class="full-image-float-right ssNonEditable"><span><img src="http://www.savagehomeautomation.com/storage/images/google-groups-logo.jpg?__SQUARESPACE_CACHEVERSION=1355801672282" alt="" /></span></span>The Pi4J project has started a&nbsp;<a href="https://groups.google.com/forum/#!forum/pi4j" target="_blank">Pi4J Google Groups</a>&nbsp;forum for community discussions on Pi4J project development.</p>
<ul>
<li><a class="offsite-link-inline" href="https://groups.google.com/forum/#!forum/pi4j" target="_blank">https://groups.google.com/forum/#!forum/pi4j</a>&nbsp;&nbsp;</li>
</ul>
<h3>Raspberry Pi Java Forums</h3>
<p>For general questions and support try posting to the Java topic on the Raspberry Pi community forums:</p>
<ul>
<li><a class="offsite-link-inline" href="http://www.raspberrypi.org/phpBB3/viewforum.php?f=81&amp;sid=302db3998ba9402cef0957008683b269" target="_blank">Raspberry Pi &gt; Programming &gt; Java</a>&nbsp;</li>
</ul>
<h3>New Installation Package</h3>
<p>Version 0.0.4 introduces a new installer package that makes it easy to install the Pi4J libraries and examples on a Raspbian / Debian OS distribution. &nbsp;See the link below for instructions on downloading and installing Pi4J.</p>
<ul>
<li><a class="offsite-link-inline" href="http://pi4j.com/install.html" target="_blank">http://pi4j.com/install.html</a></li>
</ul>
<h3>Maven Central</h3>
<p>With the release of 0.0.4, the Pi4J project artifacts are now available on Maven Central:</p>
<ul>
<li><a class="offsite-link-inline" href="http://search.maven.org/#search|ga|1|pi4j" target="_blank">http://search.maven.org/#search|ga|1|pi4j</a></li>
</ul>
<h3>Release Notes - Version 0.0.4</h3>
<p>2012-12-16 :: 0.0.4</p>
<ul>
<li>Added support for building a Pi4J .deb installer package for Debian/Raspian Linux distribution. (BETA)</li>
<li>Modified NetworkInfo static methods to permit empty array return values when a network property cannot be obtained.<a class="offsite-link-inline" href="https://github.com/Pi4J/pi4j/issues/3" target="_blank">https://github.com/Pi4J/pi4j/issues/3</a></li>
<li>Fixed issue in newer Raspberry Pi 512mb firmware where Pi4J was not compiled against latest wiringPi library and thus not detecting the hardware properly.&nbsp;<a class="offsite-link-inline" href="https://github.com/Pi4J/pi4j/issues/3" target="_blank">https://github.com/Pi4J/pi4j/issues/3</a></li>
<li>Fixed defect where Pi4J library prevented consuming program from exiting properly.&nbsp;<a class="offsite-link-inline" href="https://github.com/Pi4J/pi4j/issues/4" target="_blank">https://github.com/Pi4J/pi4j/issues/4</a>&nbsp;|&nbsp;<a class="offsite-link-inline" href="https://github.com/Pi4J/pi4j/issues/6" target="_blank">https://github.com/Pi4J/pi4j/issues/6</a></li>
<li>Added support for MCP23008 GPIO Provider using I2C bus.</li>
<li>Added support for MCP23017 GPIO Provider using I2C bus.</li>
<li>Modified build script to support concurrent soft-float and hard-float native library builds</li>
<li>Modified build script to include pulling wiringPi sources and compiling when building native library</li>
<li>Added power controller device interface, base impl, and reference impl</li>
<li>Added GpioController.provisionXXXPin methods that allow name to be optional</li>
<li>Relocated project downloads location to google code site; github deprecated downloads.</li>
<li>Added Google Groups discussion forum to project docs.</li>
<li>Added getTag() and setTag() to GpioPin interface and impl.</li>
<li>Added TemperatureConversion utility.</li>
<li>Added optional blocking argument to GpioPin pulse method to support blocking pulse invocations</li>
</ul>
<p>&gt;&gt; Click here to see the full:&nbsp;<a class="offsite-link-inline" href="https://github.com/Pi4J/pi4j/blob/d77134c39c1f81df723771544f12dcd5b4e2ff42/README.md" target="_blank">Release Notes</a></p>
<h3><strong>Getting Started</strong><a name="Getting_Started"></a></h3>
<p>To get started using the Pi4J library, please see the&nbsp;<a class="offsite-link-inline" href="http://pi4j.com/usage.html" target="_blank">Usage</a>&nbsp;page and review each of the examples to explore the functionality provided by the Pi4j library.</p>]]></content:encoded></rss:item><rss:item rdf:about="http://www.savagehomeautomation.com/projects/raspberry-pi-john-jays-8-led-button-breakout-board.html"><rss:title>Raspberry Pi - John Jay's 8 LED &amp; Button Breakout Board</rss:title><rss:link>http://www.savagehomeautomation.com/projects/raspberry-pi-john-jays-8-led-button-breakout-board.html</rss:link><dc:creator>Robert Savage</dc:creator><dc:date>2012-12-06T00:10:37Z</dc:date><dc:subject>Embedded Computing Raspberry Pi Raspberry Pi pi raspberry raspi</dc:subject><content:encoded><![CDATA[<div></div>
<h3>Overview</h3>
<div>
<div>In a previous article I demonstrated how to build your own <a href="http://www.savagehomeautomation.com/projects/raspberry-pi-build-a-gpio-testing-board.html" target="_blank">Raspberry Pi GPIO testing board</a>&nbsp;that included buttons, slide switches, and LEDs. &nbsp;Since that time, I learned about a retired engineer in Georgia named John Jay who is producing awesome little companion electronic boards and kits for the Raspberry Pi. &nbsp;The boards are available as DIY kits and/or fully assembled boards. &nbsp; The kits are very reasonably priced and are available now on eBay. &nbsp;<a class="offsite-link-inline" href="http://cgi.ebay.com/ws/eBayISAPI.dll?ViewItem&amp;item=251197102538" target="_blank">Click here to see John Jay's eBay listings</a>. &nbsp;One of Mr. Jay's kits is an 8 button / 8 LED GPIO button breakout board. &nbsp;Using this kit is certainly easier than acquiring all the individual electronic components and building the board on your own. &nbsp;</div>
<div></div>
<div>I made one slight modification to the kit so that I could connect the breakout board to my Raspberry Pi via a 26 pin ribbon cable.&nbsp;</div>
<div>
<h3>Shopping List</h3>
<div>
<ul>
<li>1 @&nbsp;<a class="offsite-link-inline" href="http://www.raspberrypi.org/" target="_blank">Raspberry Pi</a>&nbsp; (<em><a href="http://www.savagehomeautomation.com/projects/raspberry-pi-shopping-list.html">see this page for more Raspberry Pi related supplies</a></em>)</li>
<li>1 @&nbsp;<a class="offsite-link-inline" href="http://cgi.ebay.com/ws/eBayISAPI.dll?ViewItem&amp;item=251197102538" target="_blank">John Jay's 8 Button / 8 LED Breakout Board (kit)</a></li>
</ul>
</div>
<p style="padding-left: 30px;">Parts for Optional Ribbon Cable &amp; Connector (<em>below</em>)</p>
<div>
<ul>
<li>1 @&nbsp;<a class="offsite-link-inline" href="http://www.amazon.com/exec/obidos/ASIN/B007R2JJUG/savagehomeaut-20" target="_blank">26P ribbon cable</a>&nbsp;(1 meter or less)</li>
<li>2 @&nbsp;<a class="offsite-link-inline" href="http://www.amazon.com/exec/obidos/ASIN/B007R2JEMY/savagehomeaut-20" target="_blank">26P female IDC connectors&nbsp;</a>(press-fit)</li>
<li>1 @&nbsp;<a class="offsite-link-inline" href="http://www.amazon.com/exec/obidos/ASIN/B006Z8M7KM/savagehomeaut-20" target="_blank">26P box header IDC male sockets</a>&nbsp;(right angle or straight)                                                 
<ul>
</ul>
</li>
</ul>
</div>
<h3>Tools</h3>
<ul>
<li>Wire snips (<a class="offsite-link-inline" href="http://www.amazon.com/exec/obidos/ASIN/B0000WT6FI/savagehomeaut-20" target="_blank">Hakko CHP170 Micro Cutter, 16AWG Clean Cut</a>)</li>
<li>Solder Iron (<a class="offsite-link-inline" href="http://www.amazon.com/exec/obidos/ASIN/B000AS28UC/savagehomeaut-20" target="_blank">Weller WLC100 40-Watt Soldering Station</a>)</li>
<li>Solder (lead-free)</li>
</ul>
<div></div>
<h3>Assembly</h3>
<blockquote>
<p><br /><em>Assembly instructions can also be found on John's website: </em><a class="offsite-link-inline" href="http://mypishop.com/Pi%208%20LED%20&amp;%208%20Button.html" target="_blank">http://mypishop.com/Pi%208%20LED%20&amp;%208%20Button.html</a></p>
</blockquote>
<ul>
</ul>
<p><span class="thumbnail-image-float-right ssNonEditable"><a href="javascript:showFullImage('/display/ShowImage?imageUrl=%2Fstorage%2Fpost-images%2Fjj-kit%2Fbb-parts.JPG%3F__SQUARESPACE_CACHEVERSION%3D1354756690261',1224,1632);"><img style="width: 400px;" src="http://www.savagehomeautomation.com/storage/thumbnails/13113340-21185135-thumbnail.jpg?__SQUARESPACE_CACHEVERSION=1354757344429" alt="" /></a></span></p>
<p>The kit includes the following components:</p>
<ul>
<li>1 @ printed circuit board</li>
</ul>
</div>
<div>
<ul>
<li>8 @ green LEDs</li>
</ul>
</div>
<div>
<ul>
<li>8 @ momentary/normally-open pushbutton micro-switches</li>
</ul>
</div>
<div>
<ul>
<li>2 @ resistor networks</li>
</ul>
</div>
<div>
<ul>
<li>1 @ 26 pin PCB mount female header <br />(<em>not pictured)</em></li>
</ul>
</div>
<div>
<ul>
<li>1 @ peel-and-stick on rubber bumper&nbsp;<br />(<em>not pictured)</em>&nbsp;</li>
</ul>
</div>
<p>&nbsp;</p>
<div>
<p><span class="full-image-float-right ssNonEditable"><img style="width: 150px;" src="http://www.savagehomeautomation.com/storage/post-images/jj-kit/bb-box-header.jpg?__SQUARESPACE_CACHEVERSION=1354757006156" alt="" /></span></p>
<p>&nbsp;In addition to the parts provided in the kit, I also used a right-angle 26P male box header socket for connecting a 26P ribbon cable to the Raspberry Pi.</p>
<p>&nbsp;</p>
<p>&nbsp;</p>
<blockquote>
<p><strong><br />TIP</strong>: &nbsp;<em>Click any image to enlarge and view a high-resolution photo.</em>&nbsp;</p>
</blockquote>
<p><strong>STEP 1 &gt; </strong>Insert the 26P male header socket in the position at the edge of the board and then solder the pins in place on the bottom side of the board. <strong>&nbsp;<em>NOTE: &nbsp;</em></strong><em>If you are not using this optional IDC box socket connector and you are using the supplied female header, then be aware that it should be mounted to the bottom of the board and soldered in place on the top.</em></p>
<p><span class="thumbnail-image-float-left ssNonEditable"><a href="javascript:showFullImage('/display/ShowImage?imageUrl=%2Fstorage%2Fpost-images%2Fjj-kit%2Fbb-1.jpg%3F__SQUARESPACE_CACHEVERSION%3D1354758396426',979,1306);"><img src="http://www.savagehomeautomation.com/storage/thumbnails/13113340-21185479-thumbnail.jpg?__SQUARESPACE_CACHEVERSION=1354758396428" alt="" /></a>&nbsp;&nbsp;</span><span class="thumbnail-image-block ssNonEditable"><a href="javascript:showFullImage('/display/ShowImage?imageUrl=%2Fstorage%2Fpost-images%2Fjj-kit%2Fbb-2.jpg%3F__SQUARESPACE_CACHEVERSION%3D1354758458980',979,1306);"><img src="http://www.savagehomeautomation.com/storage/thumbnails/13113340-21185477-thumbnail.jpg?__SQUARESPACE_CACHEVERSION=1354758458982" alt="" /></a></span></p>
<p>&nbsp;</p>
<p><strong>STEP 2 &gt;&nbsp;</strong>Insert one of the A102J resistor networks into the RP1 position on the top of the board. &nbsp;Solder in place on the bottom of the board. &nbsp;You can bend the pins over to help hold the component in place while you solder.&nbsp;</p>
<p><span class="thumbnail-image-float-left ssNonEditable"><a href="javascript:showFullImage('/display/ShowImage?imageUrl=%2Fstorage%2Fpost-images%2Fjj-kit%2Fbb-3.jpg%3F__SQUARESPACE_CACHEVERSION%3D1354758777659',979,1306);"><img src="http://www.savagehomeautomation.com/storage/thumbnails/13113340-21185476-thumbnail.jpg?__SQUARESPACE_CACHEVERSION=1354758777660" alt="" /></a></span><span class="thumbnail-image-block ssNonEditable"><a href="javascript:showFullImage('/display/ShowImage?imageUrl=%2Fstorage%2Fpost-images%2Fjj-kit%2Fbb-4.jpg%3F__SQUARESPACE_CACHEVERSION%3D1354758949606',979,1306);"><img src="http://www.savagehomeautomation.com/storage/thumbnails/13113340-21185473-thumbnail.jpg?__SQUARESPACE_CACHEVERSION=1354758949607" alt="" /></a></span></p>
<p>&nbsp;</p>
<p><strong>STEP 3 &gt;&nbsp;</strong>Insert the second A102J resistor network into the RP3 position on the top of the board. &nbsp;Solder in place on the bottom of the board. &nbsp;</p>
<p><span class="thumbnail-image-float-left ssNonEditable"><a href="javascript:showFullImage('/display/ShowImage?imageUrl=%2Fstorage%2Fpost-images%2Fjj-kit%2Fbb-5.jpg%3F__SQUARESPACE_CACHEVERSION%3D1354759098054',644,918);"><img src="http://www.savagehomeautomation.com/storage/thumbnails/13113340-21185472-thumbnail.jpg?__SQUARESPACE_CACHEVERSION=1354759098056" alt="" /></a></span><span class="thumbnail-image-block ssNonEditable"><a href="javascript:showFullImage('/display/ShowImage?imageUrl=%2Fstorage%2Fpost-images%2Fjj-kit%2Fbb-6.jpg%3F__SQUARESPACE_CACHEVERSION%3D1354759139875',979,1306);"><img style="width: 300px;" src="http://www.savagehomeautomation.com/storage/thumbnails/13113340-21185471-thumbnail.jpg?__SQUARESPACE_CACHEVERSION=1354759164978" alt="" /></a></span></p>
<p>&nbsp;</p>
<p><strong>STEP 4 &gt; &nbsp;</strong>Next we will install the 8 LEDs. &nbsp;The LEDs have a short lead (cathode) and long lead (anode). &nbsp;The long lead (anode) should be insterted into the hole closest to the 26 pin header connector. &nbsp;See the photos below to make sure you have them in the correct orientation.&nbsp;</p>
<p><span class="thumbnail-image-float-left ssNonEditable"><a href="javascript:showFullImage('/display/ShowImage?imageUrl=%2Fstorage%2Fpost-images%2Fjj-kit%2Fbb-7.jpg%3F__SQUARESPACE_CACHEVERSION%3D1354760042115',783,1392);"><img style="width: 315px;" src="http://www.savagehomeautomation.com/storage/thumbnails/13113340-21185875-thumbnail.jpg?__SQUARESPACE_CACHEVERSION=1354760349336" alt="" /></a></span><span class="thumbnail-image-block ssNonEditable"><a href="javascript:showFullImage('/display/ShowImage?imageUrl=%2Fstorage%2Fpost-images%2Fjj-kit%2Fbb-8.jpg%3F__SQUARESPACE_CACHEVERSION%3D1354760101159',561,1047);"><img style="width: 330px;" src="http://www.savagehomeautomation.com/storage/thumbnails/13113340-21185885-thumbnail.jpg?__SQUARESPACE_CACHEVERSION=1354760339000" alt="" /></a></span></p>
<p>&nbsp;</p>
<p>Insert the 8 LEDs in position and then carefully flip the board and solder each LED in place. &nbsp;TIP: &nbsp;You may find it easier to solder just one lead of each of the LEDs and then check the LEDs from the top and adjust any for final positioning. &nbsp; &nbsp;</p>
<p><span class="thumbnail-image-float-left ssNonEditable"><a href="javascript:showFullImage('/display/ShowImage?imageUrl=%2Fstorage%2Fpost-images%2Fjj-kit%2Fbb-9.jpg%3F__SQUARESPACE_CACHEVERSION%3D1354761145454',979,1306);"><img style="width: 335px;" src="http://www.savagehomeautomation.com/storage/thumbnails/13113340-21186024-thumbnail.jpg?__SQUARESPACE_CACHEVERSION=1354761260562" alt="" /></a></span><span class="thumbnail-image-block ssNonEditable"><a href="javascript:showFullImage('/display/ShowImage?imageUrl=%2Fstorage%2Fpost-images%2Fjj-kit%2Fbb-10.jpg%3F__SQUARESPACE_CACHEVERSION%3D1354761191651',844,964);"><img style="width: 290px;" src="http://www.savagehomeautomation.com/storage/thumbnails/13113340-21186022-thumbnail.jpg?__SQUARESPACE_CACHEVERSION=1354761237025" alt="" /></a></span></p>
<p>After soldering each of the LEDs use a pair of wire snips to trim the excess lead wires.&nbsp;</p>
<p><span class="thumbnail-image-float-left ssNonEditable"><a href="javascript:showFullImage('/display/ShowImage?imageUrl=%2Fstorage%2Fpost-images%2Fjj-kit%2Fbb-11.jpg%3F__SQUARESPACE_CACHEVERSION%3D1354761593927',979,1306);"><img src="http://www.savagehomeautomation.com/storage/thumbnails/13113340-21186021-thumbnail.jpg?__SQUARESPACE_CACHEVERSION=1354761593930" alt="" /></a></span><span class="thumbnail-image-block ssNonEditable"><a href="javascript:showFullImage('/display/ShowImage?imageUrl=%2Fstorage%2Fpost-images%2Fjj-kit%2Fbb-12.jpg%3F__SQUARESPACE_CACHEVERSION%3D1354761651397',979,1306);"><img src="http://www.savagehomeautomation.com/storage/thumbnails/13113340-21186019-thumbnail.jpg?__SQUARESPACE_CACHEVERSION=1354761651398" alt="" /></a></span></p>
<p>&nbsp;</p>
<p><strong>STEP 5 &gt; &nbsp;</strong>Next we will install the momentary buttons. &nbsp;Each button has four pins that will insert into the board. &nbsp;Press each switch in place firmly to fully seat the switch. &nbsp;</p>
<p><span class="thumbnail-image-float-left ssNonEditable"><a href="javascript:showFullImage('/display/ShowImage?imageUrl=%2Fstorage%2Fpost-images%2Fjj-kit%2Fbb-13.jpg%3F__SQUARESPACE_CACHEVERSION%3D1354763726203',979,1306);"><img src="http://www.savagehomeautomation.com/storage/thumbnails/13113340-21186389-thumbnail.jpg?__SQUARESPACE_CACHEVERSION=1354763726205" alt="" /></a></span><span class="thumbnail-image-block ssNonEditable"><a href="javascript:showFullImage('/display/ShowImage?imageUrl=%2Fstorage%2Fpost-images%2Fjj-kit%2Fbb-14.jpg%3F__SQUARESPACE_CACHEVERSION%3D1354763760620',979,1306);"><img src="http://www.savagehomeautomation.com/storage/thumbnails/13113340-21186388-thumbnail.jpg?__SQUARESPACE_CACHEVERSION=1354763760622" alt="" /></a></span><br />Once the switches are placed, flip the board and solder each of the pins on all the switches.&nbsp;</p>
<p><span class="thumbnail-image-block ssNonEditable"><a href="javascript:showFullImage('/display/ShowImage?imageUrl=%2Fstorage%2Fpost-images%2Fjj-kit%2Fbb-15.jpg%3F__SQUARESPACE_CACHEVERSION%3D1354763910664',979,1306);"><img src="http://www.savagehomeautomation.com/storage/thumbnails/13113340-21186387-thumbnail.jpg?__SQUARESPACE_CACHEVERSION=1354764347752" alt="" /></a></span></p>
<p>&nbsp;</p>
<p>That's it. &nbsp;Now you have a complete assembled board ready for use with your Raspberry Pi. &nbsp;</p>
<p><span class="thumbnail-image-float-left ssNonEditable"><a href="javascript:showFullImage('/display/ShowImage?imageUrl=%2Fstorage%2Fpost-images%2Fjj-kit%2Fbb-17.jpg%3F__SQUARESPACE_CACHEVERSION%3D1354764288410',843,1142);"><img src="http://www.savagehomeautomation.com/storage/thumbnails/13113340-21186383-thumbnail.jpg?__SQUARESPACE_CACHEVERSION=1354764447891" alt="" /></a></span></p>
<p><span class="thumbnail-image-block ssNonEditable"><a href="javascript:showFullImage('/display/ShowImage?imageUrl=%2Fstorage%2Fpost-images%2Fjj-kit%2Fbb-16.jpg%3F__SQUARESPACE_CACHEVERSION%3D1354764328810',909,1133);"><img src="http://www.savagehomeautomation.com/storage/thumbnails/13113340-21186385-thumbnail.jpg?__SQUARESPACE_CACHEVERSION=1354764433707" alt="" /></a></span></p>
<p><span class="thumbnail-image-float-left ssNonEditable"><a href="javascript:showFullImage('/display/ShowImage?imageUrl=%2Fstorage%2Fpost-images%2Fjj-kit%2Fbb-18.jpg%3F__SQUARESPACE_CACHEVERSION%3D1354764381780',979,1306);"><img src="http://www.savagehomeautomation.com/storage/thumbnails/13113340-21186382-thumbnail.jpg?__SQUARESPACE_CACHEVERSION=1354764381782" alt="" /></a></span></p>
<p><span class="thumbnail-image-block ssNonEditable"><a href="javascript:showFullImage('/display/ShowImage?imageUrl=%2Fstorage%2Fpost-images%2Fjj-kit%2Fbb-19.jpg%3F__SQUARESPACE_CACHEVERSION%3D1354764414992',979,1306);"><img src="http://www.savagehomeautomation.com/storage/thumbnails/13113340-21186381-thumbnail.jpg?__SQUARESPACE_CACHEVERSION=1354764414994" alt="" /></a></span></p>
<h3>Logic</h3>
<p>The 8 LEDs are controlled by positive 3.3 VDC TTL voltage on each of the corresponding GPIO pins. &nbsp;Setting a GPIO pin to HIGH will cause the LED to turn ON and setting a GPIO pin to LOW will turn the LED OFF.</p>
<p>When depressing one of the 8 input buttons, the closed circuit will provide a ground drain for the GPIO pin thus causing it to go LOW. &nbsp;When an input button is not depressed the circuit on the GPIO pin will remain floating; therefore, each of the GPIO pins used with these buttons should be configured to set their internal resistors to pull up. &nbsp;In software, this means that the button will remain in the HIGH state when it is not pressed and will go LOW while a button is pressed.</p>
<div></div>
<h3>LED Wiring Diagram</h3>
<p>The 8 LEDs are mapped to the P1 header on the Raspberry Pi as depicted in the diagram below.</p>
<p><span class="thumbnail-image-block ssNonEditable"><a href="javascript:showFullImage('/display/ShowImage?imageUrl=%2Fstorage%2Fpost-images%2Fjj-kit%2Fjj8led-wiring-led.png%3F__SQUARESPACE_CACHEVERSION%3D1355005490097',968,1254);"><img src="http://www.savagehomeautomation.com/storage/thumbnails/13113340-21211870-thumbnail.jpg?__SQUARESPACE_CACHEVERSION=1355005490098" alt="" /></a></span></p>
<h3>Button Wiring Diagram</h3>
<p>The 8 buttons are mapped to the P1 header on the Raspberry Pi as depicted in the diagram below.</p>
<p><span class="thumbnail-image-block ssNonEditable"><a href="javascript:showFullImage('/display/ShowImage?imageUrl=%2Fstorage%2Fpost-images%2Fjj-kit%2Fjj8led-wiring-1.png%3F__SQUARESPACE_CACHEVERSION%3D1355004236044',925,1263);"><img src="http://www.savagehomeautomation.com/storage/thumbnails/13113340-21211748-thumbnail.jpg?__SQUARESPACE_CACHEVERSION=1355004236045" alt="" /></a></span></p>
<h3>GPIO Pin Cross-Reference Chart</h3>
<p style="text-align: center;">Below is a cross reference chart to better help define the GPIO pin numbers used for each button and LED.</p>
<p style="text-align: center;"><span class="thumbnail-image-block ssNonEditable"><span><a href="javascript:showFullImage('/display/ShowImage?imageUrl=%2Fstorage%2Fpost-images%2Fjj-kit%2Fjj-gpio-pin-map.png%3F__SQUARESPACE_CACHEVERSION%3D1355010570785',497,737);"><img src="http://www.savagehomeautomation.com/storage/thumbnails/13113340-21211942-thumbnail.jpg?__SQUARESPACE_CACHEVERSION=1355010570787" alt="" /></a></span></span></p>
<div></div>
<h3>C Sample Program</h3>
<p>If you are interested in native C sample code, please check out this article on Gordon's Project Blog:<br /><a class="offsite-link-inline" href="https://projects.drogon.net/more-buttons-and-leds/" target="_blank">https://projects.drogon.net/more-buttons-and-leds/</a>&nbsp;</p>
<p>Gordon provides a sample program based on the WiringPi library.</p>
<h3>Python Sample Program</h3>
<p>The following Python source example was provided by&nbsp;<a href="https://github.com/johnscuteri" target="_blank">John Scuteri<br /></a><a class="offsite-link-inline" href="https://github.com/johnscuteri/OpenSourcedButtonBoardTest/blob/master/MyTestProgram.py" target="_blank">https://github.com/johnscuteri/OpenSourcedButtonBoardTest/blob/master/MyTestProgram.py</a></p>
<div></div>
<div></div>
<h3>Java Sample Programs using Pi4J</h3>
<p>Below is a sample Java program for monitoring the 8 buttons on this board.&nbsp;</p>
<p><iframe src="http://pastebin.com/embed_iframe.php?i=AS4hK68N" style="border:1px solid black;width:650px; height:500px;"></iframe></p>
<p>Below is a sample Java program for creating a cylon effect that cycles through the 8 LEDs on this board.&nbsp;</p>
<p><iframe src="http://pastebin.com/embed_iframe.php?i=tVm5Ka66" style="border:1px solid black;width:650px; height:500px;"></iframe></p>
<h3>Final Thoughts</h3>
<p>Assembling this kit was simple and takes about 30 minutes. &nbsp;This kit is a very convient tool to have on hand while testing and developing software for the Raspberry Pi. &nbsp;This kit is also a very good educational kit to begin interacting with the Raspberry Pi's GPIO pins. &nbsp;</p>
</div>
</div>
<div></div>]]></content:encoded></rss:item><rss:item rdf:about="http://www.savagehomeautomation.com/projects/raspberry-pi-sunrise-sunset-timer-for-christmas-lights.html"><rss:title>Raspberry Pi - Sunrise / Sunset Timer for Christmas Lights</rss:title><rss:link>http://www.savagehomeautomation.com/projects/raspberry-pi-sunrise-sunset-timer-for-christmas-lights.html</rss:link><dc:creator>Robert Savage</dc:creator><dc:date>2012-12-05T07:00:00Z</dc:date><dc:subject>Christmas Embedded Computing Holiday Home Automation Pi4J Raspberry Pi Raspberry Pi pi power raspberry raspi</dc:subject><content:encoded><![CDATA[<div><span class="full-image-float-right ssNonEditable"><img style="width: 220px;" src="http://www.savagehomeautomation.com/storage/post-images/raspberrypi/christmas-lights.png?__SQUARESPACE_CACHEVERSION=1354604480357" alt="" /></span>
<h3>Overview</h3>
Turkey day (<em>Thanksgiving Day for those reading outside the US</em>) is over and according to decades of holiday tradition, it's time to hang the exterior Christmas lights on the house. &nbsp; In the past I have always used simple mechanical timers to automatically turn on and off the lights based on fixed times. &nbsp;This year, armed with my Raspberry Pi, I wanted to create a simple DIY Raspi Christmas Lighting Timer that would control the power to the Christmas lights automatically based on sunrise and sunset times. &nbsp;</div>
<div></div>
<div>Of course you may find other useful applications for this project beyond holiday lighting. &nbsp;This article will demonstrate how simple it can be to use a Raspberry Pi to control 110/240 VAC circuits. &nbsp; Additionally the software (<em>open source</em>) will be provided to control the circuit based on sunrise and sunset times. &nbsp; &nbsp;&nbsp;</div>
<div><br />
<h3>Shopping List</h3>
<div>
<ul>
<li><a class="offsite-link-inline" href="http://www.raspberrypi.org/" target="_blank">Raspberry Pi</a>&nbsp; (<em><a href="http://www.savagehomeautomation.com/projects/raspberry-pi-shopping-list.html">see this page for more Raspberry Pi related supplies</a></em>)          
<ul>
<li><a class="offsite-link-inline" href="http://www.amazon.com/exec/obidos/ASIN/B005LALOKY/savagehomeaut-20" target="_blank">5VDC 1A Micro USB Power Supply</a></li>
<li><a class="offsite-link-inline" href="http://www.amazon.com/exec/obidos/ASIN/B0058GH0LS/savagehomeaut-20" target="_blank">SD Memory Card (4GB or above)</a></li>
</ul>
</li>
<li><a class="offsite-link-inline" href="http://www.powerswitchtail.com/Pages/default.aspx" target="_blank">PowerSwitch Tail II</a>&nbsp;(US) / <a class="offsite-link-inline" href="http://www.powerswitchtail.com/Pages/PSTKKit.aspx" target="_blank">PowerSwitch Tail 240 Kit</a>&nbsp;(EU)</li>
<li><a href="http://www.amazon.com/exec/obidos/ASIN/B008MRZSH8/savagehomeaut-20">Jumper Wires (Male-to-Female)</a><br /><br /></li>
</ul>
</div>
<h3>Hardware</h3>
<p>The wiring for this project is quite simple. &nbsp;All we need are two wires to connect from the GPIO (P1) header on the Raspberry Pi to the PowerSwitch Tail power controller. &nbsp;Using male-to-female jumper wires make the task truly plug-n-play ... we don't need to solder or stip any wires. &nbsp;</p>
<p>The PowerSwitch Tail power controller works by turning on the high voltage AC circuit when a DC input of 3-12 VDC&nbsp;(3-30ma) is detected on its input terminal. &nbsp;When no input voltage is detected, the high voltage AC circuit turns off. &nbsp;</p>
<p><span class="full-image-float-left ssNonEditable"><a href="javascript:showFullImage('/display/ShowImage?imageUrl=%2Fstorage%2Fpost-images%2Fraspberrypi%2Fpowerswitch-on.png%3F__SQUARESPACE_CACHEVERSION%3D1354602664570',393,460);"><img src="http://www.savagehomeautomation.com/storage/thumbnails/13113340-21161727-thumbnail.jpg?__SQUARESPACE_CACHEVERSION=1354602801469" alt="" /></a></span><span class="thumbnail-image-block ssNonEditable"><a href="javascript:showFullImage('/display/ShowImage?imageUrl=%2Fstorage%2Fpost-images%2Fraspberrypi%2Fpowerswitch-off.png%3F__SQUARESPACE_CACHEVERSION%3D1354602697539',393,460);"><img src="http://www.savagehomeautomation.com/storage/thumbnails/13113340-21161737-thumbnail.jpg?__SQUARESPACE_CACHEVERSION=1354602773229" alt="" /></a></span></p>
<p>Fortunately the PowerSwitch Tail power controller input can be triggered directly by the&nbsp;Raspberry Pi's TTL 3.3 DC voltage supplied on its GPIO pins. &nbsp;This means that no additional transistors, relays, or other circuitry is needed to perform the switching.&nbsp;</p>
<p>In this project, we will use Raspberry Pi P1 header pin #12 (<em>which is GPIO #1 in the<a class="offsite-link-inline" href="http://pi4j.com/usage.html#Pin_Numbering" target="_blank"> Pi4J/WiringPi pin numbering scheme</a></em>)&nbsp;as the positive control signal and we will use Raspberry Pi P1 header pin #6 for GND (<em>ground</em>). &nbsp;See the wiring diagram below. &nbsp;Insert the female end of the jumper wire on the Raspberry Pi GPIO header pins and then insert the male end of the jumper wire in the PowerSwitch terminal and tighten the captive screw to secure the wire in place. &nbsp;Make sure that your Raspberry Pi is not plugged in while attaching wires to prevent accidental shorts. &nbsp;&nbsp;</p>
<p><span class="full-image-block ssNonEditable"><img src="http://www.savagehomeautomation.com/storage/post-images/raspberrypi/raspi-powerswitch.png?__SQUARESPACE_CACHEVERSION=1354601592171" alt="" /></span></p>
<p>Below are photos of the completed and assembled project. &nbsp;Click any image to enlarge.</p>
<p><span class="full-image-float-left ssNonEditable"><a href="javascript:showFullImage('/display/ShowImage?imageUrl=%2Fstorage%2Fpost-images%2Fraspberrypi%2Fraspi-powerswitch-1.jpg%3F__SQUARESPACE_CACHEVERSION%3D1354604834435',1351,1190);"><img src="http://www.savagehomeautomation.com/storage/thumbnails/13113340-21161864-thumbnail.jpg?__SQUARESPACE_CACHEVERSION=1354604989833" alt="" /></a></span></p>
<p><span class="full-image-float-left ssNonEditable"><a href="javascript:showFullImage('/display/ShowImage?imageUrl=%2Fstorage%2Fpost-images%2Fraspberrypi%2Fraspi-powerswitch-2.jpg%3F__SQUARESPACE_CACHEVERSION%3D1354604206901',1632,1224);"><img style="width: 174px;" src="http://www.savagehomeautomation.com/storage/thumbnails/13113340-21161867-thumbnail.jpg?__SQUARESPACE_CACHEVERSION=1354604878125" alt="" /></a></span><span class="thumbnail-image-block ssNonEditable"><a href="javascript:showFullImage('/display/ShowImage?imageUrl=%2Fstorage%2Fpost-images%2Fraspberrypi%2Fraspi-powerswitch-3.jpg%3F__SQUARESPACE_CACHEVERSION%3D1354604948174',1632,1224);"><img src="http://www.savagehomeautomation.com/storage/thumbnails/13113340-21161870-thumbnail.jpg?__SQUARESPACE_CACHEVERSION=1354604948175" alt="" /></a></span></p>
<h3>Software</h3>
<p>The software that determines sunrise and sunset times and controls the GPIO pins is Java based, therefore you must install a Java runtime to use this software.</p>
<p>To install the OpenJDK, simply enter this command via the Raspberry Pi's console:</p>
<pre>&gt; sudo apt-get install openjdk-7-jdk</pre>
<p><em>(If you would prefer to install the Oracle JDK, please <a href="http://www.savagehomeautomation.com/pi-jdk" target="_blank">click here</a> and read this article.)</em></p>
<p>&nbsp;</p>
<p>The source code is provided as open source software and you can download the entire project from Github.</p>
<ul>
<li><a class="offsite-link-inline" href="https://github.com/savagehomeautomation/raspi-sspc" target="_blank">Github - Source Code</a></li>
<li><a class="offsite-link-inline" href="https://github.com/savagehomeautomation/raspi-sspc/downloads" target="_blank">Github - Precompiled JAR Download</a></li>
</ul>
<p>To run the software, a pre-compiled JAR is made available so that you don't have to compile the software on your own. &nbsp;Simply use the following command on the Raspberry Pi console to download the software to the current working directory on your Raspberry Pi.</p>
<pre><span style="font-size: 90%;">&gt; wget https://github.com/downloads/savagehomeautomation/raspi-sspc/raspi-sspc-1.0.0.jar</span></pre>
<p>This software program also uses the Pi4J Project to manipulate the GPIO pin states on the Raspberry Pi; therefore, you must also download this prerequisite library to your working directory.</p>
<pre>&gt; wget https://github.com/downloads/Pi4J/pi4j/pi4j-core-0.0.3-SNAPSHOT.jar</pre>
<p>&nbsp;</p>
<p>To launch the program, use the following command:</p>
<pre>&gt; sudo java -classpath classes:./'*' SSPC</pre>
<p>When the program starts it will prompt you for your longitude and latitude. &nbsp;These coordinates are used to calculate the sunrise and sunset times for your specific geographical location. &nbsp;You can use this web page to determine your specific longitude and latitude: &nbsp;<strong><a href="http://itouchmap.com/latlong.html">http://itouchmap.com/latlong.html</a>&nbsp;</strong>&nbsp;</p>
<p><span class="full-image-block ssNonEditable"><img src="http://www.savagehomeautomation.com/storage/post-images/raspberrypi/prompt-coordinates.png?__SQUARESPACE_CACHEVERSION=1354609311335" alt="" /></span></p>
<p>At this point the program will continue to run and it will turn the power controller ON or OFF depending on the current time and it will schedule the next power event on the next available sunrise or sunset time.</p>
<p>&nbsp;</p>
<p>Re-entering the longitude and latitude coordinates every time would be annoying, so you can also use &nbsp;command line arguments to start the program with specified coordinates. &nbsp;You could include this in a shell script to launch the program with the proper command line argument every time.</p>
<pre><span style="font-size: 90%;">&gt; sudo java -classpath classes:./'*' SSPC -longitude=-73.985538 -latitude=40.748362</span></pre>
<p><span class="thumbnail-image-block ssNonEditable"><a href="javascript:showFullImage('/display/ShowImage?imageUrl=%2Fstorage%2Fpost-images%2Fraspberrypi%2Fcoordinate-arguments.png%3F__SQUARESPACE_CACHEVERSION%3D1354686194077',19,856);"><img src="http://www.savagehomeautomation.com/storage/thumbnails/13113340-21162234-thumbnail.jpg?__SQUARESPACE_CACHEVERSION=1354686436523" alt="" /></a><span class="thumbnail-caption" style="width: 680px;">(click to enlarge)</span></span></p>
<p>&nbsp;</p>
<p>Also note that while the program is running, you can manually force the power controller power state ON or OFF using the "<em>on</em>" or "<em>off</em>" commands via terminal.</p>
<p>The "<em>help</em>" command will display all the supported command options provided by the software:</p>
<p><span class="full-image-block ssNonEditable">&nbsp;<img src="http://www.savagehomeautomation.com/storage/post-images/raspberrypi/command-options.png?__SQUARESPACE_CACHEVERSION=1354609745431" alt="" /></span></p>
<p>Just leave the program running and it will automatically turn ON and OFF the power controller at the sunrise and sunset times for your location. &nbsp;</p>
<p>&nbsp;</p>
<h3><span class="thumbnail-image-float-right ssNonEditable"><span><a href="javascript:showFullImage('/display/ShowImage?imageUrl=%2Fstorage%2Fpost-images%2Fraspberrypi%2Fchristmas-lights-11.jpg%3F__SQUARESPACE_CACHEVERSION%3D1355217905727',236,396);"><img src="http://www.savagehomeautomation.com/storage/thumbnails/13113340-21234175-thumbnail.jpg?__SQUARESPACE_CACHEVERSION=1355217905728" alt="" /></a></span></span>Final Thoughts</h3>
<p>As you can see this is a very simple project to build and the software can be easily modified if you need some unique behavior. &nbsp;You can additionally take steps to include launching this program with a startup script if you want to ensure that it is automatically restarted each time the Raspberry Pi boots up.</p>
<p>This is an excellent example of an embedded Java application running on the Raspberry Pi and making use of the <a class="offsite-link-inline" href="http://pi4j.com/" target="_blank">Pi4J project</a> to control the hardware. &nbsp;&nbsp;This Java project includes a Maven build so you can easily re-build the project directly on the Raspberry Pi or your desktop if needed using Maven commands.</p>
<p>I hope you enjoyed this article and maybe thought of a few creative modifications that you can do in your home. &nbsp;Please add a comment if you find this project helpful or would like to share any modifications that you add to it. &nbsp; &nbsp; &nbsp;</p>
<p><strong>Merry Christmas!</strong></p>
<blockquote>
<p><br /><strong><em>Related Holiday Projects:</em></strong></p>
<p>&gt;&gt; <a href="http://www.savagehomeautomation.com/projects/twine-monitor-christmas-tree-water-level.html" target="_blank">Electronically Monitor Christmas Tree Water Level<br /><br /><span class="full-image-float-left ssNonEditable"><span>&nbsp;</span></span></a><span class="full-image-float-left ssNonEditable"><span><a href="javascript:showFullImage('/display/ShowImage?imageUrl=%2Fstorage%2Fpost-images%2Ftwine%2Ftwine-christmas-water-sensor.png%3F__SQUARESPACE_CACHEVERSION%3D1355217387303',1003,1238);"><img src="http://www.savagehomeautomation.com/storage/thumbnails/13113340-21048679-thumbnail.jpg?__SQUARESPACE_CACHEVERSION=1355217576613" alt="" /></a></span></span><span class="thumbnail-image-float-left ssNonEditable"><span><a href="javascript:showFullImage('/display/ShowImage?imageUrl=%2Fstorage%2Fpost-images%2Ftwine%2Ftwine-xmas-2.jpg%3F__SQUARESPACE_CACHEVERSION%3D1355217465251',1632,1224);"><img style="width: 121px;" src="http://www.savagehomeautomation.com/storage/thumbnails/13113340-21048851-thumbnail.jpg?__SQUARESPACE_CACHEVERSION=1355217496650" alt="" /></a></span></span><span class="thumbnail-image-block ssNonEditable"><span><a href="javascript:showFullImage('/display/ShowImage?imageUrl=%2Fstorage%2Fpost-images%2Ftwine%2Ftwine-xmas-6.jpg%3F__SQUARESPACE_CACHEVERSION%3D1355217566481',1224,1632);"><img style="width: 216px;" src="http://www.savagehomeautomation.com/storage/thumbnails/13113340-21048856-thumbnail.jpg?__SQUARESPACE_CACHEVERSION=1355217598707" alt="" /></a></span></span>&nbsp;</p>
</blockquote>
<blockquote>
<p><span class="full-image-float-right ssNonEditable"><span><a href="javascript:showFullImage('/display/ShowImage?imageUrl=%2Fstorage%2Fpost-images%2Fraspberrypi%2Fpislice.png%3F__SQUARESPACE_CACHEVERSION%3D1355218649104',276,375);"><img style="width: 175px;" src="http://www.savagehomeautomation.com/storage/thumbnails/13113340-20017607-thumbnail.jpg?__SQUARESPACE_CACHEVERSION=1355218811874" alt="" /></a></span></span><br /><strong>More Raspberry Pi &nbsp;Projects and Articles</strong></p>
<p><a href="http://www.savagehomeautomation.com/pi-slices/" target="_blank">http://www.pislices.com</a></p>
<p><span>This page lists the articles posted on this blog about the Raspberry Pi</span></p>
</blockquote>
</div>]]></content:encoded></rss:item><rss:item rdf:about="http://www.savagehomeautomation.com/projects/oracle-jdk-for-arm-hard-float-ea-expected-by-year-end.html"><rss:title>Oracle JDK for ARM Hard-Float EA Expected By Year End</rss:title><rss:link>http://www.savagehomeautomation.com/projects/oracle-jdk-for-arm-hard-float-ea-expected-by-year-end.html</rss:link><dc:creator>Robert Savage</dc:creator><dc:date>2012-12-04T23:40:00Z</dc:date><dc:subject>Embedded Computing Java Raspberry Pi Raspberry Pi java jdk jre oracle pi raspberry raspi</dc:subject><content:encoded><![CDATA[<p>Oracle announces plans to have early access (EA) builds of JDK for Linux ARM hard float ABI by end of 2012 in a <a class="offsite-link-inline" href="https://twitter.com/java/status/276048273305915393" target="_blank">Twitter post</a>. &nbsp;</p>
<blockquote class="twitter-tweet tw-align-center">
<p>Oracle announces EA builds for Linux ARM hard float ABI will be available by the end of the year. <a href="https://twitter.com/search/%23javaonebrasil">#javaonebrasil</a></p>
&mdash; Java (@java) <a href="https://twitter.com/java/status/276048273305915393">December 4, 2012</a></blockquote>
<p><script src="http://www.savagehomeautomation.com//platform.twitter.com/widgets.js" charset="utf-8"></script></p>
<p>&nbsp;</p>
<p>This is great news for Java programmers on the Raspberry Pi! &nbsp;See this earlier post on <a href="http://www.savagehomeautomation.com/projects/raspberry-pi-java-virtual-machine-benchmarks.html">JVM benchmarks</a> using the current Oracle JDK for soft-float.</p>
<p>I will post updates to the <a href="http://www.savagehomeautomation.com/pi-jdk">Oracle JVM installation instructions</a> and <a href="http://www.savagehomeautomation.com/projects/raspberry-pi-java-virtual-machine-benchmarks.html">benchmarks</a> articles when the new JVM for hard-float becomes available.</p>]]></content:encoded></rss:item><rss:item rdf:about="http://www.savagehomeautomation.com/projects/raspberry-pi-build-a-gpio-testing-board.html"><rss:title>Raspberry Pi - Build a GPIO Testing Board</rss:title><rss:link>http://www.savagehomeautomation.com/projects/raspberry-pi-build-a-gpio-testing-board.html</rss:link><dc:creator>Robert Savage</dc:creator><dc:date>2012-11-15T04:51:23Z</dc:date><dc:subject>Embedded Computing Pi4J Raspberry Pi Raspberry Pi gpio pi pi4j prototype raspberry raspi test</dc:subject><content:encoded><![CDATA[<p><img src="http://www.savagehomeautomation.com/storage/post-images/raspberrypi/raspi-banner680.png?__SQUARESPACE_CACHEVERSION=1347431055301" alt="" /></p>
<p>While working on <a class="offsite-link-inline" href="http://www.pi4j.com/" target="_blank">The Pi4J Project</a>, I found the need to have some type of GPIO prototyping board to quickly visualize the state of GPIO pins and control the state of GPIO pins. &nbsp; I purchased a handful of electronics parts and set out to build my GPIO testing board.</p>
<p>The picture below is the final result of building this test board:</p>
<p style="text-align: center;"><span class="thumbnail-image-block ssNonEditable"><span><a href="javascript:showFullImage('/display/ShowImage?imageUrl=%2Fstorage%2Fpost-images%2Fraspberrypi%2Fgpio-test-1.jpg%3F__SQUARESPACE_CACHEVERSION%3D1352917995351',851,1556);"><img src="http://www.savagehomeautomation.com/storage/thumbnails/13113340-20971223-thumbnail.jpg?__SQUARESPACE_CACHEVERSION=1352917995352" alt="" /></a></span></span></p>
<h3>Design Goals</h3>
<p style="text-align: left;">My design goals included:</p>
<ul>
<li>Support 7 GPIO pins.</li>
<li>Small/compact footprint.</li>
<li>Connect to Raspberry Pi via ribbon cable.</li>
<li>Support for momentary and fix on/off switches.</li>
<li>Display GPIO state using LEDs.</li>
<li>Captive screw terminals for connecting GPIO pins to external devices.</li>
<li>Order the GPIO test IO hardware based on the Pi4J/WiringPi pin numbering scheme.&nbsp;</li>
</ul>
<h3>Supplies / Parts</h3>
<p>I purchased most of the parts used in this project on eBay. &nbsp;</p>
<ul>
<li>1 @ <a class="offsite-link-inline" href="http://www.amazon.com/exec/obidos/ASIN/B007R2JJUG/savagehomeaut-20" target="_blank">26P ribbon cable</a> (1 meter or less)</li>
<li>2 @ <a class="offsite-link-inline" href="http://www.amazon.com/exec/obidos/ASIN/B007R2JEMY/savagehomeaut-20" target="_blank">26P female IDC connectors </a>(press-fit)</li>
<li>1 @ <a class="offsite-link-inline" href="http://www.amazon.com/exec/obidos/ASIN/B006Z8M7KM/savagehomeaut-20" target="_blank">26P box header IDC male sockets</a>&nbsp;(right angle or straight)</li>
<li><span>7 @ 1.5 VDC red LED</span></li>
<li>7 @ <a class="offsite-link-inline" href="http://www.amazon.com/exec/obidos/ASIN/B008LT4WX8/savagehomeaut-20" target="_blank">220 ohm resistors</a></li>
<li><span>7 @ 0.3A DC 50V <a class="offsite-link-inline" href="http://www.amazon.com/exec/obidos/ASIN/B007QAJV9S/savagehomeaut-20" target="_blank">Mini Vertical Slide Switch SPDT 3 Pin</a> PCB</span></li>
<li><span><span>7 @ <a class="offsite-link-inline" href="http://www.amazon.com/exec/obidos/ASIN/B004RXKWI6/savagehomeaut-20" target="_blank">6mm x 5mm Panel PCB Momentary Tactile Tact Push Button Switch DIP</a> (normally open)</span></span></li>
<li><span><span><span>4 @ <a class="offsite-link-inline" href="http://www.amazon.com/exec/obidos/ASIN/B0079SJNTA/savagehomeaut-20" target="_blank">3pin Block Terminal screw connector</a> 5mm pitch</span></span></span></li>
<li><span><span><span><a class="offsite-link-inline" href="http://www.amazon.com/exec/obidos/ASIN/B0002KR9F2/savagehomeaut-20" target="_blank">Solder</a> (lead-free)</span></span></span></li>
<li><span><span><span><span>Scrap wire</span></span></span></span></li>
</ul>
<h3>Tools Needed</h3>
<ul>
<li>Wire snips (<a class="offsite-link-inline" href="http://www.amazon.com/exec/obidos/ASIN/B0000WT6FI/savagehomeaut-20" target="_blank">Hakko CHP170 Micro Cutter, 16AWG Clean Cut</a>)</li>
<li>Wire strippers (<a class="offsite-link-inline" href="http://www.amazon.com/exec/obidos/ASIN/B0006BHHDQ/savagehomeaut-20" target="_blank">Paladin Tools 1118 GripP 20 Wire Stripper/Cutter, 30-20 AWG</a>)</li>
<li>Solder Iron (<a class="offsite-link-inline" href="http://www.amazon.com/exec/obidos/ASIN/B000AS28UC/savagehomeaut-20" target="_blank">Weller WLC100 40-Watt Soldering Station</a>)</li>
<li>Digital Multimeter w/ Continuity Testing (<a class="offsite-link-inline" href="http://www.amazon.com/exec/obidos/ASIN/B0012VWR20/savagehomeaut-20" target="_blank">Extech MN35 Digital Mini MultiMeter</a>)</li>
</ul>
<h3>Logic</h3>
<ul>
<li>When a GPIO pin is configured as an OUTPUT pin and its state is set to HIGH, the corresponding LED should be ON. (+3.3 VDC is delivered to the anode lead of the LED)</li>
<li>When a GPIO pin is configured as an OUTPUT pin and its state is set to LOW, the corresponding LED should be OFF.&nbsp;(0 VDC is delivered to the anode lead of the LED)</li>
<li>When a GPIO pin is configured as an INPUT pin and the correspondingly momentary switch is depressed or the toggle switch is in the ON position, the&nbsp;LED should be ON and +3.3 VDC is delivered to the GPIO pin on the Pi.</li>
<li>When a GPIO pin is configured as an INPUT pin and the correspondingly momentary switch is not depressed and the toggle switch is in the OFF position, the&nbsp;LED should be OFF and 0 VDC is delivered to the GPIO pin on the Pi.</li>
</ul>
<h3>Wiring Diagram</h3>
<p>The following illustration depicts the wiring schematic used to create this GPIO test board.</p>
<p>(<strong>NOTE:</strong> &nbsp;The GPIO pin numbering is based on the <a class="offsite-link-inline" href="http://pi4j.com/usage.html#Pin_Numbering" target="_blank">Pi4J/WiringPi GPIO pin numbering scheme</a>. &nbsp;But of course you can apply whatever GPIO pin numbering scheme to meet your needs.)</p>
<p><em>Click diagram to enlarge.</em></p>
<p><span class="full-image-block ssNonEditable"><span><a href="javascript:showFullImage('/display/ShowImage?imageUrl=%2Fstorage%2Fpost-images%2Fraspberrypi%2Fgpio-test-wiring.png%3F__SQUARESPACE_CACHEVERSION%3D1352929679556',871,1326);"><img src="http://www.savagehomeautomation.com/storage/thumbnails/13113340-20973623-thumbnail.jpg?__SQUARESPACE_CACHEVERSION=1352929688796" alt="" /></a></span>&nbsp;</span></p>
<h3>Photos</h3>
<p><em>Click any photo to enlarge.</em></p>
<p><span class="full-image-float-left ssNonEditable"><span><a href="javascript:showFullImage('/display/ShowImage?imageUrl=%2Fstorage%2Fpost-images%2Fraspberrypi%2Fgpio-test-3.png%3F__SQUARESPACE_CACHEVERSION%3D1352921509447',1150,949);"><img style="width: 231px;" src="http://www.savagehomeautomation.com/storage/thumbnails/13113340-20971955-thumbnail.jpg?__SQUARESPACE_CACHEVERSION=1352923556055" alt="" /></a></span></span><span class="full-image-float-left ssNonEditable"><span><a href="javascript:showFullImage('/display/ShowImage?imageUrl=%2Fstorage%2Fpost-images%2Fraspberrypi%2Fgpio-test-4.png%3F__SQUARESPACE_CACHEVERSION%3D1352921654634',1139,780);"><img style="width: 190px;" src="http://www.savagehomeautomation.com/storage/thumbnails/13113340-20971973-thumbnail.jpg?__SQUARESPACE_CACHEVERSION=1352923563997" alt="" /></a></span></span><span class="full-image-block ssNonEditable"><span><a href="javascript:showFullImage('/display/ShowImage?imageUrl=%2Fstorage%2Fpost-images%2Fraspberrypi%2Fgpio-test-5.png%3F__SQUARESPACE_CACHEVERSION%3D1352923481706',1632,1224);"><img src="http://www.savagehomeautomation.com/storage/thumbnails/13113340-20972012-thumbnail.jpg?__SQUARESPACE_CACHEVERSION=1352923569703" alt="" /></a></span></span></p>
<p><span class="full-image-block ssNonEditable"><span><img style="width: 650px;" src="http://www.savagehomeautomation.com/storage/post-images/raspberrypi/gpio-test-2.png?__SQUARESPACE_CACHEVERSION=1352918805900" alt="" /></span></span></p>
<h3>Videos</h3>
<p>This is a simple demonstration video of this GPIO test board in action with a simple Java program cycling states on the 7 GPIO output pins.</p>
<p><iframe width="640" height="360" src="http://www.youtube.com/embed/HBURE4xxPIs" frameborder="0" allowfullscreen></iframe>&nbsp;</p>]]></content:encoded></rss:item><rss:item rdf:about="http://www.savagehomeautomation.com/projects/raspberry-pi-rs232-serial-interface-options-revisit.html"><rss:title>Raspberry Pi - RS232 Serial Interface Options (Revisit)</rss:title><rss:link>http://www.savagehomeautomation.com/projects/raspberry-pi-rs232-serial-interface-options-revisit.html</rss:link><dc:creator>Robert Savage</dc:creator><dc:date>2012-10-21T03:55:40Z</dc:date><dc:subject>Embedded Computing Raspberry Pi Raspberry Pi com pi raspberry raspi rs232 serial uart usb</dc:subject><content:encoded><![CDATA[<p><img src="http://www.savagehomeautomation.com/storage/post-images/raspberrypi/raspi-banner680.png?__SQUARESPACE_CACHEVERSION=1347431055301" alt="" /></p>
<p>In the previous article <a href="http://www.savagehomeautomation.com/projects/raspberry-pi-installing-a-rs232-serial-port.html">Raspberry Pi - Installing a RS232 Serial Port</a> we discussed how to install a RS232 port on the Raspberry Pi. &nbsp;This is a follow up article to suggest a few alternative interface options as the XBit RS232 level-shifter board has been unavailable (<em>sold out</em>) for while now.</p>
<p>There are two primary RS232 interface options you can choose from for serial connectivity: &nbsp;</p>
<ul>
<li><a href="#usb">USB</a>&nbsp;(USB to Serial Adapter)</li>
<li><a href="#db9">DB9</a>&nbsp;(Level Shifter)</li>
</ul>
<p>Once you have a serial interface connected you can use the serial port for</p>
<ul>
<li><a href="#console">Serial Console</a></li>
<li><a href="#software">Software Application</a></li>
</ul>
<p>(<em>Click one of the above options to jump to that part of the article.</em>)</p>
<p>&nbsp;</p>
<h3>Shopping List</h3>
<p>The following items are included in this article:</p>
<ul>
<li><a class="offsite-link-inline" href="http://www.amazon.com/exec/obidos/ASIN/B008AGDTA4/savagehomeaut-20" target="_blank">PL2303HX USB to TTL to UART RS232 COM Cable module Converter</a></li>
<li><a class="offsite-link-inline" href="http://www.amazon.com/exec/obidos/ASIN/B00471S6MC/savagehomeaut-20" target="_blank">MAX232 RS232 to TTL Converter Adapter Board</a></li>
<li><a class="offsite-link-inline" href="http://www.amazon.com/exec/obidos/ASIN/B007MRQC1K/savagehomeaut-20" target="_blank">40pcs Female to Female 2.54mm 0.1 in Jumper Wires F/F</a>&nbsp;</li>
<li><a class="offsite-link-inline" href="http://www.amazon.com/exec/obidos/ASIN/B004G4XRY2/savagehomeaut-20" target="_blank">Jumper Wires Premium 6" F/F Pack of 10</a></li>
</ul>
<p>&nbsp;</p>
<p><a name="usb"></a></p>
<h3>Serial Communication via USB</h3>
<p><span class="thumbnail-image-float-right ssNonEditable"><span><img style="width: 275px;" src="http://www.savagehomeautomation.com/storage/post-images/raspberrypi/usb-serial-1.jpg?__SQUARESPACE_CACHEVERSION=1350784397502" alt="" /></span></span>If you are just looking to communicate to your Raspberry Pi via its serial UART, then you may prefer a USB interface. &nbsp;Most recent models of computers and laptops do not have the traditional RS232 DB9 port anymore, so connecting using a USB port may be preferred. &nbsp;&nbsp;</p>
<p>The following adapter is only $5.47 USD and it provides a USB to serial converter chip: &nbsp; &nbsp;&nbsp;</p>
<ul>
<li><a class="offsite-link-inline" href="http://www.amazon.com/exec/obidos/ASIN/B008AGDTA4/savagehomeaut-20" target="_blank">PL2303HX USB to TTL to UART RS232 COM Cable module Converter</a>&nbsp; (<a class="offsite-link-inline" href="http://www.amazon.com/exec/obidos/ASIN/B008AGDTA4/savagehomeaut-20" target="_blank">Buy Here</a>)</li>
</ul>
<p>This adapter is based on the Prolific PL2303HX chipset. &nbsp;To use this USB to serial interface you will have to install a USB serial port driver on your host operating system. &nbsp;Many operating systems already include support for theserolific drivers. &nbsp;But in case you need it, the drivers can be found here: &nbsp;<a href="http://prolificusa.com/portfolio/pl-2303hx-usb-to-serial-bridge-controller/">http://prolificusa.com/portfolio/pl-2303hx-usb-to-serial-bridge-controller/</a></p>
<p>Below is a wiring diagram illustrating how to connect the USB to serial interface:</p>
<p><span class="thumbnail-image-block ssNonEditable"><span><a href="javascript:showFullImage('/display/ShowImage?imageUrl=%2Fstorage%2Fpost-images%2Fraspberrypi%2Fraspi-usbserial-1.png%3F__SQUARESPACE_CACHEVERSION%3D1412775830149',1049,1125);"><img src="http://www.savagehomeautomation.com/storage/thumbnails/13113340-25527583-thumbnail.jpg?__SQUARESPACE_CACHEVERSION=1412775830151" alt="" /></a></span></span></p>
<p><em>Photos of the connected USB to Serial interface (click to enlarge):</em></p>
<p><span class="thumbnail-image-float-left ssNonEditable"><span><a href="javascript:showFullImage('/display/ShowImage?imageUrl=%2Fstorage%2Fpost-images%2Fraspberrypi%2Fraspi-usbserial-2.jpg%3F__SQUARESPACE_CACHEVERSION%3D1412776384001',1725,2300);"><img src="http://www.savagehomeautomation.com/storage/thumbnails/13113340-25527617-thumbnail.jpg?__SQUARESPACE_CACHEVERSION=1412776384003" alt="" /></a></span></span></p>
<p><span class="thumbnail-image-inline ssNonEditable"><span><a href="javascript:showFullImage('/display/ShowImage?imageUrl=%2Fstorage%2Fpost-images%2Fraspberrypi%2Fraspi-usbserial-3.jpg%3F__SQUARESPACE_CACHEVERSION%3D1412776484969',1725,2300);"><img src="http://www.savagehomeautomation.com/storage/thumbnails/13113340-25527625-thumbnail.jpg?__SQUARESPACE_CACHEVERSION=1412776484971" alt="" /></a></span></span></p>
<p style="text-align: left;"><strong>NOTE:&nbsp;</strong><span>&nbsp;Please secure the RED lead from the USB adapter so that it does not come into contact with any of the other pins or components on the Raspberry Pi. &nbsp;This RED pin carries +5VDC and could damage the Pi if it makes contact.</span></p>
<p style="text-align: left;">Now that you have the serial interface connected, you can skip down to the <a href="#console">Serial Console</a> section to test the interface.</p>
<p>&nbsp;</p>
<p><a name="db9"></a></p>
<h3>Serial Communication via DB9 (Level Shifter)</h3>
<p><span class="full-image-float-right ssNonEditable"><span><a href="javascript:showFullImage('/display/ShowImage?imageUrl=%2Fstorage%2Fpost-images%2Fraspberrypi%2Fusb-serial-5.png%3F__SQUARESPACE_CACHEVERSION%3D1350786584875',500,500);"><img src="http://www.savagehomeautomation.com/storage/thumbnails/13113340-20698191-thumbnail.jpg?__SQUARESPACE_CACHEVERSION=1350786611052" alt="" /></a></span></span></p>
<p>For certain applications and especially project involving interfacing with other hardware devices a standard RS232 serial device with a DB9 connector is preferred. &nbsp;A standard serial port such as this does not require any drivers. &nbsp;RS232 serial communication is standardized at the hardware layer. &nbsp;RS232 communication can also achieve longer distance runs (<em>maximum distance depends on baud rate</em>). &nbsp;</p>
<p>The following interface adapter is available for $9.99 USD:</p>
<ul>
<li><a class="offsite-link-inline" href="http://www.amazon.com/exec/obidos/ASIN/B00471S6MC/savagehomeaut-20" target="_blank">MAX232 RS232 to TTL Converter Adapter Board</a>&nbsp; (<a class="offsite-link-inline" href="http://www.amazon.com/exec/obidos/ASIN/B00471S6MC/savagehomeaut-20" target="_blank">Buy Here</a>)</li>
</ul>
<p>In addition to the adapter, you will need at least 4 female to female 2.54mm .1 in jumper wires.&nbsp;</p>
<p>Here are a couple of purchase options:</p>
<ul>
<li><a class="offsite-link-inline" href="http://www.amazon.com/exec/obidos/ASIN/B007MRQC1K/savagehomeaut-20" target="_blank">40pcs Female to Female 2.54mm 0.1 in Jumper Wires F/F</a>&nbsp;</li>
<li><a class="offsite-link-inline" href="http://www.amazon.com/exec/obidos/ASIN/B004G4XRY2/savagehomeaut-20" target="_blank">Jumper Wires Premium 6" F/F Pack of 10</a></li>
</ul>
<blockquote>
<p>Why is special circuitry (<em>level shifter</em>) needed for RS232 serial communication?</p>
<p><span>So .. what a&nbsp;</span><em>level shifter</em><span>&nbsp; and why is it needed you ask. &nbsp;A level shifter is a circuit that can take the low voltage (</span><span>&plusmn;</span><span>3.3VDC</span><span>) TTL signals for serial transmit (TX) and receive (RX) from the UART on the Pi and shift them to &plusmn;5VDC the voltage signals required for RS232 standard communication. &nbsp;Want to know more? &nbsp;Click&nbsp;</span><a class="offsite-link-inline" href="http://en.wikipedia.org/wiki/RS-232#Voltage_levels" target="_blank">here</a><span>. &nbsp;&nbsp;</span></p>
</blockquote>
<p><span><span>Below is a wiring diagram illustrating how to connect the level shifter serial interface:</span></span></p>
<p><span><span><span class="thumbnail-image-block ssNonEditable"><span><a href="javascript:showFullImage('/display/ShowImage?imageUrl=%2Fstorage%2Fpost-images%2Fraspberrypi%2Fraspi-rs232-schematic4.png%3F__SQUARESPACE_CACHEVERSION%3D1357108144778',909,1083);"><img src="http://www.savagehomeautomation.com/storage/thumbnails/13113340-21439927-thumbnail.jpg?__SQUARESPACE_CACHEVERSION=1357108144780" alt="" /></a></span></span></span></span></p>
<p><span><span>Now that you have the serial interface connected, you can skip down to the&nbsp;<a href="#console">Serial Console</a>&nbsp;section to test the interface.<br />(Use a straight-thru cable for connecting to a computer.)&nbsp;</span></span></p>
<p><span><span><br /></span></span></p>
<p><a name="console"></a></p>
<h3>Serial Console</h3>
<p>The Debian/Raspbian distribution images include support out-of-the-box for accessing the shell console via the hardware serial port. &nbsp;This can be extremely convenient if you need to access your Raspberry Pi when it is not connected to a monitor and network remote access is not available.</p>
<p>Open a terminal emulation software such as Hyperterminal, Procom Plus, or Indigo Terminal Emulator and connect to the serial port using settings "115200, N, 8, 1". &nbsp; You may need to press the enter key a time or two to see the prompt. &nbsp;Authenticate using your credentials and you are good to go. &nbsp;&nbsp; &nbsp; &nbsp; &nbsp;</p>
<p>Here is a screenshot of the terminal displaying the boot up information and then prompting for a login:</p>
<p><span class="full-image-block ssNonEditable"><span><img src="http://www.savagehomeautomation.com/storage/post-images/raspberrypi/serial-console.png?__SQUARESPACE_CACHEVERSION=1350789648210" alt="" /></span></span></p>
<p>&nbsp;</p>
<p><a name="software"></a></p>
<h3>Software use of the Serial Port</h3>
<p>If you intend to use the serial port for a software application running on the Raspberry Pi, there is a bit of configuration required to disable the console from using this port. &nbsp;&nbsp;By default, the serial port is configured as a console port for interacting with the Linux OS shell. &nbsp;The following steps will guide you through disabling the port from console access.</p>
<p>First, lets make of backup of the two files that we intend to modify.</p>
<pre>sudo cp /boot/cmdline.txt /boot/cmdline.bak<br />sudo cp /etc/inittab /etc/inittab.bak</pre>
<p>Next, we need to remove the "<em>console=ttyAMA0,115200</em>" and "<em>kgdboc=ttyAMA0,115200</em>" configuration parameters from the "/boot/cmdline.txt" configuration file.&nbsp;</p>
<p>To edit the file use this command:</p>
<pre>sudo nano /boot/cmdline.txt</pre>
<div></div>
<p>The file probably contains this default configuration line:</p>
<pre>dwc_otg.lpm_enable=0 <strong>console=ttyAMA0,115200 kgdboc=ttyAMA0,115200</strong> <br />console=tty1 root=/dev/mmcblk0p2 rootfstype=ext4 elevator=deadline rootwait</pre>
<p>After removing the two configuration parameters, it will look similar to this:</p>
<pre>dwc_otg.lpm_enable=0 console=tty1 root=/dev/mmcblk0p2 rootfstype=ext4 <br />elevator=deadline rootwait</pre>
<p>&nbsp;</p>
<p>The last step is to edit the "/etc/inittab" file and comment out the use of the "ttyAMA0" serial port. &nbsp;To edit the file use this command:</p>
<pre>sudo nano /etc/inittab</pre>
<div></div>
<div></div>
<p>Now towards the bottom of the file, look for a configuration line that includes the "ttyAMA0" port address.</p>
<p><span class="full-image-block ssNonEditable"><span><img src="http://www.savagehomeautomation.com/storage/post-images/raspberrypi/serial-inittab.png?__SQUARESPACE_CACHEVERSION=1350791143867" alt="" /></span></span></p>
<p>Place a pound sign ("#") in front of the line to comment it out. &nbsp;With a pound sign ("#") at the beginning of the line, Linux will ignore this configuration line. &nbsp;</p>
<p><span class="full-image-block ssNonEditable"><span><img src="http://www.savagehomeautomation.com/storage/post-images/raspberrypi/serial-inittab2.png?__SQUARESPACE_CACHEVERSION=1350791262626" alt="" /></span></span></p>
<p>Save the "/etc/inittab" file and then issue this command to reboot the Raspberry Pi:</p>
<pre>sudo reboot</pre>
<div></div>
<div></div>
<div></div>
<p>Now you are ready to use the serial port with a software application and the operating system won't interfere with the port. &nbsp;Use the device address "ttyAMA0" in your application to access this serial port. &nbsp;</p>
<blockquote>
<p>If are interested in using the serial port with Java programming, please see this page:&nbsp;<a href="http://pi4j.com/example/serial.html">http://pi4j.com/example/serial.html</a></p>
</blockquote>
<div></div>
<div></div>]]></content:encoded></rss:item><rss:item rdf:about="http://www.savagehomeautomation.com/projects/raspberry-pi-installing-the-edimax-ew-7811un-usb-wifi-adapte.html"><rss:title>Raspberry Pi - Installing the Edimax EW-7811Un USB WiFi Adapter (WiFiPi)</rss:title><rss:link>http://www.savagehomeautomation.com/projects/raspberry-pi-installing-the-edimax-ew-7811un-usb-wifi-adapte.html</rss:link><dc:creator>Robert Savage</dc:creator><dc:date>2012-10-20T22:23:58Z</dc:date><dc:subject>802.11 EW-7811 Embedded Computing Networking Raspberry Pi Raspberry Pi edimax pi raspberry raspi usb wifi wifipi wireless</dc:subject><content:encoded><![CDATA[Step-by-step instructions and screenshots for installing and configuring the Edimax EW-7811Un 150 Mbps Wireless 802.11bgn USB Adapter on your Raspberry Pi.]]></content:encoded></rss:item><rss:item rdf:about="http://www.savagehomeautomation.com/projects/pi4j-connecting-java-to-the-raspberry-pi.html"><rss:title>Pi4J - Connecting Java to the Raspberry Pi</rss:title><rss:link>http://www.savagehomeautomation.com/projects/pi4j-connecting-java-to-the-raspberry-pi.html</rss:link><dc:creator>Robert Savage</dc:creator><dc:date>2012-09-21T12:39:28Z</dc:date><dc:subject>Embedded Computing Java Pi4J Raspberry Pi Raspberry Pi gpio java pi pi4j raspberry</dc:subject><content:encoded><![CDATA[<p><span class="full-image-block ssNonEditable"><span><img src="http://www.savagehomeautomation.com/storage/post-images/raspberrypi/raspi-banner680.png?__SQUARESPACE_CACHEVERSION=1347431055301" alt="" /></span></span></p>
<p style="text-align: center;"><span class="full-image-block ssNonEditable"><span><a href="http://pi4j.com/" target="_blank"><img src="http://www.savagehomeautomation.com/storage/post-images/raspberrypi/pi4j-header-small3.png?__SQUARESPACE_CACHEVERSION=1348231401785" alt="" /></a></span></span></p>
<p style="text-align: left;"><strong>Announcing the&nbsp;<strong><a class="offsite-link-inline" href="http://pi4j.com/" target="_blank">Pi4J</a></strong>&nbsp;project!</strong></p>
<p>This project is intended to provide a bridge between the native hardware and Java for full access to the Raspberry Pi in with a Java-friendly object-oriented approach. &nbsp;Pi4J is an open source project developed by professional software engineers. &nbsp;In addition to the basic raw hardware access functionality, this project also attempts to provide a set of advanced features that make working with the Raspberry&nbsp;Pi an easy to implement and more convenient&nbsp;experience for Java developers. &nbsp;&nbsp;</p>
<p><strong>Project Website</strong></p>
<ul>
<li><a class="offsite-link-inline" href="http://pi4j.com/" target="_blank">http://www.pi4j.com</a></li>
</ul>
<p><strong>Source Repository</strong></p>
<ul>
<li><a class="offsite-link-inline" href="https://github.com/Pi4J/pi4j/" target="_blank">https://github.com/Pi4J/pi4j/</a></li>
</ul>
<p><strong><br />Basic Features </strong></p>
<ul>
<li>Export &amp; unexport GPIO pins</li>
<li>Configure GPIO pin direction</li>
<li>Configure GPIO pin edge detection</li>
<li>Control/write/set&nbsp;GPIO pin states</li>
<li>Read GPIO pin states</li>
<li>Send &amp; receive data via RS232 serial communication</li>
</ul>
<p><strong><br />Advanced Features</strong></p>
<ul>
<li>Pulse&nbsp;GPIO&nbsp;pin states</li>
<li>Listen for&nbsp;GPIO&nbsp;pin state changes (<strong>interrupt-based events; not polling</strong>)</li>
<li>Automatically set&nbsp;GPIO&nbsp;states on program termination (<strong>GPIO&nbsp;shutdown</strong>)</li>
<li>Triggers for automation based on pin state changes</li>
<li>Access system information and network information from the Raspberry Pi</li>
<li>Wrapper classes for direct access to&nbsp;WiringPi&nbsp;Library from Java</li>
</ul>
<p><strong><br />Getting Started</strong><a name="Getting_Started"></a></p>
<p>To get started using the Pi4J library, please see the&nbsp;<a class="offsite-link-inline" href="http://pi4j.com/usage.html" target="_blank">Usage</a>&nbsp;page and review each of the examples below to explore the functionality provided by the Pi4j library.</p>
<ul>
<li><a class="offsite-link-inline" href="http://pi4j.com/example/control.html" target="_blank">Control GPIO</a></li>
<li><a class="offsite-link-inline" href="http://pi4j.com/example/listener.html" target="_blank">Listen for GPIO Events</a></li>
<li><a class="offsite-link-inline" href="http://pi4j.com/example/shutdown.html" target="_blank">Shutdown GPIO</a></li>
<li><a class="offsite-link-inline" href="http://pi4j.com/example/trigger.html" target="_blank">Trigger GPIO on Events</a></li>
<li><a class="offsite-link-inline" href="http://pi4j.com/example/serial.html" target="_blank">Serial Communication</a></li>
<li><a class="offsite-link-inline" href="http://pi4j.com/example/system-info.html" target="_blank">System/Network Information</a></li>
</ul>
<p><strong><br />Simple Usage Example</strong></p>
<p>Below is a simple example demonstrating controlling a single GPIO pin state.<br />(<em>Please visit this page for a more in-depth view of this example: <a class="offsite-link-inline" href="http://pi4j.com/example/control.html" target="_blank">Control GPIO Example</a></em>)&nbsp;</p>
<blockquote>
<div>
<pre class="prettyprint"><span class="kwd">public</span><span class="pln"> </span><span class="kwd">static</span><span class="pln"> </span><span class="kwd">void</span><span class="pln"> main</span><span class="pun">(</span><span class="typ">String</span><span class="pun">[]</span><span class="pln"> args</span><span class="pun">)</span><span class="pln"> </span><span class="kwd">throws</span><span class="pln"> </span><span class="typ">InterruptedException</span><span class="pln">
</span><span class="pun">{</span><span class="pln">
    </span><span class="typ">System</span><span class="pun">.</span><span class="kwd">out</span><span class="pun">.</span><span class="pln">println</span><span class="pun">(</span><span class="str">"&lt;--Pi4J--&gt; GPIO Control Example ... started."</span><span class="pun">);</span><span class="pln">
        
    </span><span class="com">// create gpio controller</span><span class="pln">
    </span><span class="typ">Gpio</span><span class="pln"> gpio </span><span class="pun">=</span><span class="pln"> </span><span class="typ">GpioFactory</span><span class="pun">.</span><span class="pln">createInstance</span><span class="pun">();</span><span class="pln">
        
    </span><span class="com">// provision gpio pin #01 as an output pin and turn on</span><span class="pln">
    </span><span class="typ">GpioPin</span><span class="pln"> pin </span><span class="pun">=</span><span class="pln"> gpio</span><span class="pun">.</span><span class="pln">provisionOuputPin</span><span class="pun">(</span><span class="typ">Pin</span><span class="pun">.</span><span class="pln">GPIO_01</span><span class="pun">,</span><span class="pln"> </span><span class="str">"MyLED"</span><span class="pun">,</span><span class="pln"> <br /></span><span class="typ">                                                PinState</span><span class="pun">.</span><span class="pln">HIGH</span><span class="pun">);</span><span class="pln">
    </span><span class="typ">System</span><span class="pun">.</span><span class="kwd">out</span><span class="pun">.</span><span class="pln">println</span><span class="pun">(</span><span class="str">"--&gt; GPIO state should be: ON"</span><span class="pun">);</span><span class="pln">
        
    </span><span class="typ">Thread</span><span class="pun">.</span><span class="pln">sleep</span><span class="pun">(</span><span class="lit">5000</span><span class="pun">);</span><span class="pln">
        
    </span><span class="com">// turn off gpio pin #01</span><span class="pln">
    pin</span><span class="pun">.</span><span class="pln">low</span><span class="pun">();</span><span class="pln">
    </span><span class="typ">System</span><span class="pun">.</span><span class="kwd">out</span><span class="pun">.</span><span class="pln">println</span><span class="pun">(</span><span class="str">"--&gt; GPIO state should be: OFF"</span><span class="pun">);</span><span class="pln"><br /></span></pre>
<pre class="prettyprint"><span class="pln">    </span><span class="typ">Thread</span><span class="pun">.</span><span class="pln">sleep</span><span class="pun">(</span><span class="lit">5000</span><span class="pun">);</span><span class="pln">

    </span><span class="com">// toggle the current state of gpio pin #01 (should turn on)</span><span class="pln">
    pin</span><span class="pun">.</span><span class="pln">toggle</span><span class="pun">();</span><span class="pln">
    </span><span class="typ">System</span><span class="pun">.</span><span class="kwd">out</span><span class="pun">.</span><span class="pln">println</span><span class="pun">(</span><span class="str">"--&gt; GPIO state should be: ON"</span><span class="pun">);</span><span class="pln">

    </span><span class="typ">Thread</span><span class="pun">.</span><span class="pln">sleep</span><span class="pun">(</span><span class="lit">5000</span><span class="pun">);</span><span class="pln">

    </span><span class="com">// toggle the current state of gpio pin #01  (should turn off)</span><span class="pln">
    pin</span><span class="pun">.</span><span class="pln">toggle</span><span class="pun">();</span><span class="pln">
    </span><span class="typ">System</span><span class="pun">.</span><span class="kwd">out</span><span class="pun">.</span><span class="pln">println</span><span class="pun">(</span><span class="str">"--&gt; GPIO state should be: OFF"</span><span class="pun">);</span><span class="pln">
        
    </span><span class="typ">Thread</span><span class="pun">.</span><span class="pln">sleep</span><span class="pun">(</span><span class="lit">5000</span><span class="pun">);</span><span class="pln">

    </span><span class="com">// turn on gpio pin #01 for 1 second and then off</span><span class="pln">
    </span><span class="typ">System</span><span class="pun">.</span><span class="kwd">out</span><span class="pun">.</span><span class="pln">println</span><span class="pun">(</span><span class="str">"--&gt; GPIO state should be: ON for only 1 second"</span><span class="pun">);</span><span class="pln">
    pin</span><span class="pun">.</span><span class="pln">pulse</span><span class="pun">(</span><span class="lit">1000</span><span class="pun">);</span><span class="pln">
</span><span class="pun">}</span></pre>
</div>
</blockquote>
<p><br />Stay tuned ... more articles to come on using the <a class="offsite-link-inline" href="http://pi4j.com/index.html" target="_blank">Pi4J</a> library.</p>
<ul>
</ul>]]></content:encoded></rss:item><rss:item rdf:about="http://www.savagehomeautomation.com/projects/raspberry-pi-power-up-using-the-5v-header-pin.html"><rss:title>Raspberry Pi - Power Up using the 5V Header Pin</rss:title><rss:link>http://www.savagehomeautomation.com/projects/raspberry-pi-power-up-using-the-5v-header-pin.html</rss:link><dc:creator>Robert Savage</dc:creator><dc:date>2012-09-12T06:45:48Z</dc:date><dc:subject>Embedded Computing Raspberry Pi Raspberry Pi pi power raspberry</dc:subject><content:encoded><![CDATA[<p><span class="full-image-block ssNonEditable"><span><img src="http://www.savagehomeautomation.com/storage/post-images/raspberrypi/raspi-banner680.png?__SQUARESPACE_CACHEVERSION=1347431055301" alt="" /></span></span></p>
<p>Just a quick experiment powering the Raspberry Pi using the 5VDC and GND pins via the 26P GPIO header. &nbsp; The Pi powered up with no problems including providing sufficient power for my direct attached&nbsp;<a class="offsite-link-inline" href="http://www.amazon.com/exec/obidos/ASIN/B005CLMJLU/savagehomeaut-20" target="_blank">Edimax EW-7811Un 150 Mbps Wireless 11b|g|n Nano Sized USB Adapter</a>. &nbsp;I was able to remotely connect to the Pi using the WiFi connection and control the GPIO pins.&nbsp;&nbsp;</p>
<blockquote>
<p><strong>Important Note!</strong> &nbsp;<br /><br />Please be aware that if you attempt this, you should use a regulated power supply. &nbsp;Don't connect a battery pack or unregulated power supply unless you are using a voltage regulation circuit. Un-filtered/unregulated power may cause damage to you Pi. &nbsp;</p>
</blockquote>
<p style="text-align: center;"><img src="http://www.savagehomeautomation.com/storage/post-images/raspberrypi/pi5v.jpg?__SQUARESPACE_CACHEVERSION=1347432555423" alt="" /></p>
<p>You can see the specific header pins used in the photo below:</p>
<ul>
<li>PIN 2 &nbsp; = &nbsp; +5VDC (VCC) &nbsp; &nbsp;(<em>Red wire in photo</em>)</li>
<li>PIN 6 &nbsp; = &nbsp; GROUND &nbsp; &nbsp; &nbsp; &nbsp; &nbsp; (<em>Green wire in photo</em>)</li>
</ul>
<p style="text-align: center;"><span class="thumbnail-image-block ssNonEditable"><span><a href="javascript:showFullImage('/display/ShowImage?imageUrl=%2Fstorage%2Fpost-images%2Fraspberrypi%2Fpi5v2.jpg%3F__SQUARESPACE_CACHEVERSION%3D1347433573036',1000,1600);"><img src="http://www.savagehomeautomation.com/storage/thumbnails/13113340-20244665-thumbnail.jpg?__SQUARESPACE_CACHEVERSION=1347433573037" alt="" /></a></span></span></p>
<p>*&nbsp;Raspberry Pi is a trademark of the Raspberry Pi foundation.</p>]]></content:encoded></rss:item><rss:item rdf:about="http://www.savagehomeautomation.com/projects/raspberry-pi-adafruit-pi-box.html"><rss:title>Raspberry Pi - Adafruit Pi Box</rss:title><rss:link>http://www.savagehomeautomation.com/projects/raspberry-pi-adafruit-pi-box.html</rss:link><dc:creator>Robert Savage</dc:creator><dc:date>2012-09-12T06:01:09Z</dc:date><dc:subject>Embedded Computing Raspberry Pi Raspberry Pi case enclosure pi raspberry</dc:subject><content:encoded><![CDATA[<p><span class="full-image-block ssNonEditable"><span><img src="http://www.savagehomeautomation.com/storage/post-images/raspberrypi/raspi-banner680.png?__SQUARESPACE_CACHEVERSION=1347431055301" alt="" /></span></span></p>
<p>I received my Pi Box from Adafruit and immediately assembled the kit. &nbsp;</p>
<p><span class="thumbnail-image-block ssNonEditable"><span><a href="javascript:showFullImage('/display/ShowImage?imageUrl=%2Fstorage%2Fpost-images%2Fraspberrypi%2Fpibox1.jpg%3F__SQUARESPACE_CACHEVERSION%3D1347431442206',1200,1600);"><img src="http://www.savagehomeautomation.com/storage/thumbnails/13113340-20244561-thumbnail.jpg?__SQUARESPACE_CACHEVERSION=1347431442208" alt="" /></a></span></span></p>
<p>I love the size and look of this case. &nbsp;</p>
<p>PROS:</p>
<ul>
<li>Clear / See-Thru</li>
<li>Great Looking</li>
<li>Lightweight</li>
<li>Compact</li>
<li>Slot/Slit for GPIO 26P ribbon cable</li>
<li>Easy disassembly for access to hardware if needed</li>
</ul>
<p>CONS</p>
<ul>
<li>Assembly required</li>
<li>The plastic panels all comes with the protective film which I appreciate, but removing this protective film can be a chore.</li>
<li>The panels fit together and snap to lock in place; however the panels are somewhat loose fitting and the assembled enclosure can feel a bit "loose". &nbsp;<br />(<em>There is nothing structurally wrong with the design, I just wish it had a tighter, more solid fit</em>.) &nbsp; &nbsp;</li>
<li>The price at $15 feel a bit high for 6 plastic panels that I had to remove the films and assemble. &nbsp;(<em>Probably due to low production volumes.</em>)<br /><br /></li>
</ul>
<p>Despite the CONS listed, I really do like this case overall. &nbsp;There is room for improvement but this is great looking simple little case. &nbsp;For assembly time, expect around 20-30 minutes. &nbsp; &nbsp;</p>
<p>You can purchase this case via the link below:<br /><a href="https://www.adafruit.com/products/859">https://www.adafruit.com/products/859</a>&nbsp;</p>
<p>Here are a few&nbsp;additional photos. &nbsp;Click any of the images to enlarge.</p>
<p><span class="thumbnail-image-float-left ssNonEditable"><span><a href="javascript:showFullImage('/display/ShowImage?imageUrl=%2Fstorage%2Fpost-images%2Fraspberrypi%2Fpibox2.jpg%3F__SQUARESPACE_CACHEVERSION%3D1347431594036',1200,1600);"><img style="width: 210px;" src="http://www.savagehomeautomation.com/storage/thumbnails/13113340-20244573-thumbnail.jpg?__SQUARESPACE_CACHEVERSION=1347432016199" alt="" /></a></span></span><span class="thumbnail-image-float-left ssNonEditable"><span><a href="javascript:showFullImage('/display/ShowImage?imageUrl=%2Fstorage%2Fpost-images%2Fraspberrypi%2Fpibox3.jpg%3F__SQUARESPACE_CACHEVERSION%3D1347431686322',1200,1600);"><img style="width: 210px;" src="http://www.savagehomeautomation.com/storage/thumbnails/13113340-20244582-thumbnail.jpg?__SQUARESPACE_CACHEVERSION=1347432023447" alt="" /></a></span></span></p>
<p><span class="thumbnail-image-block ssNonEditable"><span><a href="javascript:showFullImage('/display/ShowImage?imageUrl=%2Fstorage%2Fpost-images%2Fraspberrypi%2Fpibox4.jpg%3F__SQUARESPACE_CACHEVERSION%3D1347431955278',1200,1600);"><img style="width: 210px;" src="http://www.savagehomeautomation.com/storage/thumbnails/13113340-20244594-thumbnail.jpg?__SQUARESPACE_CACHEVERSION=1347432029892" alt="" /></a></span>&nbsp;</span></p>
<p><span>*&nbsp;Raspberry Pi is a trademark of the Raspberry Pi foundation.</span></p>]]></content:encoded></rss:item><rss:item rdf:about="http://www.savagehomeautomation.com/projects/raspberry-pi-shopping-list.html"><rss:title>Raspberry Pi - Shopping List</rss:title><rss:link>http://www.savagehomeautomation.com/projects/raspberry-pi-shopping-list.html</rss:link><dc:creator>Robert Savage</dc:creator><dc:date>2012-08-26T15:25:22Z</dc:date><dc:subject>Embedded Computing Raspberry Pi Raspberry Pi pi raspberry</dc:subject><content:encoded><![CDATA[<p><span class="ssNonEditable full-image-block"><img src="http://www.savagehomeautomation.com/storage/post-images/raspberrypi/raspi-banner680.png?__SQUARESPACE_CACHEVERSION=1344866873551" alt="" /></span></p>
<p><span class="full-image-float-right ssNonEditable"><span><img src="http://www.savagehomeautomation.com/storage/post-images/raspberrypi/shopping-cart.png?__SQUARESPACE_CACHEVERSION=1345997825383" alt="" /></span></span>For users wanting to beginning working with the Raspberry Pi, here is a shopping list for the necessary supplies, optional components and other learning resources to get started.</p>
<p><strong>Raspberry Pi</strong></p>
<ul>
<li><a class="offsite-link-inline" href="http://www.element14.com/community/groups/raspberry-pi" target="_blank">Raspberry Pi - Model B (<em>from Farnell/Newark</em>)</a></li>
<li><a class="offsite-link-inline" href="http://uk.rs-online.com/web/generalDisplay.html?id=raspberrypi" target="_blank">Raspberry Pi - Model B (<em>from RS Components/Allied Electronics</em>)</a></li>
</ul>
<p><strong>Books</strong></p>
<ul>
<li><a class="offsite-link-inline" href="http://www.amazon.com/exec/obidos/ASIN/111846446X/savagehomeaut-20" target="_blank">Raspberry Pi User Guide</a>&nbsp;(<em>Personally Read</em>)&nbsp;<span class="ssNonEditable full-image-inline"><img src="http://www.savagehomeautomation.com/storage/post-images/raspberrypi/raspiicon.png?__SQUARESPACE_CACHEVERSION=1350773176405" alt="" /><img src="http://www.savagehomeautomation.com/storage/post-images/raspberrypi/raspiicon.png?__SQUARESPACE_CACHEVERSION=1350773176405" alt="" /><img src="http://www.savagehomeautomation.com/storage/post-images/raspberrypi/raspiicon.png?__SQUARESPACE_CACHEVERSION=1350773176405" alt="" /></span></li>
<li><a class="offsite-link-inline" href="http://www.amazon.com/exec/obidos/ASIN/0071807837/savagehomeaut-20" target="_blank">Programming the Raspberry Pi: Getting Started with Python</a></li>
<li><a class="offsite-link-inline" href="http://www.amazon.com/exec/obidos/ASIN/1449344216/savagehomeaut-20" target="_blank">Getting Started with Raspberry Pi</a></li>
<li><a class="offsite-link-inline" href="http://www.amazon.com/exec/obidos/ASIN/B008MYLMMQ/savagehomeaut-20" target="_blank">Meet the Raspberry Pi</a></li>
<li><a class="offsite-link-inline" href="http://www.amazon.com/exec/obidos/ASIN/B008C4JLZG/savagehomeaut-20" target="_blank">Beginning Raspberry Pi</a></li>
<li><a class="offsite-link-inline" href="http://www.amazon.com/exec/obidos/ASIN/B00979OA6K/savagehomeaut-20" target="_blank">Raspberry Pi - A Complete Beginner's Guide</a></li>
</ul>
<p><strong>Power Supply (5 VDC, at least 700 mA)</strong></p>
<ul>
<li><a class="offsite-link-inline" href="http://www.amazon.com/exec/obidos/ASIN/B004EYSKM8/savagehomeaut-20" target="_blank">Motorola Micro-USB Home and Travel Charger</a></li>
<li><a class="offsite-link-inline" href="http://store.apple.com/us/product/MB352LL/C/apple-usb-power-adapter?fnode=48" target="_blank">Apple iPhone Charger (1A)</a>&nbsp;&nbsp;(<em>Personally Tested</em>)&nbsp;<span class="ssNonEditable full-image-inline"><img src="http://www.savagehomeautomation.com/storage/post-images/raspberrypi/raspiicon.png?__SQUARESPACE_CACHEVERSION=1350773176405" alt="" /><img src="http://www.savagehomeautomation.com/storage/post-images/raspberrypi/raspiicon.png?__SQUARESPACE_CACHEVERSION=1350773176405" alt="" /><img src="http://www.savagehomeautomation.com/storage/post-images/raspberrypi/raspiicon.png?__SQUARESPACE_CACHEVERSION=1350773176405" alt="" /></span></li>
<li><a class="offsite-link-inline" href="http://www.amazon.com/exec/obidos/ASIN/B003ES5ZSW/savagehomeaut-20" target="_blank">USB to Micro-USB Cable</a></li>
<li><a class="offsite-link-inline" href="https://www.adafruit.com/products/501" target="_blank">Adafruit 5V 1A USB Power Supply</a></li>
<li><a class="offsite-link-inline" href="http://www.amazon.com/gp/product/B003ES5ZSW/ref=oh_details_o00_s01_i00" target="_blank">AmazonBasics USB Cable - 2.0 A Male to Micro B (6 Feet / 1.8 Meters)</a>&nbsp;(<em>Personally Tested</em>) <img src="http://www.savagehomeautomation.com/storage/post-images/raspberrypi/raspiicon.png?__SQUARESPACE_CACHEVERSION=1350773176405" alt="" /><img src="http://www.savagehomeautomation.com/storage/post-images/raspberrypi/raspiicon.png?__SQUARESPACE_CACHEVERSION=1350773176405" alt="" /><img src="http://www.savagehomeautomation.com/storage/post-images/raspberrypi/raspiicon.png?__SQUARESPACE_CACHEVERSION=1350773176405" alt="" /></li>
</ul>
<p><strong>SD Memory Card (4GB or above)</strong></p>
<ul>
<li><a class="offsite-link-inline" href="http://www.amazon.com/exec/obidos/ASIN/B0058GH0LS/savagehomeaut-20" target="_blank">AmazonBasics 8 GB SDHC Card (Class 10)</a></li>
<li><a class="offsite-link-inline" href="http://www.amazon.com/exec/obidos/ASIN/B0058GH1IK/savagehomeaut-20" target="_blank">AmazonBasics 16 GB SDHC Card (Class 10)</a>&nbsp;(<em>Personally Tested</em>)&nbsp;<span class="ssNonEditable full-image-inline"><img src="http://www.savagehomeautomation.com/storage/post-images/raspberrypi/raspiicon.png?__SQUARESPACE_CACHEVERSION=1350773176405" alt="" /><img src="http://www.savagehomeautomation.com/storage/post-images/raspberrypi/raspiicon.png?__SQUARESPACE_CACHEVERSION=1350773176405" alt="" /><img src="http://www.savagehomeautomation.com/storage/post-images/raspberrypi/raspiicon.png?__SQUARESPACE_CACHEVERSION=1350773176405" alt="" /></span></li>
<li><a class="offsite-link-inline" href="http://www.amazon.com/exec/obidos/ASIN/B0058GH2DY/savagehomeaut-20" target="_blank">AmazonBasics 32 GB SDHC Card (Class 10)</a></li>
<li><a class="offsite-link-inline" href="http://www.amazon.com/exec/obidos/ASIN/B003VNKNEG/savagehomeaut-20" target="_blank">Transcend 8 GB SDHC Card (Class 10)</a>&nbsp;&nbsp; (<em>Personally Tested</em>)&nbsp;<span class="ssNonEditable full-image-inline"><img src="http://www.savagehomeautomation.com/storage/post-images/raspberrypi/raspiicon.png?__SQUARESPACE_CACHEVERSION=1350773176405" alt="" /><img src="http://www.savagehomeautomation.com/storage/post-images/raspberrypi/raspiicon.png?__SQUARESPACE_CACHEVERSION=1350773176405" alt="" /></span></li>
<li><a class="offsite-link-inline" href="http://www.amazon.com/exec/obidos/ASIN/B003VNKNEQ/savagehomeaut-20" target="_blank">Transcend 16 GB SDHC Card (Class 10)</a>&nbsp;&nbsp;(<em>Personally Tested</em>)&nbsp;<span class="ssNonEditable full-image-inline"><img src="http://www.savagehomeautomation.com/storage/post-images/raspberrypi/raspiicon.png?__SQUARESPACE_CACHEVERSION=1350773176405" alt="" /><img src="http://www.savagehomeautomation.com/storage/post-images/raspberrypi/raspiicon.png?__SQUARESPACE_CACHEVERSION=1350773176405" alt="" /><img src="http://www.savagehomeautomation.com/storage/post-images/raspberrypi/raspiicon.png?__SQUARESPACE_CACHEVERSION=1350773176405" alt="" /></span></li>
<li><a class="offsite-link-inline" href="http://www.amazon.com/exec/obidos/ASIN/B003VNKNF0/savagehomeaut-20" target="_blank">Transcend 32 GB SDHC Card (Class 10)</a></li>
</ul>
<p><strong>HDMI Cable</strong></p>
<ul>
<li><a class="offsite-link-inline" href="http://www.amazon.com/exec/obidos/ASIN/B003L1ZYYM/savagehomeaut-20" target="_blank">AmazonBasics HDMI Cable (2 meters)</a> - <em>If your display supports HDMI input (Personally Tested) <img src="http://www.savagehomeautomation.com/storage/post-images/raspberrypi/raspiicon.png?__SQUARESPACE_CACHEVERSION=1350773176405" alt="" /><img src="http://www.savagehomeautomation.com/storage/post-images/raspberrypi/raspiicon.png?__SQUARESPACE_CACHEVERSION=1350773176405" alt="" /><img src="http://www.savagehomeautomation.com/storage/post-images/raspberrypi/raspiicon.png?__SQUARESPACE_CACHEVERSION=1350773176405" alt="" /></em></li>
<li><a class="offsite-link-inline" href="http://www.amazon.com/exec/obidos/ASIN/B001TH7T2U/savagehomeaut-20" target="_blank">AmazonBasics HDMI to DVI Cable (3 meters)</a>&nbsp;-&nbsp;<em>If your display only supports DVI input (Personally Tested)&nbsp;<span class="ssNonEditable full-image-inline"><img src="http://www.savagehomeautomation.com/storage/post-images/raspberrypi/raspiicon.png?__SQUARESPACE_CACHEVERSION=1350773176405" alt="" /><img src="http://www.savagehomeautomation.com/storage/post-images/raspberrypi/raspiicon.png?__SQUARESPACE_CACHEVERSION=1350773176405" alt="" /><img src="http://www.savagehomeautomation.com/storage/post-images/raspberrypi/raspiicon.png?__SQUARESPACE_CACHEVERSION=1350773176405" alt="" /></span></em></li>
<li><a class="offsite-link-inline" href="http://www.amazon.com/exec/obidos/ASIN/B004C9QST2/savagehomeaut-20" target="_blank">HDMI to Display Port Cable (10 feet)</a>&nbsp;<span style="font-style: italic;">-&nbsp;</span><span style="font-style: italic;">If your display only supports Display Port</span></li>
</ul>
<p><strong>Network&nbsp;</strong></p>
<ul>
<li><a class="offsite-link-inline" href="http://www.amazon.com/exec/obidos/ASIN/B001TH7GVE/savagehomeaut-20" target="_blank">AmazonBasics RJ45 Cat5e Ethernet Patch Cable (4.2 Meters)</a></li>
<li><a class="offsite-link-inline" href="http://www.amazon.com/exec/obidos/ASIN/B001TH7GVO/savagehomeaut-20" target="_blank">AmazonBasics RJ45 Cat5e Ethernet Patch Cable (15.2 Meters)</a></li>
</ul>
<p><strong>Wireless Network (Optional)</strong></p>
<ul>
<li><a class="offsite-link-inline" href="http://www.amazon.com/exec/obidos/ASIN/B005CLMJLU/savagehomeaut-20" target="_blank">Edimax EW-7811Un 150 Mbps Wireless 11b|g|n Nano Sized USB Adapter</a>&nbsp;&nbsp;(<em>Personally Tested</em>)&nbsp;<span class="ssNonEditable full-image-inline"><img src="http://www.savagehomeautomation.com/storage/post-images/raspberrypi/raspiicon.png?__SQUARESPACE_CACHEVERSION=1350773176405" alt="" /><img src="http://www.savagehomeautomation.com/storage/post-images/raspberrypi/raspiicon.png?__SQUARESPACE_CACHEVERSION=1350773176405" alt="" /><img src="http://www.savagehomeautomation.com/storage/post-images/raspberrypi/raspiicon.png?__SQUARESPACE_CACHEVERSION=1350773176405" alt="" /></span><br />&gt;&gt; <a class="offsite-link-inline" href="http://www.savagehomeautomation.com/raspi-edimax-ew-7811un" target="_blank">Review &amp; Installation Instructions</a>&nbsp;</li>
<li><a class="offsite-link-inline" href="http://www.amazon.com/exec/obidos/ASIN/B006ZZUK5Y/savagehomeaut-20" target="_blank">Airlink 101 Wireless N 150 Ultra Mini-USB Adapter</a>&nbsp; (<em>Personally Tested</em>)&nbsp;<span class="ssNonEditable full-image-inline"><img src="http://www.savagehomeautomation.com/storage/post-images/raspberrypi/raspiicon.png?__SQUARESPACE_CACHEVERSION=1350773176405" alt="" /><img src="http://www.savagehomeautomation.com/storage/post-images/raspberrypi/raspiicon.png?__SQUARESPACE_CACHEVERSION=1350773176405" alt="" /></span><br />&gt;&gt;&nbsp;<a class="offsite-link-inline" href="http://www.savagehomeautomation.com/raspi-airlink101" target="_blank">Review &amp; Installation Instructions</a>&nbsp;&nbsp;</li>
</ul>
<p><strong>USB Keyboard &amp; Mouse</strong></p>
<ul>
<li><a class="offsite-link-inline" href="http://www.amazon.com/exec/obidos/ASIN/B005EOWBHC/savagehomeaut-20" target="_blank">AmazonBasics Wired USB Keyboard (Black)</a></li>
<li><a class="offsite-link-inline" href="http://www.amazon.com/exec/obidos/ASIN/B005EJH6RW/savagehomeaut-20" target="_blank">AmazonBasics Wired USB Mouse (Black)</a></li>
<li><a class="offsite-link-inline" href="http://www.amazon.com/exec/obidos/ASIN/B003NREDC8/savagehomeaut-20" target="_blank">Logitech Desktop MK120 Mouse and keyboard Combo</a>&nbsp;</li>
</ul>
<p><strong>Case / Enclosure (Optional)</strong></p>
<ul>
<li><a class="offsite-link-inline" href="http://www.savagehomeautomation.com/projects/raspberry-pi-sb-clear-raspberry-pi-enclosure.html" target="_blank">SB Clear Raspberry Pi Enclosure</a>&nbsp; &nbsp; (<em>Personally Tested &gt; <a class="offsite-link-inline" href="http://www.savagehomeautomation.com/projects/raspberry-pi-sb-clear-raspberry-pi-enclosure.html" target="_blank">REVIEW</a></em>)&nbsp;<span class="ssNonEditable full-image-inline"><img src="http://www.savagehomeautomation.com/storage/post-images/raspberrypi/raspiicon.png?__SQUARESPACE_CACHEVERSION=1350773176405" alt="" /><img src="http://www.savagehomeautomation.com/storage/post-images/raspberrypi/raspiicon.png?__SQUARESPACE_CACHEVERSION=1350773176405" alt="" /><img src="http://www.savagehomeautomation.com/storage/post-images/raspberrypi/raspiicon.png?__SQUARESPACE_CACHEVERSION=1350773176405" alt="" /></span></li>
<li><a class="offsite-link-inline" href="http://www.amazon.com/exec/obidos/ASIN/B009NKNDVG/savagehomeaut-20" target="_blank">Multicomp Clear Raspberry Pi Enclosure</a></li>
<li><a class="offsite-link-inline" href="https://www.modmypi.com/shop/raspberry-pi-cases" target="_blank">ModMyPi Cases</a></li>
<li><a class="offsite-link-inline" href="http://www.newark.com/bud-industries/ps-11591/raspberry-pi-enclosure-pcb-box/dp/92T3300" target="_blank">Bud Industries PS-11591 Red Plastic Enclosure</a>&nbsp;(<em>Personally Tested</em>)&nbsp;<img src="http://www.savagehomeautomation.com/storage/post-images/raspberrypi/raspiicon.png?__SQUARESPACE_CACHEVERSION=1350773176405" alt="" /></li>
<li><a class="offsite-link-inline" href="https://www.adafruit.com/products/859" target="_blank">Adafruit Pi Box</a>&nbsp;&nbsp; (<em>Personally Tested &gt; <a class="offsite-link-inline" href="http://www.savagehomeautomation.com/projects/raspberry-pi-adafruit-pi-box.html" target="_blank">REVIEW</a></em>)&nbsp;<span class="ssNonEditable full-image-inline"><img src="http://www.savagehomeautomation.com/storage/post-images/raspberrypi/raspiicon.png?__SQUARESPACE_CACHEVERSION=1350773176405" alt="" /><img src="http://www.savagehomeautomation.com/storage/post-images/raspberrypi/raspiicon.png?__SQUARESPACE_CACHEVERSION=1350773176405" alt="" /></span></li>
<li><a class="offsite-link-inline" href="http://www.pibow.com/" target="_blank">Pilbow</a></li>
</ul>
<p><strong>Powered USB Hub (Optional)</strong></p>
<ul>
<li><a class="offsite-link-inline" href="http://www.amazon.com/exec/obidos/ASIN/B001DBF07I/savagehomeaut-20" target="_blank">Macally Mini 4-Port USB 2.0 Hub with AC Adapter</a></li>
<li><a class="offsite-link-inline" href="http://www.amazon.com/exec/obidos/ASIN/B001DBF07S/savagehomeaut-20" target="_blank">Macally Mini 7-Port USB 2.0 Hub with AC Adapter</a></li>
<li><a class="offsite-link-inline" href="http://www.amazon.com/exec/obidos/ASIN/B00008VFAF/savagehomeaut-20" target="_blank">D-Link DUB-H7 High Speed USB 2.0 7-Port Hub</a></li>
<li><a class="offsite-link-inline" href="http://www.amazon.com/exec/obidos/ASIN/B00006B7DA/savagehomeaut-20" target="_blank">D-Link DUB-H4 High Speed USB 2.0 4-Port Hub</a></li>
</ul>
<p><strong><strong>Expansion (Optional - Programming)</strong></strong></p>
<ul>
<li><a class="offsite-link-inline" href="http://www.raspberrypi.org/archives/1734" target="_blank">Gertboard </a>&nbsp;(<a class="offsite-link-inline" href="http://www.newark.com/element14/gertbom/gertboard-bare-pcb-w-components/dp/24W8739?Ntt=24W8739&amp;COM=raspberry-group-gert" target="_blank"><em>Buy</em></a>)</li>
<li><a class="offsite-link-inline" href="http://adafruit.com/products/801" target="_blank">Adafruit Pi Plate</a></li>
<li><a class="offsite-link-inline" href="http://adafruit.com/products/942" target="_blank">Adafruit Pi Dish</a></li>
<li><a class="offsite-link-inline" href="http://adafruit.com/products/954" target="_blank">Adafruit USB to TTL Serial Cable - Debug/Console</a>&nbsp;(<em>Personally Tested</em>)&nbsp;<img src="http://www.savagehomeautomation.com/storage/post-images/raspberrypi/raspiicon.png?__SQUARESPACE_CACHEVERSION=1350773176405" alt="" /><img src="http://www.savagehomeautomation.com/storage/post-images/raspberrypi/raspiicon.png?__SQUARESPACE_CACHEVERSION=1350773176405" alt="" /><img src="http://www.savagehomeautomation.com/storage/post-images/raspberrypi/raspiicon.png?__SQUARESPACE_CACHEVERSION=1350773176405" alt="" /></li>
<li><a class="offsite-link-inline" href="http://adafruit.com/products/914" target="_blank">Adafruit Pi Cobler</a>&nbsp;(<em>Personally Tested</em>)&nbsp;<img src="http://www.savagehomeautomation.com/storage/post-images/raspberrypi/raspiicon.png?__SQUARESPACE_CACHEVERSION=1350773176405" alt="" /><img src="http://www.savagehomeautomation.com/storage/post-images/raspberrypi/raspiicon.png?__SQUARESPACE_CACHEVERSION=1350773176405" alt="" /><img src="http://www.savagehomeautomation.com/storage/post-images/raspberrypi/raspiicon.png?__SQUARESPACE_CACHEVERSION=1350773176405" alt="" /></li>
<li><a class="offsite-link-inline" href="http://www.xbitinc.com/products/RS%252d232-Level-Shifter-with-DB9-Connector.html" target="_blank">Xbit Electronics RS-232 Level Shifter with DB9 Connector</a>&nbsp; (<a href="http://www.savagehomeautomation.com/projects/raspberry-pi-installing-a-rs232-serial-port.html"><em>How To Install</em></a>) &nbsp;(<em>Personally Tested</em>)&nbsp;<span class="ssNonEditable full-image-inline"><img src="http://www.savagehomeautomation.com/storage/post-images/raspberrypi/raspiicon.png?__SQUARESPACE_CACHEVERSION=1350773176405" alt="" /><img src="http://www.savagehomeautomation.com/storage/post-images/raspberrypi/raspiicon.png?__SQUARESPACE_CACHEVERSION=1350773176405" alt="" /><img src="http://www.savagehomeautomation.com/storage/post-images/raspberrypi/raspiicon.png?__SQUARESPACE_CACHEVERSION=1350773176405" alt="" /></span></li>
<li>Prototyping Jumer Wires (<a class="offsite-link-inline" href="https://www.adafruit.com/products/758" target="_blank"><em>Male-to-Male</em></a> | <a class="offsite-link-inline" href="https://www.adafruit.com/products/266" target="_blank"><em>Female-to-Female</em></a> | <a class="offsite-link-inline" href="https://www.adafruit.com/products/758" target="_blank"><em>Male-to-Female</em></a>)</li>
<li><a class="offsite-link-inline" href="https://www.adafruit.com/products/239" target="_blank">Solderless Breadboard</a></li>
<li><a href="http://www.savagehomeautomation.com/jj-led">John Jay's 8 LED &amp; Button Breakout Board</a> &nbsp;(<a href="http://www.savagehomeautomation.com/jj-led"><em>How To Build/Install</em></a>) &nbsp;(<em>Personally Tested</em>)&nbsp;<span class="ssNonEditable full-image-inline"><img src="http://www.savagehomeautomation.com/storage/post-images/raspberrypi/raspiicon.png?__SQUARESPACE_CACHEVERSION=1350773176405" alt="" /><img src="http://www.savagehomeautomation.com/storage/post-images/raspberrypi/raspiicon.png?__SQUARESPACE_CACHEVERSION=1350773176405" alt="" /><img src="http://www.savagehomeautomation.com/storage/post-images/raspberrypi/raspiicon.png?__SQUARESPACE_CACHEVERSION=1350773176405" alt="" /></span></li>
</ul>
<p><strong>Kits / Starter Packs</strong></p>
<ul>
<li><a class="offsite-link-inline" href="http://www.amazon.com/exec/obidos/ASIN/B008XVAVAW/savagehomeaut-20" target="_blank">CanaKit Raspberry Pi (512 MB) Complete Starter Kit</a></li>
<li><a class="offsite-link-inline" href="http://adafruit.com/products/955" target="_blank">Adafruit Raspberry Pi Starter Pack</a></li>
<li><a class="offsite-link-inline" href="http://adafruit.com/products/965" target="_blank">Adafruit Budget Pack for Raspberry Pi</a></li>
</ul>
<blockquote>
<h3>RATINGS</h3>
<p>I only rate items that I have personally used and or tested.</p>
<ul>
<li><img src="http://www.savagehomeautomation.com/storage/post-images/raspberrypi/raspiicon.png?__SQUARESPACE_CACHEVERSION=1350773176405" alt="" /><img src="http://www.savagehomeautomation.com/storage/post-images/raspberrypi/raspiicon.png?__SQUARESPACE_CACHEVERSION=1350773176405" alt="" /><img src="http://www.savagehomeautomation.com/storage/post-images/raspberrypi/raspiicon.png?__SQUARESPACE_CACHEVERSION=1350773176405" alt="" />&nbsp;- Highest rating. &nbsp;<em>I really like it and use it regularly.</em></li>
<li><img src="http://www.savagehomeautomation.com/storage/post-images/raspberrypi/raspiicon.png?__SQUARESPACE_CACHEVERSION=1350773176405" alt="" /><img src="http://www.savagehomeautomation.com/storage/post-images/raspberrypi/raspiicon.png?__SQUARESPACE_CACHEVERSION=1350773176405" alt="" />&nbsp;&nbsp;- Medium rating. &nbsp;<em>It's OK, there may be a more preferred option.</em></li>
<li><img src="http://www.savagehomeautomation.com/storage/post-images/raspberrypi/raspiicon.png?__SQUARESPACE_CACHEVERSION=1350773176405" alt="" />&nbsp;- Lowest rating. <em>&nbsp;I don't really like it and/or no longer use it regularly.</em></li>
</ul>
</blockquote>
<blockquote>
<p><span class="full-image-block ssNonEditable"><img src="http://www.savagehomeautomation.com/storage/post-images/raspberrypi/raspi-logo.png?__SQUARESPACE_CACHEVERSION=1345989599509" alt="" /></span><br />Also, please see the Quick Start Guide on the Raspberry Pi website:<br /><a href="http://www.raspberrypi.org/quick-start-guide">http://www.raspberrypi.org/quick-start-guide</a></p>
<p>And the <em><a href="http://www.savagehomeautomation.com/projects/raspberry-pi-getting-started.html" target="_blank">Getting Started</a></em> post on this website</p>
</blockquote>
<p><span style="font-size: 80%;">*&nbsp;Raspberry Pi is a trademark of the Raspberry Pi foundation.<br />* Oracle and Java are registered trademarks of Oracle.</span></p>]]></content:encoded></rss:item><rss:item rdf:about="http://www.savagehomeautomation.com/projects/raspberry-pi-change-default-java-virtual-machine-jvm.html"><rss:title>Raspberry Pi - Change Default Java Virtual Machine (JVM)</rss:title><rss:link>http://www.savagehomeautomation.com/projects/raspberry-pi-change-default-java-virtual-machine-jvm.html</rss:link><dc:creator>Robert Savage</dc:creator><dc:date>2012-08-26T00:33:52Z</dc:date><dc:subject>Embedded Computing Java JavaFX Raspberry Pi Raspberry Pi java jdk jre jvm pi raspberry</dc:subject><content:encoded><![CDATA[<p><span class="ssNonEditable full-image-block"><img src="http://www.savagehomeautomation.com/storage/post-images/raspberrypi/raspi-banner680.png?__SQUARESPACE_CACHEVERSION=1344866873551" alt="" /></span></p>
<p>You can install multiple Java virtual machines (JVM) on your Raspberry Pi and switch between them as needed. &nbsp;After installing the JVMs that you want, use the following command to select the default JVM/JRE. &nbsp;</p>
<pre>sudo update-alternatives --config java</pre>
<p><span class="full-image-block ssNonEditable"><img src="http://www.savagehomeautomation.com/storage/post-images/raspberrypi/raspi-select-jvm.png?__SQUARESPACE_CACHEVERSION=1345941193294" alt="" /></span></p>
<p>With the new JVM selected, you can test and verify that is is the new default by &nbsp;executing the java command using the version argument.</p>
<pre>java -version</pre>
<p>You should a response displaying the selected java version and VM:</p>
<p><span class="full-image-block ssNonEditable"><img src="http://www.savagehomeautomation.com/storage/post-images/raspberrypi/raspi-jdk-3.png?__SQUARESPACE_CACHEVERSION=1345927054160" alt="" /></span></p>
<p><span style="font-size: 80%;">*&nbsp;Raspberry Pi is a trademark of the Raspberry Pi foundation.<br />* Oracle and Java are registered trademarks of Oracle.</span></p>]]></content:encoded></rss:item><rss:item rdf:about="http://www.savagehomeautomation.com/projects/raspberry-pi-java-virtual-machine-benchmarks.html"><rss:title>Raspberry Pi - Java Virtual Machine Benchmarks</rss:title><rss:link>http://www.savagehomeautomation.com/projects/raspberry-pi-java-virtual-machine-benchmarks.html</rss:link><dc:creator>Robert Savage</dc:creator><dc:date>2012-08-25T21:22:54Z</dc:date><dc:subject>Embedded Computing Java Raspberry Pi Raspberry Pi benchmarks java jvm oracle pi raspberry</dc:subject><content:encoded><![CDATA[<p><span class="ssNonEditable full-image-block"><img src="http://www.savagehomeautomation.com/storage/post-images/raspberrypi/raspi-banner680.png?__SQUARESPACE_CACHEVERSION=1344866873551" alt="" /></span></p>
<p>I have recently been performing some benchmarks of the various Java Virtual Machines available on the Raspberry Pi ARM11 platform and thought I would share the results. &nbsp;I used this test suite: &nbsp;<a href="http://dacapobench.org/">http://dacapobench.org/</a></p>
<p>Thanks to forum member&nbsp;<strong><a class="offsite-link-inline" href="http://www.raspberrypi.org/phpBB3/memberlist.php?mode=viewprofile&amp;u=2154&amp;sid=0583d3677686d1ce3ae7203671f05dc1" target="_blank">chrisg</a></strong>&nbsp;on the&nbsp;<a class="offsite-link-inline" href="http://www.raspberrypi.org/phpBB3/index.php" target="_blank">Raspberry Pi forums</a>&nbsp;who posted these&nbsp;<a class="offsite-link-inline" href="http://www.raspberrypi.org/phpBB3/viewtopic.php?f=34&amp;t=6369" target="_blank">benchmarks</a>&nbsp;results for the previous Debian "Squeeze" image. &nbsp;The results listed below for the OpenJDK are taken directly from chrisg's post. &nbsp;I also ran these same tests on my Pi with Debian "Squeeze" and received very similar (<em>maybe slightly higher</em>) results. &nbsp;</p>
<p>The following JVMs are represented:</p>
<ul>
<li>Oracle SE 7 JDK (7u6)</li>
<li>Oracle SE 7 Embedded JRE (7u4)&nbsp;</li>
<li>OpenJDK Zero VM (6u18)</li>
<li>OpenJDK Cacao VM (6u18)</li>
</ul>
<p>The following chart includes all the tests performed and the resulting time in milliseconds that each test took to complete. &nbsp;Obviously the lower number the better :-)&nbsp;</p>
<p style="text-align: center;"><span class="full-image-block ssNonEditable"><img src="http://www.savagehomeautomation.com/storage/post-images/raspberrypi/java-benchmarks-1.png?__SQUARESPACE_CACHEVERSION=1345928565080" alt="" /></span></p>
<p>I included a TOTAL line that sums up all the test results in minutes for each test case for rough comparisons, but please note that it does not compensate for the time missing from failed tests.</p>
<p>The test results are charted below for a visual representation.</p>
<p style="text-align: center;"><img src="http://www.savagehomeautomation.com/storage/post-images/raspberrypi/java-benchmarks-2.png?__SQUARESPACE_CACHEVERSION=1345928581696" alt="" /><span class="full-image-block ssNonEditable">&nbsp;</span><img src="http://www.savagehomeautomation.com/storage/post-images/raspberrypi/java-benchmarks-4.png?__SQUARESPACE_CACHEVERSION=1345928621072" alt="" /></p>
<p>I was particularly interested in the performance between the two available Oracle JVMs. &nbsp;The results (<em>as expected</em>) were almost negligible. &nbsp;The graph below illustrates the results of the two Oracle JVMs.&nbsp;</p>
<p style="text-align: center;"><img src="http://www.savagehomeautomation.com/storage/post-images/raspberrypi/java-benchmarks-3.png?__SQUARESPACE_CACHEVERSION=1345928603633" alt="" /></p>
<p style="text-align: left;"><span style="font-size: 80%;">*&nbsp;Raspberry Pi is a trademark of the Raspberry Pi foundation.<br />* Oracle and Java are registered trademarks of Oracle.</span></p>]]></content:encoded></rss:item><rss:item rdf:about="http://www.savagehomeautomation.com/projects/raspberry-pi-installing-oracle-java-development-kit-jdk-170u.html"><rss:title>Raspberry Pi - Installing Oracle Java Development Kit (JDK 1.7.0u6)</rss:title><rss:link>http://www.savagehomeautomation.com/projects/raspberry-pi-installing-oracle-java-development-kit-jdk-170u.html</rss:link><dc:creator>Robert Savage</dc:creator><dc:date>2012-08-25T21:20:39Z</dc:date><dc:subject>Embedded Computing Java Raspberry Pi Raspberry Pi java jdk jre pi raspberry</dc:subject><content:encoded><![CDATA[<p><span class="ssNonEditable full-image-block"><img src="http://www.savagehomeautomation.com/storage/post-images/raspberrypi/raspi-banner680.png?__SQUARESPACE_CACHEVERSION=1344866873551" alt="" /></span></p>
<p style="text-align: left;">The Oracle JDK for ARM is now available! &nbsp;This article will provide the necessary instructions on how to install the Oracle Java Development Kit (JDK) on your Raspberry Pi. &nbsp;</p>
<p style="text-align: center;"><span class="ssNonEditable thumbnail-image-inline"><a href="javascript:showFullImage('/display/ShowImage?imageUrl=%2Fstorage%2Fpost-images%2Fraspberrypi%2Fraspi.jpg%3F__SQUARESPACE_CACHEVERSION%3D1344866408187',406,600);"><img src="http://www.savagehomeautomation.com/storage/post-images/raspberrypi/piandcoffee.png?__SQUARESPACE_CACHEVERSION=1345129306249" alt="" /></a></span></p>
<h3>Prerequisites</h3>
<ul>
<li>Install and boot the Raspberry Pi using the Debian "Wheezy" (2012-08-08 soft-float) image. &nbsp;<br />(<em>The Oracle JDK is not currently compatible with the Raspian "Wheezy" image</em>)&nbsp;</li>
<li>Enable the Raspberry Pi for SSH remote network connections. &nbsp;<br /><strong>Update</strong>: &nbsp;The Debian "Wheezy" image comes with SSH access enabled in the default image.<br /><span style="font-size: 90%;">(<a href="http://www.savagehomeautomation.com/projects/raspberry-pi-enabling-ssh-for-remote-access.html">Here is an article on how to enable SSH in the Debian Squeeze distribution</a>)</span></li>
<li>Get the Raspberry Pi's IP address.</li>
</ul>
<h3>Tools &amp; Downloads:</h3>
<p>All:</p>
<ul>
<li><a class="offsite-link-inline" href="http://downloads.raspberrypi.org/download.php?file=/images/debian/7/2012-08-08-wheezy-armel/2012-08-08-wheezy-armel.zip" target="_blank">Raspberry Pi Debian "Wheezy" image</a>&nbsp;(2012-08-08)</li>
<li><a class="offsite-link-inline" href="http://www.oracle.com/technetwork/java/javase/downloads/index.html" target="_blank">Oracle Java SE Development Kit</a>&nbsp;(Select <em>JDK Download</em>, then Linux ARM - jdk-7u6-linux-arm-sfp.tar.gz)</li>
</ul>
<p>Windows:</p>
<ul>
<li><a class="offsite-link-inline" href="http://winscp.net/eng/download.php" target="_blank">WinSCP</a></li>
</ul>
<p>Mac-OSX:</p>
<ul>
<li><a class="offsite-link-inline" href="http://cyberduck.ch/" target="_blank">Cyberduck</a></li>
</ul>
<h3>Download the Oracle JDK for the Raspberry Pi</h3>
<p>You can download the Oracle Java SE Development Kit 7u6 on this page:<br /><a class="offsite-link-inline" href="http://www.oracle.com/technetwork/java/javase/downloads/index.html" target="_blank">http://www.oracle.com/technetwork/java/javase/downloads/index.html</a></p>
<p>First, select <em>JDK Download </em>button&nbsp;under JDK SE 7, then select the LinuxARM JDK7 SE distribution (<a id="jdk-7u6-oth-JPRXXXjdk-7u6-linux-arm-sfp.tar.gz" name="jdk-7u6-oth-JPRXXXjdk-7u6-linux-arm-sfp.tar.gz">jdk-7u6-linux-arm-sfp.tar.gz</a>).&nbsp;</p>
<h3>Transfer the Oracle JDK to the Raspberry Pi</h3>
<p>After downloading the Oracle JDK to you desktop computer, we need to transfer it over to the Raspberry Pi. &nbsp;We will use SCP to transfer the file over the network. &nbsp;If you are running on a Windows desktop, then download and install <a class="offsite-link-inline" href="http://winscp.net/eng/download.php" target="_blank">WinSCP</a>.</p>
<blockquote>
<p>&nbsp;If you are using Mac OSX, you can download and install <a class="offsite-link-inline" href="http://cyberduck.ch/" target="_blank">Cyberduck</a>. &nbsp;The screens will look different but the goals are the same.</p>
</blockquote>
<p>Create a new session in WinSCP using the IP address of you Raspberry Pi. &nbsp;The default authentication credentials for the Debian Squeeze image is username "<em>pi</em>" and password "<em>raspberry</em>". &nbsp;Save the session and then login. &nbsp;You may be prompted to accept the SSH fingerprint, choose "Yes" to accept and continue.</p>
<p><span class="ssNonEditable full-image-block"><img src="http://www.savagehomeautomation.com/storage/post-images/raspberrypi/raspi-winscp-settings.png?__SQUARESPACE_CACHEVERSION=1345088737082" alt="" /></span></p>
<p>After successfully establishing a connection, select the drive and folder location in the left pane where you download the Oracle JDK file to on your local desktop system. &nbsp;In the right pane is the file system on the Raspberry Pi, we will leave it in it's default location in the "pi" user's home directory. &nbsp;Drag and drop the Oracle JDK file from the left pane to the right pane and WinSCP will start the file transfer process. &nbsp;You will be prompted with a transfer dialog, just click the "<strong>Copy</strong>" button to start the transfer. &nbsp;</p>
<p><span class="full-image-block ssNonEditable"><img src="http://www.savagehomeautomation.com/storage/post-images/raspberrypi/raspi-winscp-jdk.png?__SQUARESPACE_CACHEVERSION=1345925459862" alt="" /></span><br />When the file transfer is complete, you can close WinSCP (<em>or CyberDuck</em>).</p>
<h3>Installation Procedure on Raspberry Pi</h3>
<p>The remaining steps should be performed directly on the console of the Raspberry Pi or using a SSH terminal connection with shell access. &nbsp;In the last step, we transfered the Oracle JDK file to the "pi" user's home directory. &nbsp;We should be logged in as the "pi" user and already in the user's home directory.</p>
<p>Lets create a new directory where we will install the JDK files to.&nbsp;</p>
<pre>sudo mkdir -p -v /opt/java</pre>
<p>Next, lets unpack the Oracle JDK .gz file using this command</p>
<pre>tar xvzf ~/jdk-7u6-linux-arm-sfp.gz</pre>
<p><span class="full-image-block ssNonEditable"><span><img src="http://www.savagehomeautomation.com/storage/post-images/raspberrypi/raspi-jdk-1.png?__SQUARESPACE_CACHEVERSION=1345926703109" alt="" /></span></span>The unpacking process will take a few seconds to complete. &nbsp;It unpacks all the contents of the Oracle JDK tz file to a new directory named "jdk1.7.0_06" located in the user's home directory.</p>
<p>With the unpack complete its now time to move the new unpacked directory to the Java install location that we created earlier under "opt/java". &nbsp;</p>
<pre>sudo mv -v ~/jdk1.7.0_06 /opt/java</pre>
<p>We can also delete the original .tz file as it is no longer needed&nbsp;</p>
<pre>rm ~/jdk-7u6-linux-arm-sfp.gz</pre>
<p>To complete the JDK installation we need to let the system know there is a new JVM installed and where it is located. &nbsp;Use the following command to perform this task.</p>
<pre><span style="font-size: 90%;">sudo update-alternatives --install "/usr/bin/java" "java" "/opt/java/jdk1.7.0_06/bin/java" 1</span></pre>
<p>And finally we also need to tell the system that we want this JDK to be the default Java runtime for the system. The following command will perform this action.</p>
<pre>sudo update-alternatives --set java /opt/java/jdk1.7.0_06/bin/java</pre>
<p><span class="full-image-block ssNonEditable"><span><a href="javascript:showFullImage('/display/ShowImage?imageUrl=%2Fstorage%2Fpost-images%2Fraspberrypi%2Fraspi-jre-install-2.png%3F__SQUARESPACE_CACHEVERSION%3D1345096887183',129,816);"><img src="http://www.savagehomeautomation.com/storage/post-images/raspberrypi/raspi-jdk-2.png?__SQUARESPACE_CACHEVERSION=1345927067603" alt="" /></a></span></span></p>
<p>Now java is installed. &nbsp;To test and verify we can execute the java command using the version argument.</p>
<pre>java -version</pre>
<p>You should get the following response:</p>
<p><span class="full-image-block ssNonEditable"><span><img src="http://www.savagehomeautomation.com/storage/post-images/raspberrypi/raspi-jdk-3.png?__SQUARESPACE_CACHEVERSION=1345927054160" alt="" /></span></span></p>
<p>That's it the Oracle JDK is installed and ready for use.</p>
<h3>Add JAVA_HOME Environment Variable</h3>
<p>Some Java programs require a JAVA_HOME environment variable to be configured on the system. &nbsp;Add the following line to you "/etc/environment" using your favorite text editor.</p>
<pre>JAVA_HOME="/opt/java/jdk1.7.0_06"</pre>
<p><br />Also, edit your "~/.bashrc" file using this command</p>
<pre>nano ~/.bashrc</pre>
<p>and add the following two lines to the bottom of the file and save.</p>
<pre>export JAVA_HOME="/opt/java/jdk1.7.0_06"<br />export PATH=$PATH:$JAVA_HOME/bin&nbsp;</pre>
<p><br />Reboot or re-login to apply the export to your environment. &nbsp;</p>
<p>&nbsp;</p>
<p><span style="font-size: 80%;">* Raspberry Pi is a trademark of the Raspberry Pi foundation.<br /></span><span style="font-size: 80%;">* Oracle and Java are registered trademarks of Oracle.</span></p>]]></content:encoded></rss:item><rss:item rdf:about="http://www.savagehomeautomation.com/projects/raspberry-pi-installing-a-rs232-serial-port.html"><rss:title>Raspberry Pi - Installing a RS232 Serial Port</rss:title><rss:link>http://www.savagehomeautomation.com/projects/raspberry-pi-installing-a-rs232-serial-port.html</rss:link><dc:creator>Robert Savage</dc:creator><dc:date>2012-08-17T02:29:36Z</dc:date><dc:subject>Embedded Computing Raspberry Pi Raspberry Pi com gpio pi port raspberry rs232 serial uart</dc:subject><content:encoded><![CDATA[<p><span class="full-image-block ssNonEditable"><span><img src="http://www.savagehomeautomation.com/storage/post-images/raspberrypi/raspi-banner680.png?__SQUARESPACE_CACHEVERSION=1344867662099" alt="" /></span></span></p>
<blockquote>
<p><strong>Attention</strong></p>
<p>A new article has been posted that provides additional RS232 serial interface options, hardware, and wiring digrams.</p>
<ul>
<li><a href="http://www.savagehomeautomation.com/projects/raspberry-pi-rs232-serial-interface-options-revisit.html">Raspberry Pi - RS232 Serial Interface Options (Revisit)</a></li>
</ul>
<p>If you are trying to connect to a Raspberry Pi Compute Module Development board then see this article:</p>
<ul>
<li><a href="http://www.savagehomeautomation.com/projects/rs232-serial-on-raspberry-pi-compute-module.html">RS232 Serial on Raspberry Pi Compute Module</a>&nbsp;</li>
</ul>
</blockquote>
<p><br /><span class="full-image-float-right ssNonEditable"><span><img src="http://www.savagehomeautomation.com/storage/post-images/raspberrypi/serial-port.jpg?__SQUARESPACE_CACHEVERSION=1345160825165" alt="" /></span></span></p>
<p>Do you need your Raspberry Pi to talk to serial controlled devices? &nbsp;Do you need to access the Linux shell when you don't have a network connection and don't have the ability to connect the Pi to a keyboard and monitor? &nbsp;Do you want to add more geek cred to your Pi by having a series of wires leads dangling from the GPIO header? &nbsp;If the answer to any of these questions is <strong>YES!</strong>, then this is the post for you! &nbsp;</p>
<p>Adding a RS232 serial port to the Raspberry Pi is actually quite simple. &nbsp;Add you need is a RS-232 level shifter and a four wire leads to connect to the GPIO header. &nbsp;So .. what a <em>level shifter</em> you ask. &nbsp;A level shifter is a circuit that can take the low voltage (<span>&plusmn;</span><span>3.3VDC</span>) TTL signals for serial transmit (TX) and receive (RX) from the UART on the Pi and shift them to &plusmn;5VDC the voltage signals required for RS232 standard communication. &nbsp;Want to know more? &nbsp;Click <a class="offsite-link-inline" href="http://en.wikipedia.org/wiki/RS-232#Voltage_levels" target="_blank">here</a>. &nbsp; &nbsp;&nbsp;</p>
<p>There a many level shifters out there and the information here can be used to adapt any of them for you Raspberry Pi, but for wiring schematic and the illustrations used in this article I will focus on one that I had laying around the house available from XBit Electronics.</p>
<p><strong><a class="offsite-link-inline" href="http://www.xbitinc.com/products/RS%252d232-Level-Shifter-with-DB9-Connector.html" target="_blank">Xbit Electronics - RS-232 Level Shifter with DB9 Connector</a></strong></p>
<blockquote>
<p><strong>Note: &nbsp;</strong>The Xbit RS-232 level shifter is no longer available. &nbsp;Any RS-232 level shifter that supports an input voltage down to 3 VDC should work juts fine. &nbsp;Here are a couple of examples:</p>
<ul>
<li><a class="offsite-link-inline" href="http://www.amazon.com/exec/obidos/ASIN/B00WPBXDJC/savagehomeaut-20" target="_blank">Ableconn PI232DB9M Compact GPIO TX / RX to DB9M RS232 Serial Expansion Board for Raspberry Pi</a></li>
<li><a class="offsite-link-inline" href="http://www.amazon.com/exec/obidos/ASIN/B005D5T292/savagehomeaut-20" target="_blank">RS232 to TTL converter board DCE with Female DB9 3.3V to 5V</a></li>
</ul>
</blockquote>
<p><span class="full-image-float-left ssNonEditable"><span><a href="javascript:showFullImage('/display/ShowImage?imageUrl=%2Fstorage%2Fpost-images%2Fraspberrypi%2Frs232-level-shifter-xbitinc.jpeg%3F__SQUARESPACE_CACHEVERSION%3D1344897803257',983,1280);"><img src="http://www.savagehomeautomation.com/storage/thumbnails/13113340-19867698-thumbnail.jpg?__SQUARESPACE_CACHEVERSION=1345166745605" alt="" /></a></span><span class="thumbnail-caption" style="width: 300px;">(click image to enlarge)</span></span><span class="full-image-block ssNonEditable"><span><a href="javascript:showFullImage('/display/ShowImage?imageUrl=%2Fstorage%2Fthumbnails%2F13113340-19867709-thumbnail.jpg%3F__SQUARESPACE_CACHEVERSION%3D1344897945694',278,300);"><img src="http://www.savagehomeautomation.com/storage/thumbnails/13113340-19867711-thumbnail.jpg?__SQUARESPACE_CACHEVERSION=1345166870647" alt="" /></a></span></span></p>
<p>&nbsp;</p>
<p>I used the following jumper wires to connect between the level-shifter and the Raspberry Pi GPIO header. &nbsp;The Xbit level-shifter comes with a 5 pin header that you can solder directly on to the circuit board. &nbsp;Mine is soldered on to the bottom of the level shifter so that I can insert it directly into the prototyping breadboard. &nbsp;If you are not using a breadboard, then it is probably more convenient to solder the 5 pin header to the top of the Xbit circuit board.</p>
<p>I also used a prototyping breadboard to make my connections, but you could just as easily solder leads to the level-shifter if you want a more permanent solution. &nbsp;Do not solder wires to the GPIO header, that is not a good idea. &nbsp;Use either these prototype push pin connectors or a press-fit connect to interface with the GPIO header. &nbsp;</p>
<p style="text-align: center;"><span class="thumbnail-image-block ssNonEditable"><span><a href="javascript:showFullImage('/display/ShowImage?imageUrl=%2Fstorage%2Fpost-images%2Fraspberrypi%2Fraspi-gpio-rs232-3-1.jpg%3F__SQUARESPACE_CACHEVERSION%3D1357107845735',1014,1632);"><img src="http://www.savagehomeautomation.com/storage/thumbnails/13113340-21439905-thumbnail.jpg?__SQUARESPACE_CACHEVERSION=1357107845736" alt="" /></a></span><span class="thumbnail-caption" style="width: 680px;">(click image to enlarge)</span></span></p>
<p>This level-shifter uses a source supply (VCC) voltage of 3.3-5VDC. &nbsp;Fortunately the Raspberry GPIO includes a pin that provide the 3.3 VDC neccessary for the VCC connection on the level-shifter. &nbsp;The next three wiring connections are as simple as it gets ... Ground to Ground, TX to TX, and RX to RX. &nbsp;A wiring diagram and close up photos are included below to help provide a clear picture of the connections.</p>
<p><span class="thumbnail-image-float-left ssNonEditable"><span><a href="javascript:showFullImage('/display/ShowImage?imageUrl=%2Fstorage%2Fpost-images%2Fraspberrypi%2Fraspi-rs232-schematic2.png%3F__SQUARESPACE_CACHEVERSION%3D1357105879925',1305,906);"><img src="http://www.savagehomeautomation.com/storage/thumbnails/13113340-21439782-thumbnail.jpg?__SQUARESPACE_CACHEVERSION=1357105879927" alt="" /></a></span><span class="thumbnail-caption" style="width: 402px;">(click any image to enlarge)</span></span></p>
<p><span class="thumbnail-image-inline ssNonEditable"><span><a href="javascript:showFullImage('/display/ShowImage?imageUrl=%2Fstorage%2Fpost-images%2Fraspberrypi%2Frs232-closeup.png%3F__SQUARESPACE_CACHEVERSION%3D1345165280308',1224,1260);"><img style="width: 230px;" src="http://www.savagehomeautomation.com/storage/thumbnails/13113340-19912113-thumbnail.jpg?__SQUARESPACE_CACHEVERSION=1345168963534" alt="" /></a></span></span></p>
<p><span class="thumbnail-image-float-left ssNonEditable"><span><a href="javascript:showFullImage('/display/ShowImage?imageUrl=%2Fstorage%2Fpost-images%2Fraspberrypi%2Fraspi-gpio-rs232-2-1.jpg%3F__SQUARESPACE_CACHEVERSION%3D1357106996386',1224,1624);"><img src="http://www.savagehomeautomation.com/storage/thumbnails/13113340-21439850-thumbnail.jpg?__SQUARESPACE_CACHEVERSION=1357106996388" alt="" /></a></span></span><span class="thumbnail-image-block ssNonEditable"><span><a href="javascript:showFullImage('/display/ShowImage?imageUrl=%2Fstorage%2Fpost-images%2Fraspberrypi%2Fraspi-gpio-rs232-1-1.jpg%3F__SQUARESPACE_CACHEVERSION%3D1357107270119',1224,1632);"><img src="http://www.savagehomeautomation.com/storage/thumbnails/13113340-21439873-thumbnail.jpg?__SQUARESPACE_CACHEVERSION=1357107270121" alt="" /></a></span></span></p>
<p>&nbsp;</p>
<p>Here are a few alternatives to the XBit level shifter including an option without the DB9 connector and a USB option.&nbsp;</p>
<ul>
<li><a class="offsite-link-inline" href="https://www.sparkfun.com/products/11189" target="_blank">https://www.sparkfun.com/products/11189</a></li>
<li><a class="offsite-link-inline" href="https://www.sparkfun.com/products/449" target="_blank">https://www.sparkfun.com/products/449</a></li>
<li><a class="offsite-link-inline" href="https://www.sparkfun.com/products/718" target="_blank">https://www.sparkfun.com/products/718</a></li>
</ul>
<p>(<strong>NOTE</strong>: I have not personally used or tested these alternative options but based on the specs they should work just fine. &nbsp;Also when connecting a level shifter, please take note of the source voltage required to drive the level shifter. &nbsp;Some are 5VDC only and other may support 3.3VDC. &nbsp;Make sure to get one that support 3.3 VDC and connect it &nbsp;to appropriate 3.3 VDC source voltage pin on the P1 header!)</p>
<h3>Connecting to the Raspberry Pi Console</h3>
<p>Both the Debian "<em>Squeeze</em>" and Raspian "<em>Wheezy</em>" images by default include support for accessing the shell by connecting a terminal emulation program to the serial port. &nbsp;Just connect a straight thru serial cable (<em>not a null modem cable</em>) between the computer and your new DB9 port on your Raspberry Pi. &nbsp;Open a terminal emulation software such as Hyperterminal, Procom Plus, or Indigo Terminal Emulator and connect to the serial port using settings "115200, N, 8, 1". &nbsp; You may need to press the enter key a time or two to see the prompt. &nbsp;Authenticate using your credentials and you are good to go. &nbsp;</p>
<p>Enjoy the world of serial connectivity!</p>]]></content:encoded></rss:item><rss:item rdf:about="http://www.savagehomeautomation.com/projects/raspberry-pi-installing-oracle-java-runtime-environment-jre.html"><rss:title>Raspberry Pi - Installing Oracle Java Runtime Environment (JRE 1.7.0u4 Embedded)</rss:title><rss:link>http://www.savagehomeautomation.com/projects/raspberry-pi-installing-oracle-java-runtime-environment-jre.html</rss:link><dc:creator>Robert Savage</dc:creator><dc:date>2012-08-16T05:12:08Z</dc:date><dc:subject>Embedded Computing Java Raspberry Pi Raspberry Pi cyberduck java jdk jre jvm openjdk oracle pi raspberry winscp</dc:subject><content:encoded><![CDATA[<p><span class="full-image-block ssNonEditable"><img src="http://www.savagehomeautomation.com/storage/post-images/raspberrypi/raspi-banner680.png?__SQUARESPACE_CACHEVERSION=1344866873551" alt="" /></span></p>
<p style="text-align: left;">The&nbsp;<a class="offsite-link-inline" href="http://www.raspberrypi.org/" target="_blank">Raspberry Pi</a>&nbsp;is an inexpensive little ARM-based embedded computer developed as a teaching and experiment platform. &nbsp;I wanted to experiment running Java applications on my Raspberry Pi so I need to install a Java Runtime to execute Java-based applications. &nbsp;</p>
<p style="text-align: center;"><span class="thumbnail-image-inline ssNonEditable"><a href="javascript:showFullImage('/display/ShowImage?imageUrl=%2Fstorage%2Fpost-images%2Fraspberrypi%2Fraspi.jpg%3F__SQUARESPACE_CACHEVERSION%3D1344866408187',406,600);"><img src="http://www.savagehomeautomation.com/storage/post-images/raspberrypi/piandcoffee.png?__SQUARESPACE_CACHEVERSION=1345129306249" alt="" /></a></span></p>
<p>I first installed the Open JDK on the device since this is the JRE flavor most commonly found in mainstream Linux OS distributions. &nbsp; Installing the Open JDK is quite simple. &nbsp;All you have to do is enter the following command and it will download and install the Open JDK. &nbsp;</p>
<pre>apt-get install openjdk-6-jdk</pre>
<p>However, the performance I experienced while using the Open JDK on the Raspberry Pi was quite disappointing and dare I say <em>unusable</em> for any reasonably sophisticated Java program. &nbsp;ChrisG posts some pretty revealing benchmarks using various JVMs in this blog article: &nbsp;<a href="http://www.raspberrypi.org/phpBB3/viewtopic.php?f=34&amp;t=6369">http://www.raspberrypi.org/phpBB3/viewtopic.php?f=34&amp;t=6369</a>&nbsp; &nbsp;I ran the same benchmark tests on my Pi and got very similar results. &nbsp;If you notice the Oracle JRE benchmark results in ChrisG's post you will see that they are an order of magnitude better in performance than the Open JDK Zero and Open JDK Cacao JVMs. &nbsp;For my goals, this make the Oracle JVM the only suitable candidate for running my Java applications. &nbsp;</p>
<p>This article will provide the necessary instructions on how to install the Oracle Java Runtime Environment on your Raspberry Pi. &nbsp;</p>
<h3>Prerequisites</h3>
<ul>
<li>Install and boot the Raspberry Pi using the Debian "Wheezy" (2012-08-08 soft-float) image. &nbsp;(<em>or the older&nbsp;Debian "<em>Squeeze</em>" (2012-04-19) image</em>)&nbsp;<br />(<em>The Oracle JRE is not currently compatible with the Raspian "Wheezy" image</em>)&nbsp;</li>
<li>Enable the Raspberry Pi for SSH remote network connections. &nbsp;<br /><strong>Update</strong>: &nbsp;The Debian "Wheezy" image comes with SSH access enabled in the default image.<br /><span style="font-size: 90%;">(<a href="http://www.savagehomeautomation.com/projects/raspberry-pi-enabling-ssh-for-remote-access.html">Here is an article on how to enable SSH in the Debian Squeeze distribution</a>)</span></li>
<li>Get the Raspberry Pi's IP address.</li>
</ul>
<h3>Tools &amp; Downloads:</h3>
<p>All:</p>
<ul>
<li><a class="offsite-link-inline" href="http://downloads.raspberrypi.org/download.php?file=/images/debian/7/2012-08-08-wheezy-armel/2012-08-08-wheezy-armel.zip" target="_blank">Raspberry Pi Debian "Wheezy" image</a>&nbsp;(2012-08-08)</li>
<li><span style="text-decoration: line-through;"><a class="offsite-link-inline" href="http://elinux.org/RaspberryPiBoardDistributions" target="_blank">Raspberry Pi Debian "Squeeze" image</a> (2012-04-19)</span></li>
<li><a class="offsite-link-inline" href="http://www.oracle.com/technetwork/java/embedded/downloads/javase/index.html" target="_blank">Oracle Java SE Embedded 7</a>&nbsp;(ARMv6/7 Linux - Headless -&nbsp;1.7.0u4)</li>
</ul>
<p>Windows:</p>
<ul>
<li><a class="offsite-link-inline" href="http://winscp.net/eng/download.php" target="_blank">WinSCP</a></li>
</ul>
<p>Mac-OSX:</p>
<ul>
<li><a class="offsite-link-inline" href="http://cyberduck.ch/" target="_blank">Cyberduck</a></li>
</ul>
<h3>Download the Oracle JRE for the Raspberry Pi</h3>
<p>You can download the Oracle Java SE Embedded 7 JRE for ARMv6/7 Linux - Headless on this page:<br /><a href="http://www.oracle.com/technetwork/java/embedded/downloads/javase/index.html">http://www.oracle.com/technetwork/java/embedded/downloads/javase/index.html</a></p>
<p>Please note that you do unfortunately have to fill out a survey to download the JVM. &nbsp;This means that you cannot simply use a tool such as wget or curl to download the JVM directly to the Raspberry Pi. (oracle-fail!) &nbsp;Well I guess you could <em>technically</em> run "startx" and use a graphical browser in the X-Windows GUI to complete this step, but this article will use SCP to get the JVM file transferred to the Raspberry Pi.</p>
<h3>Transfer the Oracle JRE to the Raspberry Pi</h3>
<p>After downloading the Oracle JRE to you desktop computer, we need to transfer it over to the Raspberry Pi. &nbsp;We will use SCP to transfer the file over the network. &nbsp;If you are running on a Windows desktop, then download and install <a class="offsite-link-inline" href="http://winscp.net/eng/download.php" target="_blank">WinSCP</a>.</p>
<blockquote>
<p>&nbsp;If you are using Mac OSX, you can download and install <a class="offsite-link-inline" href="http://cyberduck.ch/" target="_blank">Cyberduck</a>. &nbsp;The screens will look different but the goals are the same.</p>
</blockquote>
<p>Create a new session in WinSCP using the IP address of you Raspberry Pi. &nbsp;The default authentication credentials for the Debian Squeeze image is username "<em>pi</em>" and password "<em>raspberry</em>". &nbsp;Save the session and then login. &nbsp;You may be prompted to accept the SSH fingerprint, choose "Yes" to accept and continue.</p>
<p><span class="full-image-block ssNonEditable"><img src="http://www.savagehomeautomation.com/storage/post-images/raspberrypi/raspi-winscp-settings.png?__SQUARESPACE_CACHEVERSION=1345088737082" alt="" /></span></p>
<p>After successfully establishing a connection, select the drive and folder location in the left pane where you download the Oracle JRE file to on your local desktop system. &nbsp;In the right pane is the file system on the Raspberry Pi, we will leave it in it's default location in the "pi" user's home directory. &nbsp;Drag and drop the Oracle JRE file from the left pane to the right pane and WinSCP will start the file transfer process. &nbsp;You will be prompted with a transfer dialog, just click the "<strong>Copy</strong>" button to start the transfer. &nbsp;</p>
<p><span class="full-image-block ssNonEditable"><img src="http://www.savagehomeautomation.com/storage/post-images/raspberrypi/raspi-winscp-transfer.png?__SQUARESPACE_CACHEVERSION=1345089562670" alt="" /></span><br />When the file transfer is complete, you can close WinSCP (<em>or CyberDuck</em>).</p>
<h3>Installation Procedure on Raspberry Pi</h3>
<p>The remaining steps should be performed directly on the console of the Raspberry Pi or using a SSH terminal connection with shell access. &nbsp;In the last step, we transfered the Oracle JRE file to the "pi" user's home directory. &nbsp;We should be logged in as the "pi" user and already in the user's home directory.</p>
<p>Lets create a new directory where we will install the JRE files to.&nbsp;</p>
<pre>sudo mkdir -p -v /opt/java</pre>
<p>Next, lets unpack the Oracle JRE tar file using this command</p>
<pre>tar xvzf ~/ejre-7u4-fcs-b20-linux-arm-vfp-client_headless-12_apr_2012.gz</pre>
<p><br /><span class="full-image-block ssNonEditable"><img src="http://www.savagehomeautomation.com/storage/post-images/raspberrypi/raspi-jre-install-1.png?__SQUARESPACE_CACHEVERSION=1345096812998" alt="" /></span>The unpacking process will take a few seconds to complete. &nbsp;It unpacks all the contents of the Oracle JRE tar file to a new directory named "ejre1.7.0_04" located in the user's home directory.</p>
<p>With the unpack complete its now time to move the new unpacked directory to the Java install location that we created earlier under "opt/java". &nbsp;</p>
<pre>sudo mv -v ~/ejre1.7.0_04 /opt/java</pre>
<p>We can also delete the original taf file as it is no longer needed&nbsp;</p>
<pre>rm ~/ejre-7u4-fcs-b20-linux-arm-vfp-client_headless-12_apr_2012.gz</pre>
<p>To complete the JRE installation we need to let the system know there is a new JVM installed and where it is located. &nbsp;Use the following command to perform this task.</p>
<pre><span style="font-size: 90%;">sudo update-alternatives --install "/usr/bin/java" "java" "/opt/java/ejre1.7.0_04/bin/java" 1</span></pre>
<p>And finally we also need to tell the system that we want this JRE to be the default JRE for the system. The following command will perform this action.</p>
<pre>sudo update-alternatives --set java /opt/java/ejre1.7.0_04/bin/java</pre>
<p><span class="full-image-block ssNonEditable"><a href="javascript:showFullImage('/display/ShowImage?imageUrl=%2Fstorage%2Fpost-images%2Fraspberrypi%2Fraspi-jre-install-2.png%3F__SQUARESPACE_CACHEVERSION%3D1345096887183',129,816);"><img src="http://www.savagehomeautomation.com/storage/thumbnails/13113340-19899522-thumbnail.jpg?__SQUARESPACE_CACHEVERSION=1345096894311" alt="" /></a></span></p>
<p>Now java is installed. &nbsp;To test and verify we can execute the java command using the version argument.</p>
<pre>java -version</pre>
<p>You should get the following response:</p>
<p><span class="full-image-block ssNonEditable"><img src="http://www.savagehomeautomation.com/storage/post-images/raspberrypi/raspi-jre-install-3.png?__SQUARESPACE_CACHEVERSION=1345096514544" alt="" /></span></p>
<p>That's it the Oracle JRE is installed and ready for use.</p>
<h3>Add JAVA_HOME Environment Variable</h3>
<p>Some Java programs require a JAVA_HOME environment variable to be configured on the system. &nbsp;Add the following line to you "/etc/environment" or your "~/.bashrc" file using your favorite text editor.</p>
<pre>JAVA_HOME="/opt/java/ejre1.7.0_04"</pre>
<p>Reboot or re-login to apply the export to your environment.&nbsp;&nbsp;</p>
<p>Coffee &amp; Pie &nbsp;- what could be better! &nbsp;</p>
<h3>Demo Video&nbsp;</h3>
<p>Hinkmond Wong and Gary Collins of&nbsp;<a href="http://www.oracle.com/">Oracle</a>&nbsp;are going to introduce you to developing for the&nbsp;<a href="http://www.raspberrypi.org/">Raspberry Pi</a>&nbsp;using&nbsp;<a href="http://www.oracle.com/technetwork/java/embedded/downloads/javase/index.html">Java Embedded</a>&nbsp;technology.</p>
<p>In addition to demoing the Raspberry Pi running Java Embedded, they will cover:</p>
<ul>
<li>What is Java SE Embedded?</li>
<li>Developing with Java for Embedded</li>
<li>Best practices w/ Java for Embedded&nbsp;</li>
<li>Downloading and installing Java SE Embedded Platform</li>
</ul>
<p><iframe width="560" height="315" src="http://www.youtube.com/embed/7DSp77OxzLg" frameborder="0" allowfullscreen></iframe></p>
<p><span style="font-size: 80%;">* Raspberry Pi is a trademark of the Raspberry Pi foundation.<br />* Oracle and Java are registered trademarks of Oracle.</span></p>]]></content:encoded></rss:item><rss:item rdf:about="http://www.savagehomeautomation.com/projects/raspberry-pi-enabling-ssh-for-remote-access.html"><rss:title>Raspberry Pi - Enabling SSH for Remote Access</rss:title><rss:link>http://www.savagehomeautomation.com/projects/raspberry-pi-enabling-ssh-for-remote-access.html</rss:link><dc:creator>Robert Savage</dc:creator><dc:date>2012-08-16T02:45:00Z</dc:date><dc:subject>Embedded Computing Raspberry Pi Raspberry Pi emulation pi raspberry ssh terminal</dc:subject><content:encoded><![CDATA[<p><span class="full-image-block ssNonEditable"><span><img src="http://www.savagehomeautomation.com/storage/post-images/raspberrypi/raspi-banner680.png?__SQUARESPACE_CACHEVERSION=1344881925351" alt="" /></span></span></p>
<p>For some applications you may not want your Raspberry Pi permanenenty attached to a monitor and keyboard or perhaps you just would like to be able to access your Raspberry Pi remotely. &nbsp;Enabling the SSH server on your Raspberry Pi will provide SSH terminal access over your network. &nbsp;This article will cover the steps need to enable the SSH server for remote access and how to connect to the Raspberry Pi using a SSH terminal enumation software from Windows and Mac OSX. &nbsp;</p>
<h3>Enable SSH Server on Raspberry Pi &nbsp; &nbsp;</h3>
<blockquote>
<p><strong>NOTE: &nbsp;</strong></p>
<p>If you are running the Raspian "<em>Wheezy</em>" image or the Debian "<em>Wheezy</em>" image, please note that SSH is already enabled by default. &nbsp;You can also use the Raspberry configuration utility to enable/disable the SSH server by running the command and selecting the SSH item from the menu:&nbsp;</p>
<pre>sudo raspi-config&nbsp;<br /><br /><span class="thumbnail-image-block ssNonEditable"><span><a href="javascript:showFullImage('/display/ShowImage?imageUrl=%2Fstorage%2Fpost-images%2Fraspberrypi%2Fraspi-config.png%3F__SQUARESPACE_CACHEVERSION%3D1345612267783',351,616);"><img style="width: 500px;" src="http://www.savagehomeautomation.com/storage/post-images/raspberrypi/raspi-config.png?__SQUARESPACE_CACHEVERSION=1345612371572" alt="" /></a></span></span>&nbsp;</pre>
You can skip this section and proceed to the next section in the article.</blockquote>
<p>From the console on the Raspberry Pi please enter the following two commands:</p>
<pre>sudo rm /etc/ssh/ssh_host_*
sudo dpkg-reconfigure openssh-server</pre>
<p>These steps will create the RSA and DSA encryption keys enable the SSH server. &nbsp;The SSH server will also be started automatically each time you reboot your Raspberry Pi. &nbsp;</p>
<p><span class="full-image-block ssNonEditable"><span><img src="http://www.savagehomeautomation.com/storage/post-images/raspberrypi/raspi-ssh-server.png?__SQUARESPACE_CACHEVERSION=1345036903621" alt="" /></span></span></p>
<p>Now, lets get connected.</p>
<h3>Getting the IP Adrress from your Raspberry Pi &nbsp; &nbsp;</h3>
<p>Before we can connect remotely, we first need to determine what the IP address is for the Raspberry Pi. &nbsp;For most users, when the Raspberry Pi boots up and is connected to you router/switch/residential gateway it will dynamically obtain an IP address using DHCP. &nbsp;</p>
<p>Use the following command from the console to get the IP adress:</p>
<pre>ifconfig</pre>
<p>In the resulting output on the screen, look for the <strong><em>inet add</em></strong> for the <strong><em>eth0</em></strong> device.</p>
<p><span class="thumbnail-image-block ssNonEditable"><span><img src="http://www.savagehomeautomation.com/storage/post-images/raspberrypi/raspi-ifconfig.png?__SQUARESPACE_CACHEVERSION=1345036720067" alt="" /></span></span></p>
<h3>Connect from Windows</h3>
<p>You can use any terminal emulation software you like; however, for this demonstration we will use Putty a very popular an free terminal software for Windows.</p>
<p>You can download the Putty software <a class="offsite-link-inline" href="http://www.chiark.greenend.org.uk/~sgtatham/putty/download.html" target="_blank">here</a>.</p>
<p>Double click the putty.exe program to start Putty. &nbsp;You will be prompted with the Putty configuration dialog. &nbsp;Enter the IP address of your Raspberry Pi in the <strong>Host Name</strong> field and make sure the the connection type is set to <strong>SSH</strong>. &nbsp;</p>
<p><span class="full-image-block ssNonEditable"><span><img src="http://www.savagehomeautomation.com/storage/post-images/raspberrypi/raspi-putty-config.png?__SQUARESPACE_CACHEVERSION=1345037355891" alt="" /></span></span></p>
<p>To persist these setting so you don't have to re-enter them every time you start Putty, enter a name such as "RaspberyrPi" in the <strong>Saved Sessions</strong> field and press the <strong>Save</strong> button.</p>
<p>Click the <strong>Open</strong> button to connect to the Raspberry Pi and start the SSH session.<br />You will be prompted with a message to cache the RSA2 fingerprint. &nbsp;Select <strong>Yes</strong> to accept the key and continue the connection.&nbsp;</p>
<p><span class="full-image-block ssNonEditable"><span><img src="http://www.savagehomeautomation.com/storage/post-images/raspberrypi/raspi-ssh-keys.png?__SQUARESPACE_CACHEVERSION=1345037805888" alt="" /></span></span></p>
<p>Upon connection, you will need to provide the authentication credentials to logon to the Raspberry Pi.&nbsp;<br />The credentials may vary depending on the operating system image that you installed on your Raspberry. &nbsp;If you loaded Raspian "<em>Wheezy</em>" or Debian "<em>Squeeze</em>" then use username "pi" and password "raspberry". &nbsp; &nbsp;</p>
<p><span class="full-image-block ssNonEditable"><span><img src="http://www.savagehomeautomation.com/storage/post-images/raspberrypi/raspi-putty.png?__SQUARESPACE_CACHEVERSION=1345038050561" alt="" /></span></span>Now you can interact with your Raspberry Pi just as if you where setting at the keyboard console. &nbsp;</p>
<h3>Connect from Mac OSX</h3>
<p>No additional software is needed for OSX to connect to the Raspberry SSH server. &nbsp;Just open theTerminal application and enter the <strong>ssh </strong>command with the username@ip-address format:</p>
<pre>ssh pi@10.1.1.194</pre>
<div id="_mcePaste"><span class="full-image-block ssNonEditable"><span><img src="http://www.savagehomeautomation.com/storage/post-images/raspberrypi/raspi-ssh-osx.png?__SQUARESPACE_CACHEVERSION=1345038877156" alt="" /></span></span></div>
<div>Upon connection, you will be prompted with a message to permanently accept the RSA fingerprint. Enter "Yes" to accept the key and continue the connection. &nbsp;Next, you will need to provide the authentication password to logon to the Raspberry Pi. &nbsp;The credentials may vary depending on the operating system image that you installed on your Raspberry. &nbsp;If you loaded Raspian "Wheezy" or Debian "Squeeze" then use username "pi" and password "raspberry". &nbsp;&nbsp;</div>
<p>Upon connection, you will need to provide the authentication credentials to logon to the Raspberry Pi. &nbsp;The credentials may vary depending on the operating system image that you installed on your Raspberry. &nbsp;If you loaded Raspian "Wheezy" or Debian "Squeeze" then use username "pi" and password "raspberry". &nbsp;&nbsp;</p>
<p>Now you can interact with your Raspberry Pi just as if you where setting at the keyboard console. &nbsp;</p>
<p>&nbsp;</p>]]></content:encoded></rss:item><rss:item rdf:about="http://www.savagehomeautomation.com/projects/raspberry-pi-getting-started.html"><rss:title>Raspberry Pi - Getting Started</rss:title><rss:link>http://www.savagehomeautomation.com/projects/raspberry-pi-getting-started.html</rss:link><dc:creator>Robert Savage</dc:creator><dc:date>2012-08-15T05:00:00Z</dc:date><dc:subject>Embedded Computing Raspberry Pi Raspberry Pi getting started pi raspberry</dc:subject><content:encoded><![CDATA[<p><span class="full-image-block ssNonEditable"><img src="http://www.savagehomeautomation.com/storage/post-images/raspberrypi/raspi-banner680.png?__SQUARESPACE_CACHEVERSION=1344866873551" alt="" /></span></p>
<p><span class="full-image-float-right ssNonEditable"><a href="javascript:showFullImage('/display/ShowImage?imageUrl=%2Fstorage%2Fpost-images%2Fraspberrypi%2Fraspi.jpg%3F__SQUARESPACE_CACHEVERSION%3D1344866408187',406,600);"><img src="http://www.savagehomeautomation.com/storage/thumbnails/13113340-19860197-thumbnail.jpg?__SQUARESPACE_CACHEVERSION=1344866959337" alt="" /></a></span></p>
<p>The <a class="offsite-link-inline" href="http://www.raspberrypi.org/" target="_blank">Raspberry Pi</a> is a revolutionary step forward in bringing low cost embedded computing to the masses. &nbsp;Designed as an educational learning tool and the "B" model priced at only $35 USD, the Raspberry Pi makes a great little device for DIYers and hobbyists.&nbsp;</p>
<p>This article will provide the necessary information on the basic supplies needed and instructions on getting started with your new Raspberry Pi.&nbsp; &nbsp;</p>
<h3>Supplies</h3>
<ul>
<li>Raspberry Pi - Model B</li>
<li>SDHC Card (<em>4 GB or more;</em>&nbsp;<em>Preferably Class 10</em>)</li>
<li>Micro USB Cable</li>
<li>Power Supply (<em>5 volt with at least 700mA</em>)</li>
<li>HDMI Cable</li>
<li>USB Keyboard</li>
<li>USB Mouse</li>
<li>Ethernet Cable (<em>optional</em>)</li>
<li>Case / Enclosure (<em>optional</em>)</li>
</ul>
<blockquote>
<p><span class="full-image-float-right ssNonEditable"><span><img style="width: 50px;" src="http://www.savagehomeautomation.com/storage/post-images/raspberrypi/shopping-cart.png?__SQUARESPACE_CACHEVERSION=1345994918154" alt="" /></span></span><br />A <a href="http://www.savagehomeautomation.com/projects/raspberry-pi-shopping-list.html" target="_blank">shopping list</a> with direct linked items is available via this <a href="http://www.savagehomeautomation.com/projects/raspberry-pi-shopping-list.html" target="_blank">post</a>.</p>
</blockquote>
<h3>Power</h3>
<p>To power the Raspberry Pi you will need a 5 VDC power supply with a minimum of 700 mA and micro USB connector to plug into the micros USB port on the board. &nbsp;</p>
<p style="text-align: center;"><span class="full-image-block ssNonEditable"><span><a href="javascript:showFullImage('/display/ShowImage?imageUrl=%2Fstorage%2Fpost-images%2Fraspberrypi%2Fraspi-power.png%3F__SQUARESPACE_CACHEVERSION%3D1344919106178',596,809);"><img src="http://www.savagehomeautomation.com/storage/thumbnails/13113340-19870823-thumbnail.jpg?__SQUARESPACE_CACHEVERSION=1344920693693" alt="" /></a></span></span></p>
<p>If you have an extra Apple iPhone charger laying around, this makes a perfect power supply for the Raspberry Pi. &nbsp;The Apple iPhone charger is 5VDC @ 1A (1000mA). &nbsp;Using the Apple iPhone charger or similar USB charger you will still need a USB to micro USB adapter (A Male to Micro B). &nbsp;I used this&nbsp;<a class="offsite-link-inline" href="http://www.amazon.com/gp/product/B003ES5ZSW/ref=oh_details_o00_s01_i00" target="_blank">AmazonBasics USB Cable - 2.0 A Male to Micro B (6 Feet / 1.8 Meters)</a></p>
<p><span class="full-image-float-left ssNonEditable"><img style="width: 150px;" src="http://www.savagehomeautomation.com/storage/post-images/raspberrypi/iphone_charger.jpg?__SQUARESPACE_CACHEVERSION=1344917391504" alt="" /></span></p>
<p><br /><span class="full-image-float-left ssNonEditable"><a href="javascript:showFullImage('/display/ShowImage?imageUrl=%2Fstorage%2Fpost-images%2Fraspberrypi%2Famazon-micro-usb.jpg%3F__SQUARESPACE_CACHEVERSION%3D1344918142288',1401,1401);"><img src="http://www.savagehomeautomation.com/storage/thumbnails/13113340-19870907-thumbnail.jpg?__SQUARESPACE_CACHEVERSION=1344918145604" alt="" /></a></span></p>
<p><span style="vertical-align: super;"><strong>NOTE</strong>: &nbsp;<br />Do not attempt to use your computer's USB port to power the Raspberry Pi.</span></p>
<p><span style="vertical-align: super;">&nbsp;&nbsp;</span></p>
<h3>Video/Display</h3>
<p>The Raspberry Pi includes a HDMI port to connect the device to a computer or TV monitor. &nbsp;If you monitor does not accept a HDMI connection directly, then you many need a HDMI to DVI or HDMI to display port adapter/cable. &nbsp;I am using this HDMI/DVI adapter cable that I picked up from Amazon: &nbsp;<a class="offsite-link-inline" href="http://www.amazon.com/exec/obidos/ASIN/B000E8SY5Q/savagehomeaut-20" target="_blank">Eforcity Black 6FT /2 Meter HDMI Male to DVI Male Cable</a>&nbsp;&nbsp;</p>
<p style="text-align: center;"><span class="full-image-block ssNonEditable"><span><a href="javascript:showFullImage('/display/ShowImage?imageUrl=%2Fstorage%2Fpost-images%2Fraspberrypi%2Fraspi-hdmi.png%3F__SQUARESPACE_CACHEVERSION%3D1344919547319',596,809);"><img src="http://www.savagehomeautomation.com/storage/thumbnails/13113340-19871152-thumbnail.jpg?__SQUARESPACE_CACHEVERSION=1344925166347" alt="" /></a></span></span></p>
<h3>Keyboard/Mouse</h3>
<p>You can plug in just about any standard USB keyboard and mouse. &nbsp;I am using a USB to PS2 adapter with an old PS2 keyboard and PS2 mouse.&nbsp;</p>
<p style="text-align: center;"><span class="full-image-block ssNonEditable"><span><a href="javascript:showFullImage('/display/ShowImage?imageUrl=%2Fstorage%2Fpost-images%2Fraspberrypi%2Fraspi-usb.png%3F__SQUARESPACE_CACHEVERSION%3D1344919605077',596,809);"><img src="http://www.savagehomeautomation.com/storage/thumbnails/13113340-19871162-thumbnail.jpg?__SQUARESPACE_CACHEVERSION=1344920722793" alt="" /></a></span></span></p>
<h3>Network Connectivity</h3>
<p>You will need a network (CAT-5) ethernet cable to connect the Raspberry Pi to you network switch/hub/router/residential gateway.</p>
<p style="text-align: center;"><span class="full-image-block ssNonEditable"><span><a href="javascript:showFullImage('/display/ShowImage?imageUrl=%2Fstorage%2Fpost-images%2Fraspberrypi%2Fraspi-lan.png%3F__SQUARESPACE_CACHEVERSION%3D1344919640746',596,809);"><img src="http://www.savagehomeautomation.com/storage/thumbnails/13113340-19871170-thumbnail.jpg?__SQUARESPACE_CACHEVERSION=1344920735525" alt="" /></a></span></span></p>
<h3>Installing OS Image</h3>
<p>Before booting your Raspberry Pi for the first time, you will need to flash an operating system to a SD card using a Windows, Apple Mac. or other Linux computer with an SD card reader. &nbsp;You can download your choice of operating system image from the main Raspberry Pi download page:<br /><a href="http://www.raspberrypi.org/downloads">http://www.raspberrypi.org/downloads</a>&nbsp;</p>
<p>Or from the Raspberry Pi Wiki distributions page:<br /><a href="http://elinux.org/RaspberryPiBoardDistributions">http://elinux.org/RaspberryPiBoardDistributions</a></p>
<p>The following page includes detailed instructions based on your desktop operating system for flashing the image to the SD card.<br /><a href="http://elinux.org/RPi_Easy_SD_Card_Setup">http://elinux.org/RPi_Easy_SD_Card_Setup</a>&nbsp;</p>
<p>Once your SD card has been flashed successfully, you are ready to insert it into the Raspberry Pi and boot it up.</p>
<p style="text-align: center;"><span class="full-image-float-left ssNonEditable"><span><img style="color: #0000ee;" src="http://www.savagehomeautomation.com/storage/thumbnails/13113340-19871833-thumbnail.jpg?__SQUARESPACE_CACHEVERSION=1344925264439" alt="" /></span></span><br /><span class="full-image-block ssNonEditable"><span><a href="javascript:showFullImage('/display/ShowImage?imageUrl=%2Fstorage%2Fpost-images%2Fraspberrypi%2Fraspi-sdcard.png%3F__SQUARESPACE_CACHEVERSION%3D1344919678204',596,809);"><img src="http://www.savagehomeautomation.com/storage/thumbnails/13113340-19871179-thumbnail.jpg?__SQUARESPACE_CACHEVERSION=1344920747139" alt="" /></a></span></span></p>
<p style="text-align: left;"><strong>NOTE: &nbsp;</strong>If you are planning on running Java-based applications and want to run using the Oracle JRE, then you should use the "Debian ARM&nbsp;<span>2012-04-19 (Squeeze)</span>" distribution at this time instead of the newer "<span>2012-08-07 (raspbian/wheezy)</span>" distribution. &nbsp;The newer distribution supports hardware floating point, but is incompatible with the Oracle JRE at this time.&nbsp;</p>
<h3>Booting &amp; Initial Configuration</h3>
<p>On inital boot, depending on the image you load, the Raspberry Pi may reboot one or more times while setting itself up. &nbsp;Once complete a login prompt should be provided allowing you to enter credentials to access the console. &nbsp;The login credentials vary depending on which distribution you have loaded, but the default credentials for Raspbian and Debian distributions are username "pi" and password "raspberry".</p>
<p>If you are using the Raspbian "Wheezy" image, the <a class="offsite-link-inline" href="http://elinux.org/RPi_raspi-config" target="_blank">raspi-config</a> configuration utility should load on the first boot and allow you to select your local configuration options.</p>
<p>If you are using the Debian "Squeeze" image, you will need to run the following commands to configure the system your your locale, keyboard and timezone.</p>
<pre><pre>sudo dpkg-reconfigure locales<br />sudo dpkg-reconfigure keyboard-configuration<br />sudo dpkg-reconfigure tzdata&nbsp;</pre>
</pre>
<p>For information on other distributions, please see this page: &nbsp;<a href="http://elinux.org/RaspberryPiBoardDistributions">http://elinux.org/RaspberryPiBoardDistributions</a></p>
<h3>Starting X (GUI)</h3>
<p>Run the following command from the console to start the graphical user interface.</p>
<pre>startx</pre>
<p>Now you are up and running .. have fun with your Raspberry Pi!&nbsp;</p>
<p><span style="font-size: 80%;">* Raspberry Pi is a trademark of the Raspberry Pi foundation.</span></p>]]></content:encoded></rss:item></rdf:RDF>