


 Print Article
 Raspberry Pi - Installing the Airlink 101 Wireless N 150 Ultra Mini-USB Adapter (AWLL5099)


;) The Airlink 101 Wireless N 150 Ultra Mini-USB Adapter is another low-cost wireless network adapter for use with the Raspberry Pi. Here is what this little adapter has going for it:
The Airlink 101 Wireless N 150 Ultra Mini-USB Adapter is another low-cost wireless network adapter for use with the Raspberry Pi. Here is what this little adapter has going for it:
- It is on the approved list of known working peripherals.

- Works directly attached to the Raspberry Pi USB port.
(Some network adapters used with the Pi require an external USB powered hub) - The latest Raspbian distributions come with the driver for this adapter pre-installed.
- It's tiny! It does not block access to the second USB port on the Raspberry Pi (Model B).
- Supports 150 Mbps 802.11n
- Backward compatible with 802.11b/g
- Internal chip antenna
- Affordable / Reasonably priced at $9.49 USD (Buy it here)
Shopping List
- 1 @ Raspberry Pi (see this page for more Raspberry Pi related supplies)
- 1 @ Airlink 101 Wireless N 150 Ultra Mini-USB Adapter
Photos
(Click photo to enlarge.)
;)
;)
;)
;)
Packaging / Specs
(Click image to enlarge.)
;)
;)
Installation
The latest Raspian distribution (Raspbian “wheezy” 2012-12-16) already includes the drivers for this adapter pre-installed. This greatly simplifies the installation. (If you are using a different distribution or an older distribution you may have to install the Linux driver for the Realtek RTL8192CU driver.)
Insert the Airlink 101 USB adapter into your Raspberry Pi's USB port. Next, lets make sure that the Raspberry Pi recognizes the device. Use the following command to verify that the Pi "sees" the Airlink 101 WiFi adapter.
lsusb

You should see the RealTek RTL8188CUS 802.11n WLAN Adapter device listed in the output. This is the chipset used by the Airlink 101 adapter.
Now that we have verified that the Airlink 101 adapter is recognized, lets check to make sure the kernel driver is loaded. Use the following command to list the kernel modules:
lsmod
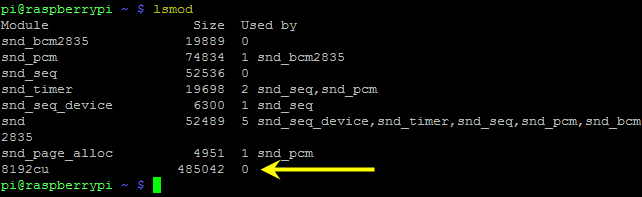
You should see the "8192cu" kernel module loaded. If not, try removing and re-inserting the Airlink 101 USB adapter.
As a final validation check to make sure that the Airlink 101 adapter is ready to use, send the "iwconfig" command to display a listing of the current wireless network configuration.
iwconfig
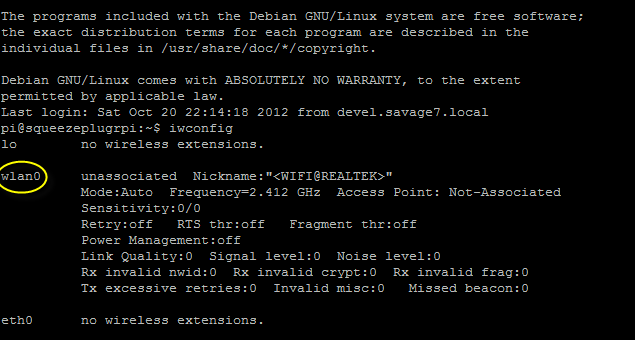
We are just looking to ensure that the "wlan0" adapter is present.
Now we are ready to move on to the configuration steps.
Configuration
One you have installed the adapter, verified the kernel driver is loaded, and confirmed that a wireless network interface ("wlan0") is available, you will need to configure the wireless connection settings to securely connect to your wireless network.
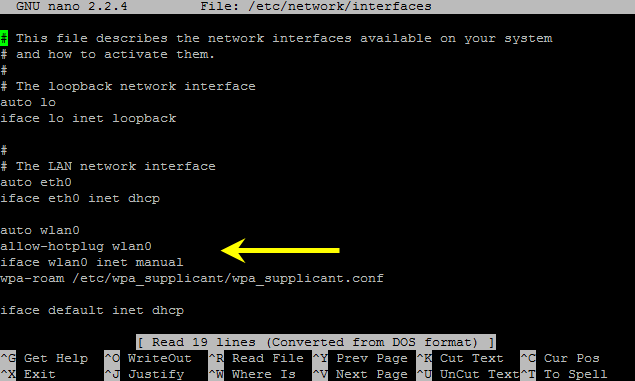
First, let's open the network interfaces configuration file for editing using the following command:
sudo nano /etc/network/interfaces
Make sure the following lines are added to (or un-commented in) your file
auto wlan0
allow-hotplug wlan0
iface wlan0 inet manual
wpa-roam /etc/wpa_supplicant/wpa_supplicant.conf
After modifying the network interface configuration file, we need to create the wireless configuration file. Use the following command to create (or edit) this file.
sudo nano /etc/wpa_supplicant/wpa_supplicant.conf
Add the following data to this wireless configuration file. (Replace the "_SSID_" and "_WPA_SHARED_KEY_" text with your actual SSID and WPA key values.)
network={
ssid="_SSID_"
proto=RSN
key_mgmt=WPA-PSK
pairwise=CCMP TKIP
group=CCMP TKIP
psk="_WPA_SHARED_KEY_"
}
(Note: This configuration is intended for WPA protected wireless networks.)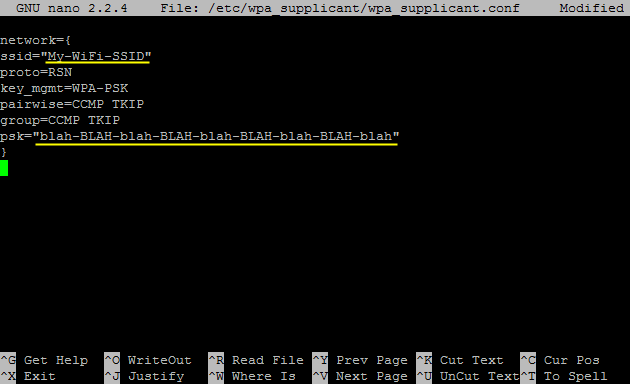
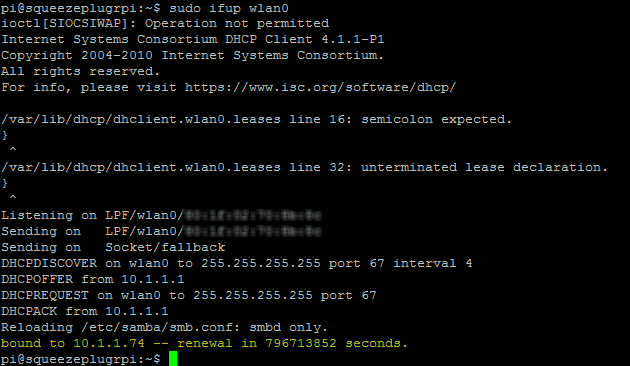
Once the configuration files are complete, use the following command to restart the wireless adapter / interface.
sudo ifup wlan0
This command will restart the network interface and use the newly defined interface and wireless settings to establish a wireless network connection. Assuming the configuration is correct, the wlan0 interface should connect and acquire an IP address.
For connection verification and an alternate way to see your assigned IP address, use the following command to list the network configuration:
ifconfig wlan0
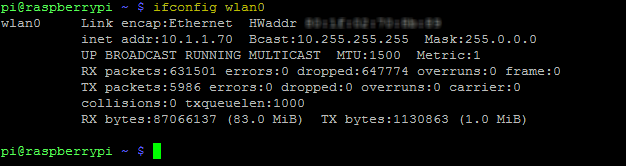
If you have any trouble getting connected using the "ifup" command, verify your wireless connection settings and reboot your Raspberry Pi. If you have the Raspberry Pi connected to a display you can watch the Pi attempt the connection during startup.
That's it, hopefully you now have a WiFiPi.
* Raspberry Pi is a trademark of the Raspberry Pi foundation.
Also check out the installation instructions for installing and configuring the
;)
The following article is an excellent resource describing many different wireless network configurations for Debian based distributions:
Reader Comments (14)
Will I have to enter every time or will the Raspberry Pi remember my network?
Step 1) Type: sudo nano /etc/wpa_supplicant/wpa_supplicant.conf
Add the following data to this wireless configuration file. (Replace the "_SSID_" and "_WPA_SHARED_KEY_" text with your actual SSID and WPA key values.)
network={
ssid="_SSID_"
proto=RSN
key_mgmt=WPA-PSK
pairwise=CCMP TKIP
group=CCMP TKIP
psk="_WPA_SHARED_KEY_"
}
Step 2) Type: sudo ifup wlan0
Step 3) verify my IP address.
@Brewgod23,
These changes are persisted to the configuration files. On reboot, the Pi should/will continue to use these settings. Once completed, I have never had to go back and change them or re-apply them.
Hello,
I have an Airlink 101 wifi usb module, and am trying to get it working with my RPi. My OS is the modified Raspbian Wheezy August 16 titled: Occidentalis v0.2. Rubus occidentalis by Adafruit, so I'm guessing it should be equivalent in so far as wifi is concerned. Following your tutorial, running lsusb shows the same results as you have, but when I run lsmod, I'm not seeing the 8192cu kernal module loaded, in addition, iwconfig produces "wlan1" instead of "wlan0". Fortunately I have ethernet LAN working but would like to get wifi up and running. Can you help me sort through this?
Thanks,
Cris
Hi Robert,
Thank you. So far so good. I made the edits as if I were at home, with my own router and password. I will test that.
In the meantime, I'm in "Starbucks Mode" using SSH over an Ethernet cable. Here, Starbucks uses AT&T Wifi, with an SSID of attwifi. I don't believe it requires a password at all, though there is a Welcome to Starbucks screen later on, once I open a browser and attempt to connect. From my Mac, it says attwifi does not have any security of its own turned on at all.
So, first question: if I don't normally enter a password, should I just enter a blank password and leave key_mgmt=WPA-PSK or change key_mgmt to something else? Like "none" or something?
Second question: am I right in assuming that I could add another network={ . . . } definition for another network, such as friend's house, school, work, etc.?
Thanks again for your tutorial.
John
seems as though you need to shut down eth0 to get wlan0 to work. have you seen that as well?
Followed the instructions to a "T". I specifically bought Airlink 101 adapter and downloaded the February 12, 2013 version of "wheezy" ver 3.1.9. I plugged the adapter directly to the USB input of the PI and a generic keyboard, no mouse, no hub. The Pi sees the adapter per lsusb and on bootup I can see that Pi recognizes it is connected. However, iwconfig does not see it as wlan0, nor did sudo ifub wlan0 see it. This is my second attempt to get a WIFI adapter to work with the Pi.
Any suggestions, I am getting desperate to get the Pi working.
seems as though you need to shut down eth0 to get wlan0 to work. have you seen that as well?
Yes, that seems to be my experience. This means one of two things. Either I'm working over Ethernet cable to start with, using SSH. In this case I need to unplug the cable and restart to see if it is working. This will work with no monitor.
If you have a monitor available for the Pi, you can just try to get it going that way, monitor, keyboard and command line. That's how the expert in our local Linux group handled it. However, this is one of the very few times he admitted that it might be handy to also startx and have the LXDE desktop available. There is a very handy WiFi config tool on the desktop.
It is not magic, though. I had tried to add in another network={ . . . } definition by copying a very similar one. Because I didn't know nano that well, instead of copy and paste (or cut and uncut) multiple lines, I just typed it again. Well, I made a very small typo which made the whole thing fail, and it took my friend's debugging to find out the mistake.
I noticed you too have a large number of dropped packets on your Pi / Airlink combo. I have the same setup and am seeing the same thing. About a 50% packet loss! Any ideas?
My Netgear wireless lists 802.11h+d, 802.11n Preamble, Rate (802.11a) and Rate (802.b/g). Will the Airlink 101 work with my wireless system and my Raspberry Pi B?
Thanks,
Doug
I've set up this wifi adapter before using your article, but I reinstalled my OS (Raspbian rather than NOOBS) I can't get the wifi to work. It returns withL
pa_supplicant: /sbin/wpa_supplicant daemon failed to start
run-parts: /etc/network/if-pre-up.d/wpasupplicant exited with return code 1
Failed to bring up wlan0.
Here is my /etc/network/interfaces file:
# interfaces(5) file used by ifup(8) and ifdown(8)
# Please note that this file is written to be used with dhcpcd
# For static IP, consult /etc/dhcpcd.conf and 'man dhcpcd.conf'
# Include files from /etc/network/interfaces.d:
source-directory /etc/network/interfaces.d
auto lo
iface lo inet loopback
iface eth0 inet manual
auto wlan0
allow-hotplug wlan0
iface wlan0 inet manual
wpa-roam /etc/wpa_supplicant/wpa_supplicant.conf
allow-hotplug wlan1
iface wlan1 inet manual
wpa-conf /etc/wpa_supplicant/wpa_supplicant.conf
My /etc/wpa_supplicant/wpa_supplicant.conf:
country=US
ctrl_interface=DIR=/var/run/wpa_supplicant GROUP=netdev
update_config=1
network={
ssid="Lawson Claypit"
proto=RSN
key_mgmt=none
}
We didn't bother putting a password on our network because we're in the country far away from roads and/or houses. What am I doing wrong? Bear in mind I'm using SSH to control the Raspberry plugged into the back of our router via ethernet. I wanted to move the Raspberry away, which is why I needed wifi. I can plug it into a screen if needed, though SSH is far more convenient.
speazely e3d3fd1842 https://www.mirdesi.net/vetgetaso
speazely e3d3fd1842 https://www.mirdesi.net/vetgetaso
speazely e3d3fd1842 https://www.mirdesi.net/vetgetaso
speazely e3d3fd1842 https://www.mirdesi.net/vetgetaso