


 Print Article
 Raspberry Pi - Installing the Edimax EW-7811Un USB WiFi Adapter (WiFiPi)


;) The Edimax EW-7811Un 150 Mbps Wireless 802.11bgn USB Adapter is a popular choice for use with the Raspberry Pi. Here is what this little adapter has going for it:
The Edimax EW-7811Un 150 Mbps Wireless 802.11bgn USB Adapter is a popular choice for use with the Raspberry Pi. Here is what this little adapter has going for it:
- It is on the approved list of known working peripherals.

- Works directly attached to the Raspberry Pi USB port.
(Some network adapters used with the Pi require an external USB powered hub) - The latest Raspbian distributions come with the driver for this adapter pre-installed.
- It's tiny! It does not block access to the second USB port on the Raspberry Pi (Model B).
- Supports 150 Mbps 802.11n
- Backward compatible with 802.11b/g
- Internal chip antenna
- Affordable / Reasonably priced at $8.79 USD (Buy it here)
Shopping List
- 1 @ Raspberry Pi (see this page for more Raspberry Pi related supplies)
- 1 @ Edimax EW-7811Un 150 Mbps Wireless 11n Nano Size USB Adapter
Photos
(Click photo to enlarge.);)
;)
;)
;)
Packaging / Specs
(Click image to enlarge.)
;)
;)
Installation
The latest Raspian distribution (Raspbian “wheezy” 2012-09-18) already includes the drivers for this adapter pre-installed. This greatly simplifies the installation. (If you are using a different distribution or an older distribution you may have to install the Linux driver for the Realtek RTL8192CU driver.)
Insert the Edimax USB adapter into your Raspberry Pi's USB port. Next, lets make sure that the Raspberry Pi recognizes the device. Use the following command to verify that the Pi "sees" the Edimax WiFi adapter.
lsusb

You should see the Edimax EW-7811Un device listed in the output.
Now that we have verified that the Edimax adapter is recognized, lets check to make sure the kernel driver is loaded. Use the following command to list the kernel modules:
lsmod
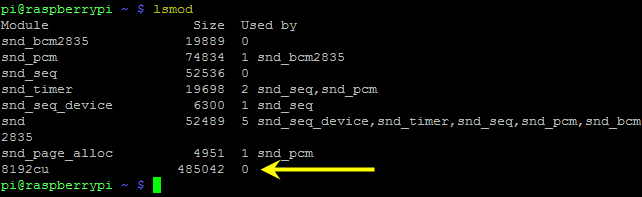
You should see the "8192cu" kernel module loaded. If not, try removing and re-inserting the Edimax USB adapter.
As a final validation check to make sure that the Edimax is ready to use, send the "iwconfig" command to display a listing of the current wireless network configuration.
iwconfig
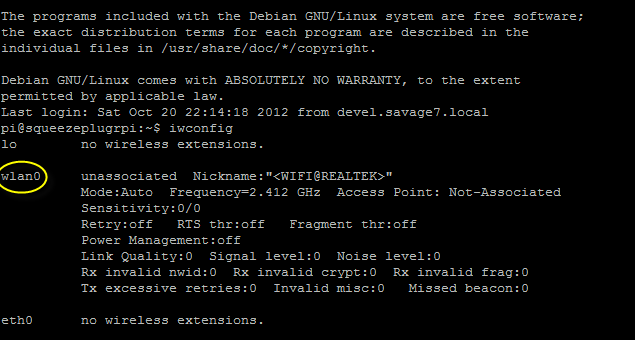
We are just looking to ensure that the "wlan0" adapter is present.
Now we are ready to move on to the configuration steps.
Configuration
One you have installed the adapter, verified the kernel driver is loaded, and confirmed that a wireless network interface ("wlan0") is available, you will need to configure the wireless connection settings to securely connect to your wireless network.
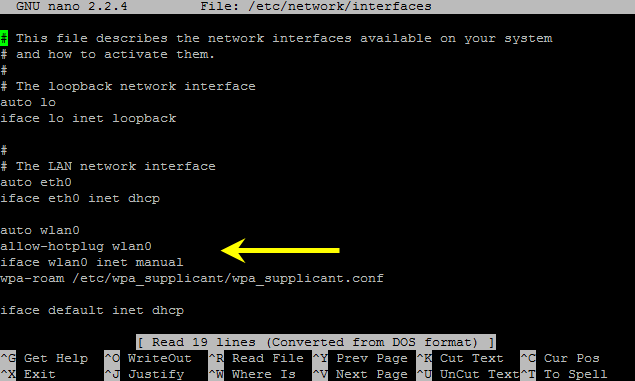
First, let's open the network interfaces configuration file for editing using the following command:
sudo nano /etc/network/interfaces
Make sure the following lines are added to (or un-commented in) your file
auto wlan0
allow-hotplug wlan0
iface wlan0 inet manual
wpa-roam /etc/wpa_supplicant/wpa_supplicant.conf
After modifying the network interface configuration file, we need to create the wireless configuration file. Use the following command to create (or edit) this file.
sudo nano /etc/wpa_supplicant/wpa_supplicant.conf
Add the following data to this wireless configuration file. (Replace the "_SSID_" and "_WPA_SHARED_KEY_" text with your actual SSID and WPA key values.)
network={
ssid="_SSID_"
proto=RSN
key_mgmt=WPA-PSK
pairwise=CCMP TKIP
group=CCMP TKIP
psk="_WPA_SHARED_KEY_"
}
(Note: This configuration is intended for WPA protected wireless networks.)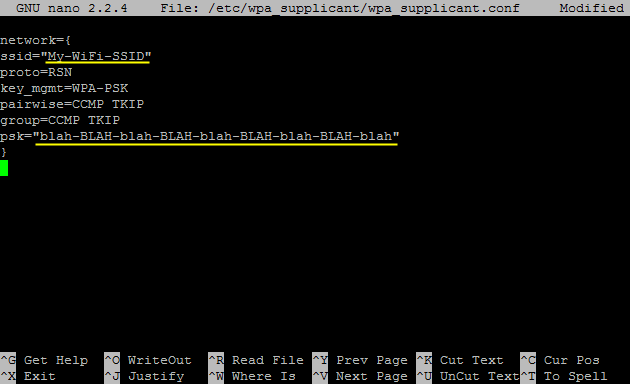
Once the configuration files are complete, use the following command to restart the wireless adapter / interface.
sudo ifup wlan0
This command will restart the network interface and use the newly defined interface and wireless settings to establish a wireless network connection. Assuming the configuration is correct, the wlan0 interface should connect and acquire an IP address.
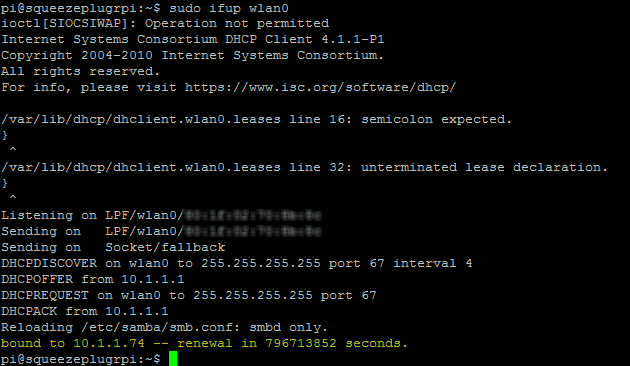
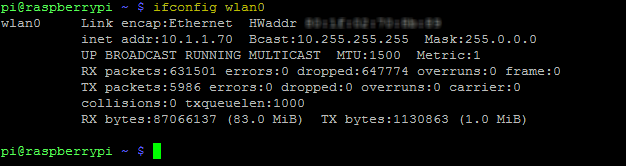
For connection verification and an alternate way to see your assigned IP address, use the following command to list the network configuration:
ifconfig wlan0
If you have any trouble getting connected using the "ifup" command, verify your wireless connection settings and reboot your Raspberry Pi. If you have the Raspberry Pi connected to a display you can watch the Pi attempt the connection during startup.
That's it, hopefully you now have a WiFiPi.
* Raspberry Pi is a trademark of the Raspberry Pi foundation.
Also check out the installation instructions for installing and configuring the
>> Airlink 101 Wireless N 150 Ultra Mini-USB Adapter (AWLL5099)
;)
The following article is an excellent resource describing many different wireless network configurations for Debian based distributions:
Reader Comments (59)
Hi,
Thanks for the guide. I am having trouble with my Edimax. I get a IP from my router, but still don't have a internet connection. I think it is related to my power suply, mainly because the PI drops out of my routers DHCP list and thet fact that the power supply only delivers 0,7A, i think it should be ta bit higher.
My question:
What power supply are you using?
@Holger,
I am using an Apple iPhone USB charger rated at 1A and a Samsung Galaxy Tab charger rated at 1A on my Raspberry Pis.
When I get to the last step: sudo ifup wlan0... I get the following:
ifup: interface wlan0 already configured
Then when I check with ifconfig wlan0...I don't have an IP address
??
perhaps i am being a real dumb ass and am very new to all this but after i
sudo nano /etc/network/interfaces
i get a blank screen with the hot keys at the bottom..not sure where to go from here
@Paul,
Which Linux distribution are your running on your Raspberry Pi? I believe the latest versions of Raspian do include a default "/etc/network/interfaces" file with some network configuration defined for the local LAN port (eth0) and the loopback interface (lo).
Great write-up, any chance you know or have seen additional details relating to how these guys were able to get this adapter to work with hostapd.
esrlabs
pi forum
Will I have to enter every time or will the Raspberry Pi remember my network?
sudo nano /etc/wpa_supplicant/wpa_supplicant.conf
sudo ifup wlan0
@Brewgod23,
These changes are persisted to the configuration files. On reboot, the Pi should/will continue to use these settings. Once completed, I have never had to go back and change them or re-apply them.
Hello, I've followed your excellent interactions but I just can't get the WLAN up and running. If you have time (who does nowadays?)can you look at http://antael.blogspot.com/2013/01/making-my-raspberry-pi-using-wifi-part-2.html and see if you see something obvious?
Thanks,
Andy
@andy
change your proto=WPA2 in your wpa_supplicant.conf file
this worked for me.
Hi
Your instructions are excellent in detail and presentation, and I have followed them ... without success ... like Jon (18/12/12) I get told wlan0 is already configured and don't get an IP address. Watching the scrolling details after multiple re-boots (in case that, and taking the adapter out and replacing it) ... it seems to fail, just after the line "ioclt[SIOCSIWAP] : Operation not permitted" which it does do, to go any further with network stuff and moves onto other issues - can't recall what ...
My router is a Netgear, and in setting up other PC/tablet connections I recall WPA and TKIP references, but not CCMP ... could that be relevant?
Cheers
Toby
Hi Robert
Went back and played a bit. @Oraclebhoy came in while I was writing ... and had a possibly useful suggestion ...
Tried changing the "proto=" to "WPA2" and WPA without success. Had a look at the wpa_gui connector whilst doing this - it's trying and failing to make a connection, although scanning picks up the device. Changed the expectations of WPA or WPA2 there too without success. Didn't try changing CCMP & TKIP options ... should I? at the wpa_gui, or do I need to edit the wpa supplicant file further? If so, how?
Looking at the "ifconfig wlan0" report above, mine has the first "Link encap:Ethernet" and the third "LINK BROADCAST" lines but not the "inet addr:" second line.
Tried a sequence to repeat the "error" made also on booting ...
$ sudo ifup wlan0
ifup: interface wlan already configured
$ sudo ifdown wlan0
$ sudo ifup wlan0
ioctl [SIOCSIWAP] : operation not permitted
ioctl [SIOCSIWENCODEEXT] : invalid argument
ioctl [SIOCSIWENCODEEXT] : invalid argument
$
During this, the wpa_gui reports ...
Status Scanning
Last message WPS-AP-Available
... until the "sudo ifdown wlan0" when it goes to ...
Status Could not get status from wpa supplicant
Last message Signal 15 received
... until the "sudo ifup" ... when it goes back to "scanning".
Any ideas where to go from here?
Cheers
Toby
I've the exact same issue as what Toby has mentioned. I get the same response when I down ifup and ifdown. Please help
Follow-up further ... set up a RPi for some friends children - just plugged in the adapter and it worked through the desktop without editing/creating any files, etc, other than asking for the PSK. Just like using an ethernet cable. I wonder if it's something to do with the sort of wirless connection/router is involved ... this was to a BT Hub ... and it made no mention of dhcp, which my Netgear does ... relevant?
Cheers
Toby
I was able to get my WiFi work by settings the config via 'wap_gui' post login. Just to mention, I'd configured WEP in wpa_supplicant.conf file manually, which did not work) but setting via wap_gui worked.
Regards
Rajiv
Hi
I had the same problems as described above.
I found on the Pi forum the fix.
There is a problem with routers that don;t braodcast the SSID. Mine didn't for security reasons.
Switched on the SSID broadcast and it all sprnag to life!
Hi Paul
Unlike Rajiv I still can't get mine too work, although successfully used wap-gui on another setup, so I know it's not the Edimax not working ... it's set up, and might be the router ... how did you switch on SSID broadcast?
So I got the Edimax WiFi cardworking by modifying the /etc/network/interfaces file:
http://antael.blogspot.com/2013/01/wifi-is-live-and-kicking.html
I am not using the wpa_supplicant configuration file at all, I am not sure but that seemed to be the problem with Fixed IP address over the wlan0 interface.
--Andy
Toby
Switching on/off the SSID broadcast is in your router set-up menu somewhere.
In the case of my D-Link it is under Wireless Setup (manual) Wireless Network Settings
Hi Robert!
Is there a possibility to add multiple networks? So if I move to another house the WiFi will be conntected automatically?