


Raspberry Pi - RS232 Serial Interface Options (Revisit)


In the previous article Raspberry Pi - Installing a RS232 Serial Port we discussed how to install a RS232 port on the Raspberry Pi. This is a follow up article to suggest a few alternative interface options as the XBit RS232 level-shifter board has been unavailable (sold out) for while now.
There are two primary RS232 interface options you can choose from for serial connectivity:
Once you have a serial interface connected you can use the serial port for
(Click one of the above options to jump to that part of the article.)
Shopping List
The following items are included in this article:
- PL2303HX USB to TTL to UART RS232 COM Cable module Converter
- MAX232 RS232 to TTL Converter Adapter Board
- 40pcs Female to Female 2.54mm 0.1 in Jumper Wires F/F
- Jumper Wires Premium 6" F/F Pack of 10
Serial Communication via USB
 If you are just looking to communicate to your Raspberry Pi via its serial UART, then you may prefer a USB interface. Most recent models of computers and laptops do not have the traditional RS232 DB9 port anymore, so connecting using a USB port may be preferred.
The following adapter is only $5.47 USD and it provides a USB to serial converter chip:
This adapter is based on the Prolific PL2303HX chipset. To use this USB to serial interface you will have to install a USB serial port driver on your host operating system. Many operating systems already include support for theserolific drivers. But in case you need it, the drivers can be found here: http://prolificusa.com/portfolio/pl-2303hx-usb-to-serial-bridge-controller/
Below is a wiring diagram illustrating how to connect the USB to serial interface:
;)
Photos of the connected USB to Serial interface (click to enlarge):
;)
;)
NOTE: Please secure the RED lead from the USB adapter so that it does not come into contact with any of the other pins or components on the Raspberry Pi. This RED pin carries +5VDC and could damage the Pi if it makes contact.
Now that you have the serial interface connected, you can skip down to the Serial Console section to test the interface.
Serial Communication via DB9 (Level Shifter)
;)
For certain applications and especially project involving interfacing with other hardware devices a standard RS232 serial device with a DB9 connector is preferred. A standard serial port such as this does not require any drivers. RS232 serial communication is standardized at the hardware layer. RS232 communication can also achieve longer distance runs (maximum distance depends on baud rate).
The following interface adapter is available for $9.99 USD:
In addition to the adapter, you will need at least 4 female to female 2.54mm .1 in jumper wires.
Here are a couple of purchase options:
Why is special circuitry (level shifter) needed for RS232 serial communication?
So .. what a level shifter and why is it needed you ask. A level shifter is a circuit that can take the low voltage (±3.3VDC) TTL signals for serial transmit (TX) and receive (RX) from the UART on the Pi and shift them to ±5VDC the voltage signals required for RS232 standard communication. Want to know more? Click here.
Below is a wiring diagram illustrating how to connect the level shifter serial interface:
;)
Now that you have the serial interface connected, you can skip down to the Serial Console section to test the interface.
(Use a straight-thru cable for connecting to a computer.)
Serial Console
The Debian/Raspbian distribution images include support out-of-the-box for accessing the shell console via the hardware serial port. This can be extremely convenient if you need to access your Raspberry Pi when it is not connected to a monitor and network remote access is not available.
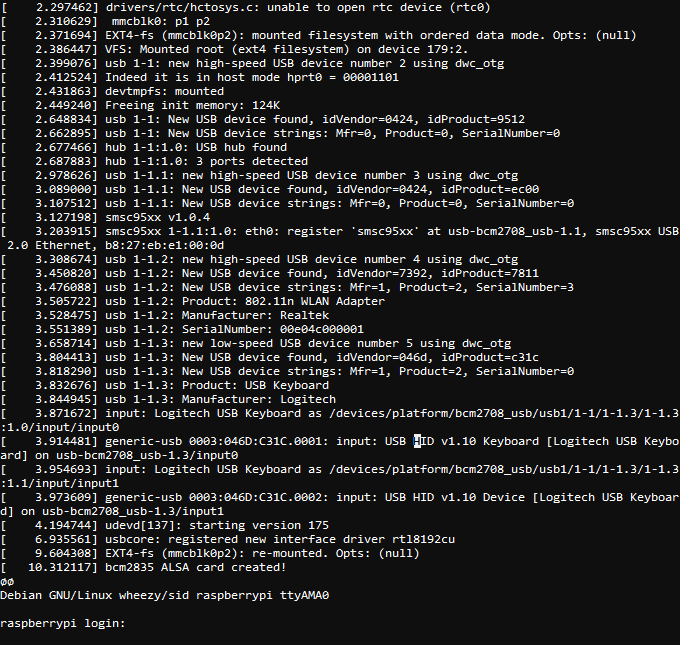
Open a terminal emulation software such as Hyperterminal, Procom Plus, or Indigo Terminal Emulator and connect to the serial port using settings "115200, N, 8, 1". You may need to press the enter key a time or two to see the prompt. Authenticate using your credentials and you are good to go.
Here is a screenshot of the terminal displaying the boot up information and then prompting for a login:
Software use of the Serial Port
If you intend to use the serial port for a software application running on the Raspberry Pi, there is a bit of configuration required to disable the console from using this port. By default, the serial port is configured as a console port for interacting with the Linux OS shell. The following steps will guide you through disabling the port from console access.
First, lets make of backup of the two files that we intend to modify.
sudo cp /boot/cmdline.txt /boot/cmdline.bak
sudo cp /etc/inittab /etc/inittab.bak
Next, we need to remove the "console=ttyAMA0,115200" and "kgdboc=ttyAMA0,115200" configuration parameters from the "/boot/cmdline.txt" configuration file.
To edit the file use this command:
sudo nano /boot/cmdline.txt
The file probably contains this default configuration line:
dwc_otg.lpm_enable=0 console=ttyAMA0,115200 kgdboc=ttyAMA0,115200
console=tty1 root=/dev/mmcblk0p2 rootfstype=ext4 elevator=deadline rootwait
After removing the two configuration parameters, it will look similar to this:
dwc_otg.lpm_enable=0 console=tty1 root=/dev/mmcblk0p2 rootfstype=ext4
elevator=deadline rootwait
The last step is to edit the "/etc/inittab" file and comment out the use of the "ttyAMA0" serial port. To edit the file use this command:
sudo nano /etc/inittab
Now towards the bottom of the file, look for a configuration line that includes the "ttyAMA0" port address.
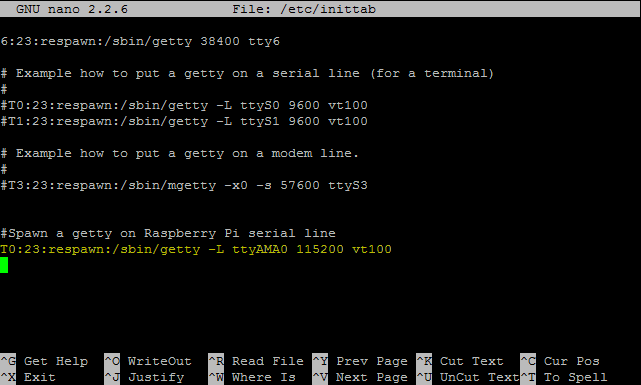
Place a pound sign ("#") in front of the line to comment it out. With a pound sign ("#") at the beginning of the line, Linux will ignore this configuration line.

Save the "/etc/inittab" file and then issue this command to reboot the Raspberry Pi:
sudo reboot
Now you are ready to use the serial port with a software application and the operating system won't interfere with the port. Use the device address "ttyAMA0" in your application to access this serial port.
If are interested in using the serial port with Java programming, please see this page: http://pi4j.com/example/serial.html
 Robert Savage
I have updated the wiring diagram and photos for the USB TTL adapter approach to remove the 5VDC RED pin connection. It was technically working, but I felt it was safer to eliminate this connection to prevent current from being sourced from the USB connection/adapter back into the Raspberry Pi.
