


 Print Article
 Raspberry Pi - Programming Pi-Face with Java & Pi4J


;)
Overview
I just got my hands on a Pi-Face expansion board for my Raspberry Pi. I purchased mine direct from Newark and it arrived is less than a week. My first objective was to get this board integrated into the Pi4J project and fully working with Java on my Raspberry Pi. This article covers installing the Pi-Face board, setting up the SPI communication driver, and demonstrates programming the Pi-Face in Java. With the Pi-Face Java API interface now available in the Pi4J libraries (in Pi4J version 0.0.5-SNAPSHOT and later) this makes it a breeze to program and work with in your own Java program.
Shipping List
- 1 @ Raspberry Pi (see this page for more Raspberry Pi related supplies)
- 1 @ Pi-Face (available on Amazon, CPC, Newark, Farnell)
Documentation
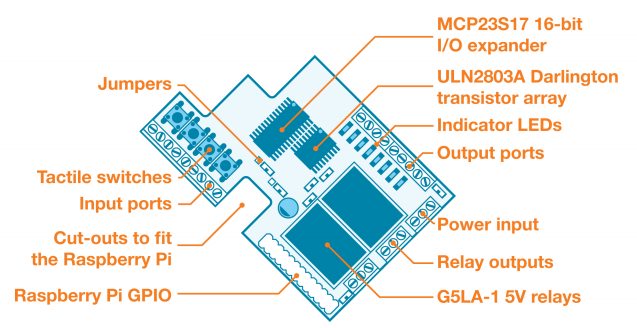
Board Layout/Features
- 2 mechanical relays (connected to outputs 1 and 2; can be disabled via jumpers)
- 4 momentary pushbutton PCB switches (connected to inputs 1-4)
- 8 digital inputs (sink to GND to activate each input pin; pulled-up via software)
- 8 open-collector outputs
- 8 LED indicators (for the 8 digital outputs)
Photos
(Click any photo to enlarge.)
;)
;)
;)
;)
;)
;)
Hardware Installation
Installing the Pi-Face board is a snap. It literally takes just a few seconds. First, remove the power supply from your Raspberry Pi so that it is powered down while installing (or uninstalling) the Pi-Face board. With the Pi powered down, simply place the Pi-Face board directly on top of the Pi such that the header connector on the Pi-Face is aligned with and mates with the P1 header pins on the Raspberry Pi as shown in the photo below. Press the Pi-Face board down until the P1 header connector is fully seated.
;)
Note that on the opposite side there should be a rubber bumper attached to the Pi-Face that rests on top of the HDMI connector on the Raspberry Pi. This bumper prevents any electronics from shorting out between the Pi-Face and Raspberry Pi boards.
;)
Driver Installation
The Pi-Face expansion board uses a MCP23S17 16-Bit I/O Expander chip to perform all of its onboard functionality. The MCP23S17 chip uses SPI for communication between the Raspberry Pi and the Pi-Face board. The Raspberry Pi supports a SPI driver but it must be configured to enable it.
You can enable it for one time use by issuing the following two commands from the terminal (Note that if you reboot the system you will need to re-issue these command to enable the SPI driver again.):
   sudo modprobe spi_bcm2708
   sudo chown `id -u`.`id -g` /dev/spidev0.*
If you prefer to permanently load the SPI driver, then you will need to perform the following steps:
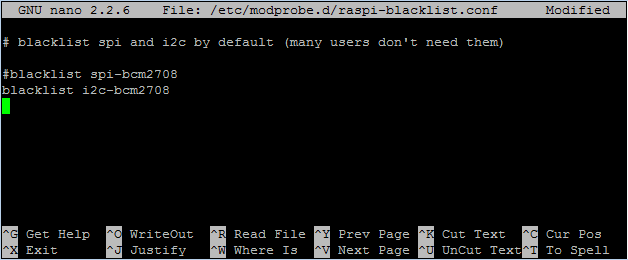
- Edit the /etc/modprobe.d/raspi-blacklist.conf using this command:
sudo nano /etc/modprobe.d/raspi-blacklist.conf
- Comment out the line "blacklist spi-bcm2708" by placing a "#" character at the beginning of the line. This will prevent the SPI driver from being blacklisted on reboot.
#blacklist spi-bcm2708
Save the file when your changes are complete (CTRL-O to save; CTRL-X to exit)
Here is what my blacklist file looks like:
- Reboot the Raspberry Pi for the settings to take effect.
sudo reboot
Programming
Now we are to the fun part .. programming in Java to interact with the Pi-Face board. The good news is that if you use the Pi4J libraries all the nitty-gritty hard work (SPI communication protocol for the chipset and state change monitoring threads) is already done for you. Pi4J has implemented the following new device interface and implementation classes to support the Pi-Face board:
- com.pi4j.device.piface.PiFace (Public Interface)
- com.pi4j.device.piface.PiFaceBase (Abstract Base Class)
- com.pi4j.device.piface.impl.PiFaceDevice (Public Implementation Class)
(Browse the com.pi4j.device.piface namespace here.)
These interfaces and classes expose much of the Pi-Face's capabilities using some of the newer Pi4J components interfaces such as Relay, Switch, and LED. In addition to the component interfaces, you can also access the raw GPIO pins if needed.
NOTE: You will need to include the following pi4j dependency JARs in your program and included on the classpath:
- pi4j-core.jar
- pi4j-device.jar
- pi4j-gpio-extension.jar
Example Java Program
The following is the Pi-Face example Java code that is now provided with the Pi4J installation and available as open-source in the Pi4J Github repository.
This sample implements the following logic:
- When switch 'S1' is pressed, relay 'K0' will turn ON
- When switch 'S1' is released, relay 'K0' will turn OFF
- When switch 'S2' is pressed, relay 'K1' will toggle states
- When switch 'S3' is pressed, 'LED02' will start blinking
- When switch 'S3' is released, 'LED02' will stop blinking and turn OFF
- When switch 'S4' is pressed, the cylon effect on 'LED03' to 'LED07' will speed up
- When switch 'S4' is pressed, the cylon effect on 'LED03' to 'LED07' will slow down
Installing, Compiling and Running The Sample
Follow the instructions on http://pi4j.com/install.html to install Pi4J and compile the included sample programs.
If you want to compile just this single example use the following commands:
cd /opt/pi4j/examples
javac -classpath .:classes:/opt/pi4j/lib/'*' -d . PiFaceExample.java
To run the sample, use the following command:
cd /opt/pi4j/examples
sudo java -classpath .:classes:/opt/pi4j/lib/'*' PiFaceExample
;)
