


 Print Article
 Raspberry Pi - Sunrise / Sunset Timer for Christmas Lights


Overview
Turkey day (Thanksgiving Day for those reading outside the US) is over and according to decades of holiday tradition, it's time to hang the exterior Christmas lights on the house. In the past I have always used simple mechanical timers to automatically turn on and off the lights based on fixed times. This year, armed with my Raspberry Pi, I wanted to create a simple DIY Raspi Christmas Lighting Timer that would control the power to the Christmas lights automatically based on sunrise and sunset times.Shopping List
Hardware
The wiring for this project is quite simple. All we need are two wires to connect from the GPIO (P1) header on the Raspberry Pi to the PowerSwitch Tail power controller. Using male-to-female jumper wires make the task truly plug-n-play ... we don't need to solder or stip any wires.
The PowerSwitch Tail power controller works by turning on the high voltage AC circuit when a DC input of 3-12 VDC (3-30ma) is detected on its input terminal. When no input voltage is detected, the high voltage AC circuit turns off.
;)
;)
Fortunately the PowerSwitch Tail power controller input can be triggered directly by the Raspberry Pi's TTL 3.3 DC voltage supplied on its GPIO pins. This means that no additional transistors, relays, or other circuitry is needed to perform the switching.
In this project, we will use Raspberry Pi P1 header pin #12 (which is GPIO #1 in the Pi4J/WiringPi pin numbering scheme) as the positive control signal and we will use Raspberry Pi P1 header pin #6 for GND (ground). See the wiring diagram below. Insert the female end of the jumper wire on the Raspberry Pi GPIO header pins and then insert the male end of the jumper wire in the PowerSwitch terminal and tighten the captive screw to secure the wire in place. Make sure that your Raspberry Pi is not plugged in while attaching wires to prevent accidental shorts.

Below are photos of the completed and assembled project. Click any image to enlarge.
;)
;)
;)
Software
The software that determines sunrise and sunset times and controls the GPIO pins is Java based, therefore you must install a Java runtime to use this software.
To install the OpenJDK, simply enter this command via the Raspberry Pi's console:
> sudo apt-get install openjdk-7-jdk
(If you would prefer to install the Oracle JDK, please click here and read this article.)
The source code is provided as open source software and you can download the entire project from Github.
To run the software, a pre-compiled JAR is made available so that you don't have to compile the software on your own. Simply use the following command on the Raspberry Pi console to download the software to the current working directory on your Raspberry Pi.
> wget https://github.com/downloads/savagehomeautomation/raspi-sspc/raspi-sspc-1.0.0.jar
This software program also uses the Pi4J Project to manipulate the GPIO pin states on the Raspberry Pi; therefore, you must also download this prerequisite library to your working directory.
> wget https://github.com/downloads/Pi4J/pi4j/pi4j-core-0.0.3-SNAPSHOT.jar
To launch the program, use the following command:
> sudo java -classpath classes:./'*' SSPC
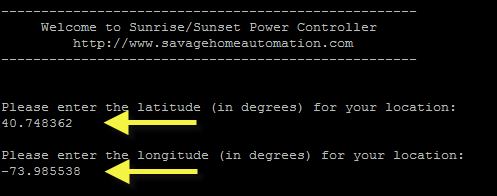
When the program starts it will prompt you for your longitude and latitude. These coordinates are used to calculate the sunrise and sunset times for your specific geographical location. You can use this web page to determine your specific longitude and latitude: http://itouchmap.com/latlong.html
At this point the program will continue to run and it will turn the power controller ON or OFF depending on the current time and it will schedule the next power event on the next available sunrise or sunset time.
Re-entering the longitude and latitude coordinates every time would be annoying, so you can also use command line arguments to start the program with specified coordinates. You could include this in a shell script to launch the program with the proper command line argument every time.
> sudo java -classpath classes:./'*' SSPC -longitude=-73.985538 -latitude=40.748362
;) (click to enlarge)
(click to enlarge)
Also note that while the program is running, you can manually force the power controller power state ON or OFF using the "on" or "off" commands via terminal.
The "help" command will display all the supported command options provided by the software:
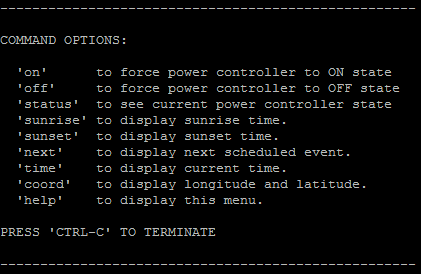
Just leave the program running and it will automatically turn ON and OFF the power controller at the sunrise and sunset times for your location.
 Final Thoughts
;)
As you can see this is a very simple project to build and the software can be easily modified if you need some unique behavior. You can additionally take steps to include launching this program with a startup script if you want to ensure that it is automatically restarted each time the Raspberry Pi boots up.
This is an excellent example of an embedded Java application running on the Raspberry Pi and making use of the Pi4J project to control the hardware. This Java project includes a Maven build so you can easily re-build the project directly on the Raspberry Pi or your desktop if needed using Maven commands.
I hope you enjoyed this article and maybe thought of a few creative modifications that you can do in your home. Please add a comment if you find this project helpful or would like to share any modifications that you add to it.
Merry Christmas!
Related Holiday Projects:
;)
;)
;)
More Raspberry Pi Projects and ArticlesThis page lists the articles posted on this blog about the Raspberry Pi
;)
Reader Comments (31)
Neat article. I'm curious about a couple of things though:
1) Does the Java process actually have to run as root? Anyway around that?
2) Did you end up building some kind of enclosure for the Pi or are you just controlling interior lights?
Thanks,
Corey
@Corey,
Thanks for checking out the article.
>> 1) Does the Java process actually have to run as root? Anyway around that?
Unfortunately yes .. at least for now. I am using the Pi4J library to control the GPIO on the Raspberry Pi and it requires to be run as root. It is because it needs to configure/provision GPIO pins with the Linux OS @ /sys/class/gpio/*. Hoping some day there will be a better way.
>> 2) Did you end up building some kind of enclosure for the Pi or are you just controlling interior lights?
I am using the Adafruit clear enclosure, but the Raspberry Pi is located indoors. The Pi and PowerSwitch are inside the garage and an extension cord just runs out from garage to the exterior lights.
Thanks, Robert
Great post. Thanks for the information on the pi4j library I have been looking for a way to access the GPIO through Java.
@Rich Dean,
Thanks for checking out the project and Pi4J. Lean more about the Pi4J project at: http://pi4j.com
Great introductory article. Couple of questions - hope you don't mind:
1) Looking closely at the code, it looks like you've got an override switch connected to pin 11 (GPIO 0) not pictured on the diagram. Is that right, or am I missing something?
2) Do you know of a 240v equivalent of the PowerSwitch Tail II that doesn't require assembly? I'm awful at soldering.
Cheers in advance.
Hi @Andrew,
Thanks and am happy to answer what questions I can!
1.) On the override switch, good catch. Yes, I did write the code to support an override switch (momentary-toggle-state), but I did not end up actually installing one and I left it out of the article to keep it simple for most users. The implementation would look similar to this diagram, but using GPIO 0 instead of GPIO 2: http://pi4j.com/images/gpio-listener-example.png
2.) Sorry, I am sure some 240V alternative must exist, but I only know of the kit available from PowerSwitch Tail.
http://www.powerswitchtail.com/Pages/PSTKKit.aspx
Merry Christmas,
Robert
Mr. Savage,
Great project. The sunrise and sunset event calculations are really wonderful ... plus the means to override default behavior. Thanks for posting.
Sincerely,
Joe Parkfly
@jparkfly
@Joe
Thanks for checking out the article. I'll probably move the Sunrise/Sunset class into the Pi4J project as a utility class. In the latest dev snapshot there is also a temperature conversion utility, so these utility classes may be useful to others.
Cheers!
Robert
Hello,
Do you realy live in the Empire State Building ?
;)
Hervé
Hi Hervé,
Nice catch!
I knew somebody would eventually track down the location based on the longitude and latitude in the sample :-)
I put in those coordinates for fun. I am actually in Texas.
Regards, Robert
Hi Hervé,
Nice application project of the PI. I am thinking an application like this, which controls not just one but multiple powered devices at different setting times. I think it would be needed a power switch for each circuit, modification of the code and the use multiple GPIO# ports to connect each switch. Any thought?
Regards,
Ruben
@Ruben,
Do you need each of the power outlets distributed in different locations? Or would a single power strip with each outlet individually controlled work for your needs?
I am thinking of doing a multi-outlet project where I can control up to 12 power outlets on a single power strip using the Pi and adding more scheduling capability.
Let me know your thoughts!
Thanks, Robert
this is wonderful :D thank you! but how do i compile the software on my own? (i want to learn it instead of just take the precompiled jar and run it ) :)
Mr. Savage,
Can this do the inverse, complete circuit at sunrise open circuit and sunset?
Thanks!
@yvonnezoe,
You just need to install a Java Development Kit (JDK7) and Apache Maven (v3). The project is built built with a Maven build script. Navigate in a command shell to the project directory where you checked out the source code and run this command to re-build the project: "mvn clean install".
This will produce a new compiled JAR file in the /target sub-directory.
Thanks, Robert
@sdoh321,
Absolutely, However, it will require a slight modification to the source code:
Use the "1.0.1-SNAPSHOT" brach of the source code: (not master branch)
https://github.com/savagehomeautomation/raspi-sspc/blob/1.0.1-SNAPSHOT
Then modify this one line of code at line #77:
https://github.com/savagehomeautomation/raspi-sspc/blob/1.0.1-SNAPSHOT/src/main/java/SSPC.java#L77
Change
powerController = new GpioPowerComponent(outputPin, PinState.HIGH, PinState.LOW);
to
powerController = new GpioPowerComponent(outputPin, PinState.LOW, PinState.HIGH);
this will inverse the states. There may be other lines of code needing modification to display the correct messaging, but this single line change should make it functional.
Thanks, Robert
Hello, I'm new to programming- Is there an easy way to edit and compile the code on PC? I've tried to install JDK7 and Maven to no avail.
I'm trying to change the code in order to create an automated reptile heat lamp that turns on at sunrise and off 30 minutes after sunset.
Any help is greatly appreciated.
Hi tsand0488,
Yes, you can do the development on your PC. In fact I do all the development for Pi4J on my PC except runtime testing. I use either Eclipse or IntelliJ as my IDE and use Maven for my build environment. You can't run and test Pi4J based projects on the the PC, as it only runs on the RPi. So you will have to transfer your program to the RPi for runtime.
(Internally, there are native C compiled parts that are specifically compiled for ARM on the RPi)
Thanks, Robert
I just had to take the time to thank you. I really appreciate your contribution of both this code and tutorial. After struggling to use PyEphem to achieve the same effect this was a walk in the park. Your coding skills are fantastic and with the comments you left it was easy for me to understand what was happening even with my very minimal knowledge of java. My strawberries give their thanks too since they will now be receiving an extra lumens boost via raspi controlled lights which now come on and off at sunrise and sunset to mimic the changing seasons.
I am sorry, but I am getting errors while compiling 1.0.1-SNAPSHOT (even though I did not changed anything) :
[ERROR] Failed to execute goal on project raspi-sspc: Could not resolve dependencies for project com.savagehomeautomatio
n.raspi:raspi-sspc:jar:1.0.0: Could not find artifact com.pi4j:pi4j-core:jar:0.0.4-SNAPSHOT -> [Help 1]
I am using java 1.7.0_51 and maven 3.2.1.
Any help is greatly appreciated.